

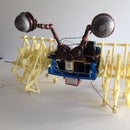
Introduction: Robot Head - Mr. C.H.I.P.s Speaks


Greetings!
This is not really an Instructable as such. I intend to just give you some guidelines on creating a version of the awesome project using a vintage Teddy Ruxpin and the C.H.I.P 9 dollar microprocessor.
The Robot Head speaks any text that you type into the web page that it serves up. All you have to do is type the web address into your browser and the page appears. The C.H.I.P. microprocessor receives the text via wifi and runs it through a text to speech converter. I also added a random function that quotes Albert Einstein occasionally. Led lights flash, the eyes move, the mouth is automatically synched with the speech. It's really cool...and a little creepy.
If I were you, I would begin looking at the Chippy Ruxpin info from Make Magazine: http://makezine.com/projects/chippy-ruxpin/
I was really inspired by the article. I ordered the C.H.I.P. and patiently waited for a couple of months for it to arrive. I followed the instructions in the Makezine article, and it all worked without a hitch.
Step 1: The Head


http://www.thingiverse.com/thing:1351302 - Dasaki Compact Animatronic Eyes
http://www.thingiverse.com/thing:402281 - Eyelid I adapted to the Compact Eyes
Previously, I took the Dasaki Compact Eye 3D model and altered it to use a universal joint for the eye movement and full upper eyelids. I re-designed the eye support bar as you can see in the image. The green piece is my revised version.
I also adapted the eyelids to the eyeball size. The 3D file is for ping pong balls.
I used a Traxxas 1539U-joint for the eye support. For the eyes, I got cheap Halloween mask half-eyes. They come in a bag with different colored irises. Some epoxy putty held the U-joint to the eyeball, and the other side was bolted into the eye support frame.
I attached a 9 gram servo behind each eye with an arm on it, and a thin wire going from the end of the arm to the connecting point on the eyelid.
BUT..... there are lots of YouTube videos out there with people showing eye mechanisms. Most use brass and wood and epoxy putty to create the moving eyes. You can use ping pong balls for eyes. You can use those plastic Easter eggs for eyes and size it up. Hobby stores sell clear plastic balls that split in half in various sizes.
Really, Why do the same thing I did? Why not try something different and outrageous?
For the jaw, I made a 4-bar mechanism. I have made these before with flat brass from the hardware or craft store. You could use popsicle sticks, or balsa wood, or any sort of plastic. The mask's chin is really lightweight, so it doesn't take much to move it.
Instead of a 4-bar mechanism, you could use a simple lever and so the jaw moves in an arc instead of a linear movement. A servo could pull a string to move it down, and elastic could bring it back up.
The ears I created and 3D printed could be lids to a jar of peanuts. They could be cut from the bottom of a Coke plastic bottle.
The brain came from a group of spheres on Thingiverse. But you could use polyfill and insert leds to make it glow like a cloud. You could use a mass of twisted wires. Maybe a mobeus strip? A balloon paper mache'd with images of things it is thinking about? Bubblewrap?
Step 2: Testing With Relays


For a long time the C.H.I.P. project was just the little board sitting on the floor attached to an ancient tv with component inputs for video and sound. Then I decided to see if the GPIO output pins would trigger relays. I used a relay board from http://www.miniinthebox.com/
The GPIO pins successfully triggered the relays.
So I thought, why not see if the pins would trigger input into an Arduino? I attached the GPIO output pins into the analog input pins to an Arduino Pro. I could get readings when the CHIP activated the GPIO pins, so there was communication.
If I knew more, or had more time, I was thinking of sending serial data out of the CHIP and into the Arduino. But since I had working code for the Chippy Ruxpin project, I decided to just go with that.
Step 3: Circuit Connections


The first image is from the Chippy Ruxpin project. The GPIO pins were attached to a little Adafruit motor driver board. The eyes and mouth were triggered through the board.
But I wanted to control servo motors.
The second image shows how I connected the CHIPs GPIO pins to the analog inputs. Then I used digital pins 9 through 12 for the four servos: eyes left/right, eyes up/down, eyelids open/close, and mouth open/close. The servo library makes using them easy. I did have to run the sweep program and adapt it in order to get the best positions for the servos. You don't want to tear your head apart or strip the servo gears by having the servo push things too far.
I have attached a video showing the eye project I did a while back. They were just waiting for a good project to bring them to life.
The attached code is loaded into an Arduino Pro - but any Arduino board will work.
Attachments

Step 4: Cool Blinky Leds


I had played with shift registers (74-595) before and thought it would be cool to have a lot of blinky lights in the head. The lights would kind of mimic the human brain's activity. Brain scientists talk about areas of the brain "lighting up" when the brain is doing different processes.
When I created the board with the shift registers, I soldered 3 600 ohm resistors to each control pin. The leds are connected to 5 VDC power, and their cathode lead is connected to the shift registers. You can link more than two shift registers together, but that gave me 14 control lines, and that was enough for the effect.
But I didn't want the Arduino Pro to be constantly processing the lighting. So I added an Adruino Duemilanove to the mix. I used Software Serial to make a serial connection between the Pro and the Duemilanove. The Pro sends an 'A' to have the slave run a random lighting code. The Pro sends a 'B' to change to a flashing mode while the mouth is moving.
This simple code gives the impression that the brain is lighting up depending upon whether it is waiting or talking.
Again, why try to do what I did? I am lucky enough to have a Makerbot Replicator 2 to use. But you could easily make the head pieces out of cardboard or plastic sheeting. You could sculpt some organic-looking pieces using Instant Paper Mache and wire. You could take a Halloween skull and drill holes for the leds and cut out sections with a dremel tool. There are all sorts of ways that the skull could be done.
Attachments
Step 5: What Next?

Finally, I added a nice little sound amp and a speaker. I have a scavenged transformer with a 12 VDC and 5 VDC output that worked nicely to power everything.
Ohh - I almost forgot the face. I was making some masks for a theatre show. I vacuumformed over a cement head cast I had left from another project. The polystyrene is light and pretty strong. But you could use a Halloween mask. Halloween suppliers sell blank plastic masks much like the one I used. You could also make a pretty non-human robot head out of all sorts of plastic bottles and cartons. Go out and dig through a dumpster around a commercial site. What did you find? How can you use it? Retro robots would be a great inspiration.
Well, I hope that was fun. I certainly have been having fun with my Mr. C.H.I.P.s. I have linked to the address with my phone and typed things for him to say. And he is a pretty swell nightlight in my studio!


