

Introduction: Rotary Vending Prototype


This tutorial explains how to build and program an online operated rotary dispensing machine that could be used in a variety of applications including vending products. This is the next step of development towards an open source vending machine since our last instrucatable located here. You may notice this model does not shoot product out at you but more elegantly rotates it to you... then shoots it out at you. The idea is to have 8 different products that stack on top of each other in groups of four or five. If a person selects say "product 5" the main deck rotates to bring that product in front of the servo arm which swings out pushing the bottommost product out an inch. From this point a wheel mechanism will pull the product the rest of the way out and cause it to fall into the hands of the eager customer. As of yet the final Dispensing of the product hasn't been realized, but fear not we will continue to work on it.
The potential of an open source vending machine is built around the idea that people who create product--designers, jewelers, bakers, makers, etc.--should focus on what they are best at. This means their energies should be directed towards perfecting their craft. With physical shop space requiring a high overhead in some areas the option of vending product could be a more cost effective approach to bringing product to a consumer. Further, if the vending machine is 'smart' enough to handle all of the payment processing and keep track of its own inventory, then the designer is granted a freedom from the business side of their craft.
The realization of this prototype is thanks to funding from Sparkfun Electronics and the support of White Mountain Science Inc. All designs and programming were done by Ethan Peters and Nicholas Sullo.
Step 1: Materials


When we ordered these parts from Sparkfun we created this wishlist which can be accessed here. Many of these parts, if not all of them, can be interchanged with other parts if need be. We have also included the parts list below.
-DIP Socket - 16-Pin
-Servo Hub - Standard (Hitec Standard)
-Servo Mount
-Servo - Hitec HS-425BB (Standard Size)
-Ribbon Cable - 10 wire (15ft)
-Hook-up Wire - Red, Gray, and Black (22 AWG)
-RedBoard
-Standard Gearmotors - 20 RPM and 168 RPM (3-12V)
-2x Motor Mount
-H-Bridge Motor Driver 1A (SN754410)
-4 Pin Molex Connector - Pigtail
-Power Supply - 12V/5V (2A)
-Power Cable - 7A IEC C13
-Voltage Regulator - 5V
-Electrolytic Decoupling Capacitors - 1000uF, 100uF, and 10uF/25V
-2x Precision Disc Wheel - 2"
-Rocker Switch - Round w/ Blue LED
-Female Headers
-Break Away Male Headers - Right Angle
-Machine Screws - Socket Head (6-32) 5/16", 1/2", 7/16", 9/16", and 3/4"
-Nuts (6-32)
-Round Base A (Check on Sparkfun's website to see specifically what this is)
-Solder-able Breadboard
-Bearing Mount - Flat (1/4" Bore)
-2x Infrared Emitters and Detectors
-2x Set Screw Hubs - 1/4" Bore
-2x Shaft Couplers - 1/4" to 6mm
- ~10x Shaft Spacers - 1/4"
-2x D-Shafts (1/4"D x 10"L)
In addition to these parts we used 3/16" plywood for all the structural pieces cut out with the laser cutter as well as a pcDuino v3 for the main control and web interface for the machine.
Step 2: PcDuino Setup: First Commands


The next few steps will go through how to set up the pcDuino so we can make it do some cool stuff.
The first thing to do is to open the terminal and run
sudo apt-get update
and
sudo apt-get upgrade
These commands will ensure that your pcDuino is up to date and ready
From here on we used two tutorials which can be found here and here to help us set up the pcDuino initially, but we will still go through the steps.
Step 3: PcDuino Setup: Installing


First we need to install Requests using the following command
sudo apt-get install python-requests
Then we need to install python-pip
sudo apt-get install python-imaging python-imaging-tk python-pip python-dev git
Finally we need to install Flask with the following command
sudo pip install flask
For more information about what each of these installations does specifically, refer to links provided last step.
Step 4: PcDuino Setup: Downloads and Directories


Next go to the Github here and download python-pcduino.
Then unzip the file and move it to your /home/ubuntu directory.
To unzip files you may need to run
sudo apt-get install zip unzip
in the terminal to install the unzipper. Then go to your downloads folder and click Tools in the top menu. Then click Open Current Folder in Terminal. Or you could also hit F4 while inside the Downloads folder. Next we want to unzip the file we downloaded from Github
unzip python-pcduino-master.zip
You will now have an unzipped python-pcduino-master folder which we can move into the /home/ubuntu directory.
Now download the files found here. Unzip these and put the directory inside the "Samples" directory in the "python-pcduino-master" directory.
Step 5: PcDuino Setup: Running the Code!


Now, while in the "web-led" directory, hit F4 to open the folder in terminal. Now before we run the actual python code we need to run the following command in the terminal:
sudo modprobe gpio
This loads the pcDuino's gpio driver module which is not loaded at boot by default. To load this driver module at boot, simply run
echo gpio | sudo tee -a /etc/modules
in the terminal.
Now just connect LEDs to gpio 0 and gpio 1 on the pcDuino. A full pinout of all the gpio on the pcDuino can be found here. Connect the positive leads of the LEDs to pins and the negative leads to ground.
We can finally run the code now! Just run
sudo python web-led.py
in the terminal. Your terminal should look like the second picture on this step. Then just check the IP address that your pcDuino is on by right clicking the wifi symbol in the bottom toolbar and clicking Connection Information. Then using another computer or your phone, as long as you are connected to the same wifi connection, go to the IP address of your pcDuino. You should see a screen similar to the first picture on this step. And when you click (turn on) next to each LED it should turn the LED on. Congratulations! You have just made a basic web interface. This program was just a preliminary test program to run just to make sure that everything is working correctly. We will get into to running and editing the actual vending program later. First we have to build a machine for that code to control...
Step 6: Building the Machine: Structure


Now that the pcDuino is ready we can begin construction of the base. All of the svg files for laser cutting are attached to this step. Please read the README.txt file--its extremely helpful. Also attached is a sketchup file showing what the final build should look like. All the screws used are 6-32 machine screws. Most of the construction is done with t-slots to hold pieces together. Refer to the picture of the corner joint to see how to assemble with this method. In total you will need
3/4"
x20
These are use for joining the walls the edges and for the cross booms
1/2"
x24
These screw are used on the rotary deck (20) and the servo L mount(4)
9/16"
x62
Used for the rest of the construction including triangle corner pieces,
bottom cross pieces, the main motor box, and
mounting the servo mount to the cross boom
3/8"
x4
Used for mounting the main motor to the motor box For mounting the boards
to the board mount cross piece we are not specifying what length screw to
use. We used 9/16" but any screw that can make it through and not be too
long will do.
The construction of the base can be a bit time consuming. The holes in the plywood made by the laser are the diameter of the shaft of the screw meaning that the screw threads itself into the hole. It is a bit more difficult to start each screw, but we found they hold extremely well.
Attachments


Step 7: Building the Machine: Product Bins


For most of our testing we continued to design around the idea of vending a arduino-ish sized box. As it turns out the part of our design that has gone through the most iterations is the design for the product bins and in the end they are still nothing special. We stuck to cutting ours from cardboard. Makercase, a pretty awesome website if you haven't checked it out, was used to generate the .svg files for our boxes that we were dispensing. You can visit their website here.


Step 8: Building the Machine: Electronics Overview


The circuitry in this vending machine can be broken into four different parts. There is the servo and its control electronics (in this case a Redboard). There is a DC motor and its control electronics. There is the IR emitter and detector and the voltage divider circuit for that. And finally a pcDuino to tie it all together.
Step 9: Electronics: SN754410 Motor Controller


The biggest and most complicated circuit of the entire machine is the motor controller circuit based around the SN754410 DIP IC. Considering that, it makes sense to explain it first in the instructable. Two wonderful resources for the hookup of it are located here and here. As shown in the schematic provide, there is a lot of symmetry to the circuit. A step by step guide for setting up the circuit is:
- Pins 1, 9, and 16 are connected to +5V
- Pins 4, 5, 12, and 13 are connected to Ground
- Pins 3 and 6 are connected to the two terminals of one of your motors
- Pins 11 and 14 are connected to the two terminals of your other motor.
- Pins 2 and 7 are the logic pins for your motor connected to pins 3 and 6
- Pins 15 and 10 are the logic pins for your other motor
- Finally pin 8 is the supply for your motors, in this case +12V
Two logic lines are needed per motor to allow for the motor to rotate in either direction. When the first logic pin is high and the second is low, the motor will spin one way. When the first logic pin is low and the second logic pin is high, the motor will spin in the other direction. And if both pins are high or low then the motor will not spin at all. This concept is understood better when looking at our program. For soldering this circuit a solderable breadboard from Sparkfun was used, though any circuit building technique could be used.
Attachments
Step 10: Electronics: IR Emitter, Detector, and Voltage Divider


The IR emitter and detector circuit is fairly simple. It is composed of four parts: the IR emitter, the IR detector, and two resistors. The IR emitter is hooked up to +5V and ground, through a resistor. The detector is hooked up in a similar fashion, but the voltage first runs through a 10K resistor. After this the analog output from this circuit is taken and sent to the pcDuino as an analog input. Then the detector is added and connected to ground. We built this circuit by leaving the resistors on the main board and routing three wires from a ribbon cable strip up to the IR sensor. These were the two positive leads of the emitter and detector, and a ground wire. We also created a 3D printed enclosure to keep the emitter and detector the correct distance apart. If you order the emitter and detector from Sparkfun they should slide nicely into the slots. We have included the Sketchup file for the part as well as the stl file generated from that Sketchup part.

Step 11: The Python and Jinja/html Programs


So way back when (on step 5 actually) we were able to control some LED's by running a python program through a terminal in that directory. Now that we have built a machine we can begin to control motors instead of simple LED's. If you refer to the web-led folder and its corresponding directories (templates and gpio folders) you'll notice in the web-led.py that the gpio folder is imported. This folder is a python module that gives python the ability to make use of the gpio pins on the pcDuino. The templates folder has a .html file that uses jinja 2 to communicate to the python program and run chunks of code via href tags. More information about jinja 2 can be found here.
We modified the web-led code to fit our needs and reworked the .html template file. You will need only one more python module--the ADC or analog to digital converter module. The ADC module allows us to read values from the IR detector and control when the main motor spins. So start by creating a new folder called "open-vend" or whatever clever name floats your boat. We will be more or less copying the structure of folders and directories that were present in the web-led folder so go ahead and in the new directory create a "templates" folder and copy in the "gpio" python module folder from the web-led directory. Back on step 4 we downloaded a folder from github called "python-pcduino". Lets rediscover that folder and in its samples/adc_test/ directory copy the adc folder and paste it into the open-vend folder.
At this point your "open-vend" directory should look like the first photo (part 1).
Go ahead and download the open-vend.html file and place it into the templates directory. Finally download the open-vend.py program attached. Paste this into the open-vend folder. While in the open-vend directory run open-vend.py with
sudo python open-vend.py
Step 12: PcDuino Setup: Serial Communication With Python

Turns out we need to add a little bit more functionality to our wonderfilled pcDuino in order to allow it to vend. In the next slide you we are going to setup up an arduino to control our servo and communicate to it with python, but first we need to give python the ability to use serial communication. Python's libraries do not contain the pyserial module. To install pyserial on the pcDuino in a terminal window simply paste
sudo apt-get install python-serial
From this point if the setup of communication between the arduino and pcDuino can be followed through this instructable. You don't necessarily have to follow the entire instructable, but it does give you a more thorough understanding of serial communication than will be outlined in this tutorial.
Step 13: Electronics: Control Your Servo!


Although the pcDuino is a fine piece of computer genius, and even given their documentation on the pcDuino website we were unable to find an easy way to control a servo natively. Luckily via serial communication the pcDuino can be used to communicate to an arduino which easily controls a servo. Its a little bit silly doing it this way given that the pcDuino has "arduino-ish headers", but until pcDuino releases documentation on how to use them for servo control this will be the way we approach it.
The basic method we use was to send a series of bits, in our case in the form of a letter, from the pcDuino through USB serial to the arduino which was running a program that listened for received bits. On the python side the program writes "S" through serial to the arduino. On the arduino side the program listens for
if(Serial.available() > 0) {
	char data = Serial.read();
After this the servo control loop is run if the char data is "S" and the arduino sends back a "Y" to the python to verify that it successfully received and ran the code.
All of the code is found in the ArduinoServo.ino file and the python file. The .ino file is on this step
The last piece of the servo is the custom arm we designed and 3D printed to better push the product boxes out. Both the sketchup file, for reference and redesign, and the .stl file, for 3D printing, are attached.

Step 14: Electronics: Connecting It All Up


The pin assignments for the entire electrical system of the vending machine can be seen below.
Note: Make sure to connect all your ground connections together
GPIO assignments
Red Board
6 -- Servo PWM
PcDuino
2 -- Program Status LED (This is an LED which is turned on at the beginning of the program. This is for the future when the pcDuino is not hooked up to a monitor. That way we can know that the program is in fact running.)
3 --Main Motor Logic pin 1
4-- Main Motor Logic pin 2
5 -- Secondary Motor Logic pin 1
6 -- Secondary Motor Logic pin 2
7 -- Arduino Communication Status LED (This LED is turned on once serial communication between the pcDuino and the Redboard has been established)
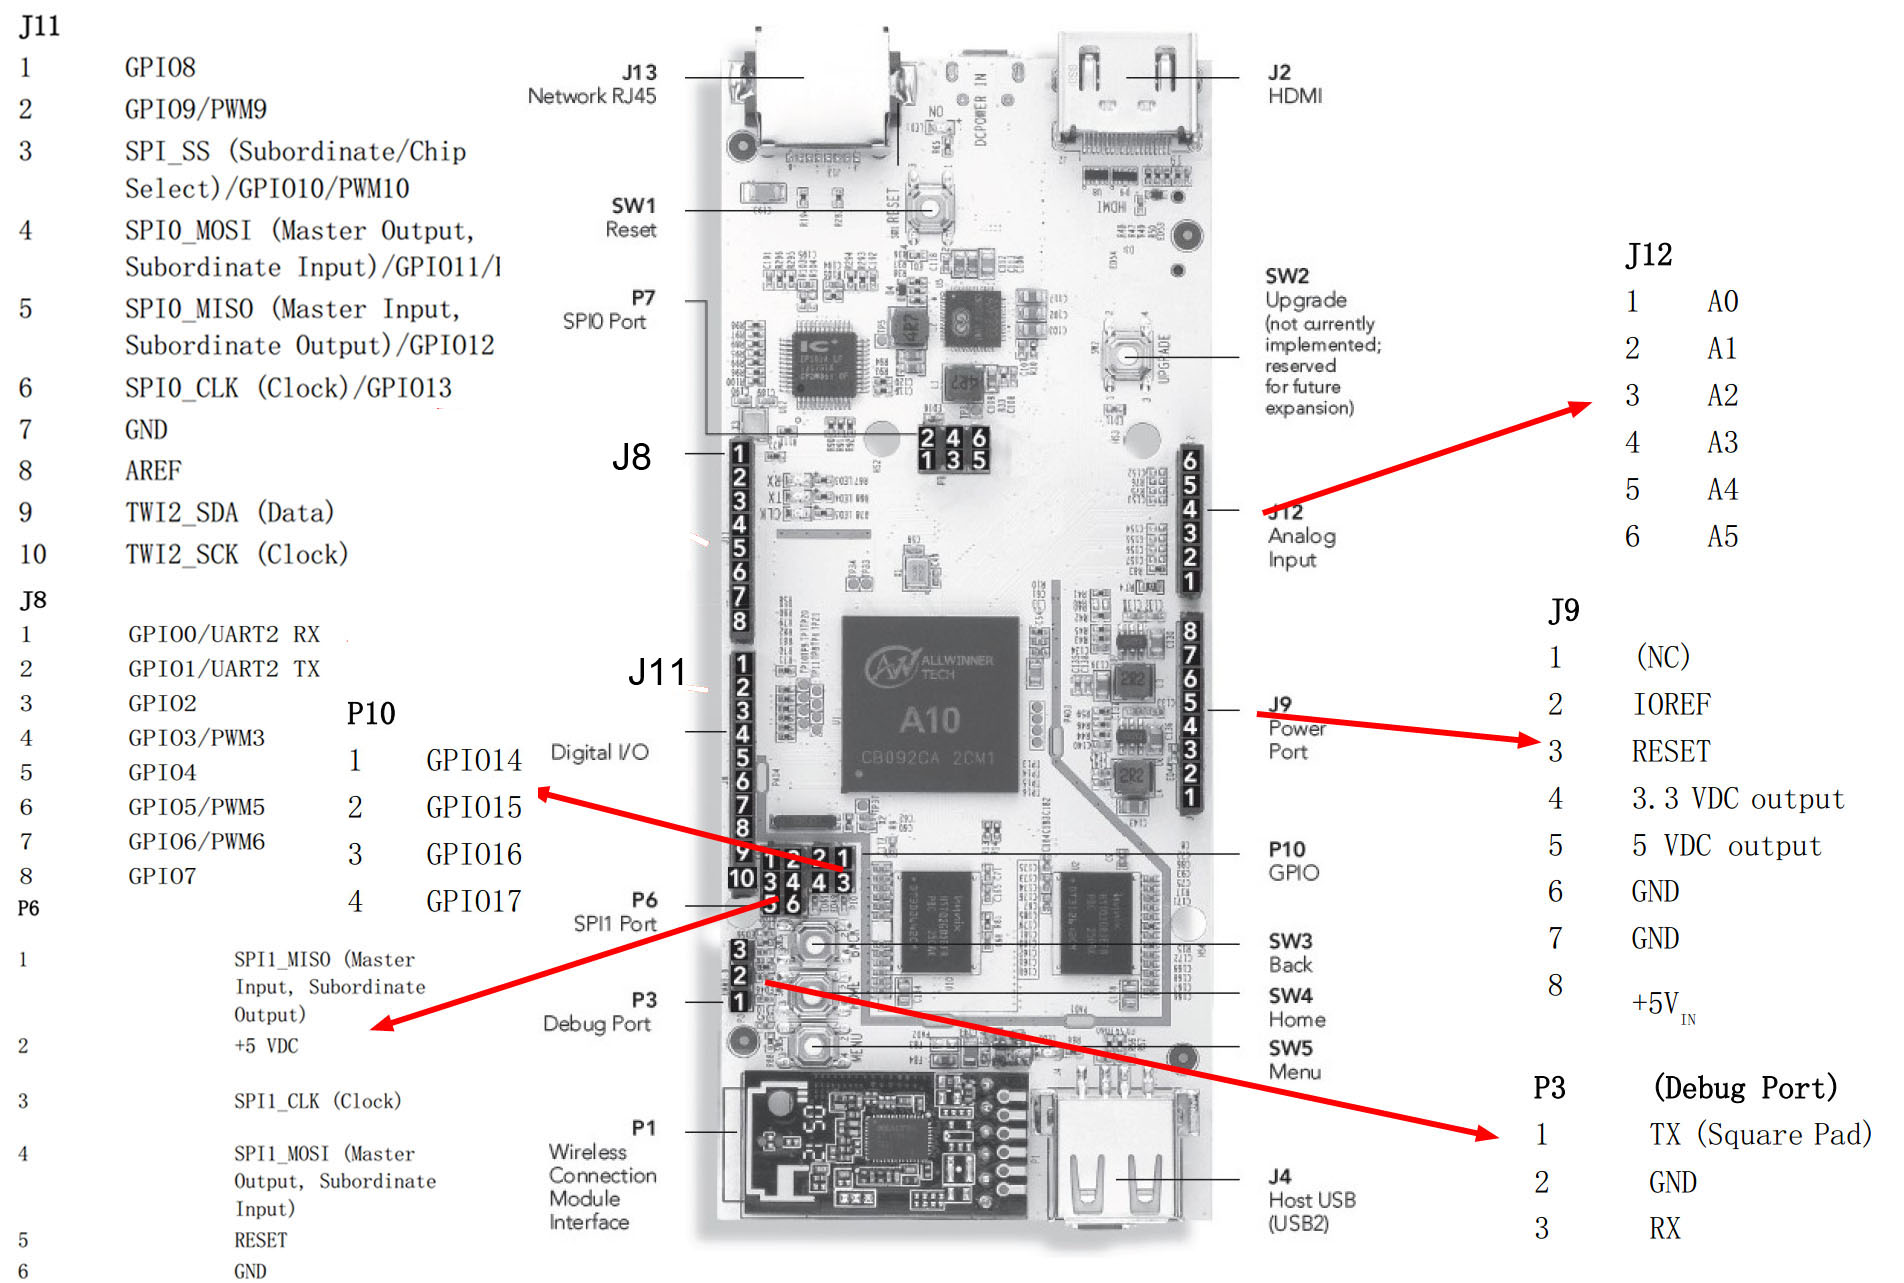
A0 -- Disk IR
For power for the motors we used a 12V power supply from Sparkfun. The original plan was to also add the pcDuino on to this power supply, since the power supply could supply both 12V and 5V simultaneously, but unfortunately it was not as simple as that. We think that the 5V from the power supply has too much noise and needs some decoupling capacitors to clean up the signal. We did not get around to adding these to our design, but the 12V was still used for powering the motors.
Step 15: Outroduction


Now that you have a freshly assembled and fully functional prototype open source vending machine gleaming in your presence you may wonder,"Now what?". In actuality you probably haven't rebuilt our prototype, and we take no offence, but the potential for this project to grow and be refined by others still exists. So what can be done?
First of, all the designs here are free and open, and as of yet, not in their final form. This vending machine serves the purpose to show how a rotary design would function with a swinging servo arm and a mechanism that brings the product the rest of the way out. It also shows how a micro pc could change how people interact with vending machines by making all payment processing and browsing virtual and web based.
That said, it has no security, is light enough to pick up and walk off with, can't actually process payment transactions, has no software for a vendor to set prices or manage inventory, and, topologically speaking, could resemble a picnic basket. Among this their are many tweaks that can make this model better and countless others that can take the ideas presented in this instructable and carry it towards the final goal of making this vending machine both consumer and maker friendly. Those who choose to redesign or have great ideas for the project they don't have time to bring to life feel free to comment and subscribe.
Also here are links to our website (currently under construction) White Mountain Science Inc. (WMSI) and


