Introduction: Router Table Major Improvements


Sometimes to be more effective or efficient when using a tool you need to modify the tool to work best for you. I decided it was finally time to modify my router table for the greater good and make better use of the space I had available.
I have a router table, but it takes up a lot of room in my garage where space is at a premium since my work area is in the 3rd car stall. I have tried to put as many things as possible on caster wheels so I can move things out of the way or move them to where I need them. For some reason I have never gotten around to putting the router table on wheels. I thought it would be great to make some other major improvements to it at that same time.
Here is a video with the details of the router table improvements.
Don't forget to subscribe for more upcoming project videos.
Goals for this project:
- Add better dust collection (main goal).
- Make it mobile.
- Get router bits and router wrenches closer to the router.
- Add Storage.
- Future Expandability.
More on each of the goals
1. Add better dust collection - The fence on my router table has a dust collection port on the back that pulls some of the saw dust from the router bit area, but a lot of dust goes down around the bit under the table. I have had some items stored under the router in the past on the cross pieces that one of the new lower shelves sit on. A lot of saw dust piles up on those items and just makes a mess.
2. Make it mobile - I don't use the router table on a regular basis so I also like to use it for an assembly table and a sanding table. Having it on wheels was important. Even more important was that the wheels were double locking casters. This means that when the wheels are locked then the cast will not swivel and the wheels will not roll.
3. Get router bits and wrenches closer to the router - I always seems to be losing my wrenches for tightening and loosening the collet on the router. Having a place on the router to keep them was key to making it more efficient to use the table.
4. Add Storage - There was a lot of unused space under the router table. In fact, all of the space underneath was underutilized. I only had pieces of wood and some router fences and attachments I had made sitting on the cross piece on the bottom of the table. That is a lot of volume to go unused in a small garage shop.
5. Future Expandability - I wanted the improvements I made to the router table to have potential for future expansion. By this I mean I did not want any of the improvements to stop me from making something like a new jig for the table.
Step 1: Tools and Materials


Materials
WOOD
- 3/4" baltic birch plywood
- 1/2" poplar wood for door fronts
HARDWARE
- Kreg pockethole screws - hardwood and softwood types
- 3/8"-16 tpi bolts for caster plates - 1" long and 2" long
- 3/8" nylon locking nuts
- Door knobs
- Magnetic holders for door catches
CASTERS
- 4" Casters that lock the swivel and the wheel - these were obtained at a local home store
Tools
The tools I used on the project were as follows:
- Kreg K4 Pockethole Jig - http://www.kregtool.com
- Table saw
- Oscillating spindle and belt sander
- Cordless drill
- Drill press
- 2-1/8" Forstner Drill Bit
- Random orbit sander
- Sanding block
- Screwdrivers and wrenches
- Shop vac
NOTE: If you plan on using any tool for a project please make sure you are familiar with the tool and all of the dangers associated with it. If you are not familiar with a tool then you should ask someone who is to show you the proper way to use it. A lot of communities have classes at local colleges on the proper use of tools and machinery. There are also local woodworking clubs that offer classes at very reasonable rates for beginners. I highly recommend using these resources for your safety and for the most efficient use of the tool.
SAFETY FIRST
Always wear eye and hearing protection.
Always work safe with the proper safety equipment and guards on your tools.
Step 2: Add Casters to the Table


The first thing I did was add locking caster wheels to the table. These type of caster wheels lock the wheel from swiveling and from rolling. The ones I got at a local home goods store are easy to lock and unlock with the hand or foot so it only takes a second to lock or unlock with your foot.
The leveling feet on the table were screwed in to 3/8" - 16 tpi inserts in each table leg. I decided to add a piece of 3/4" plywood to the bottom of the table as well.
I turned the router table upside down so it was easier to add the bottom shelf and the caster wheels.
I cut a sheet of 3/4" plywood to the outside dimensions of the table legs and then determined where to drill holes to match the holes for the inserts in each of the legs. Then I placed the caster wheels on top of the plywood with the corner hole of the caster wheel plate aligned with the hole in the leg. I marked the remaining three holes for each caster wheel and then drilled all of the holes.
Next I put the plywood piece back on the legs and attached all of the caster wheels.
I used 2" long 3/8" bolts for the holes in the legs and 1" long 3/8" bolts for the other three holes in the caster plate.
Step 3: Add the Second Bottom Shelf


Next I added a plywood shelf to sit on the cross pieces of the original table. I cut a piece of 3/4" plywood the same dimensions as the bottom piece. This was the outside dimensions of the table legs.
I then notched out the corners of the piece of plywood for the table legs.
This shelf just sits in place by gravity and is locked in place by the notches. It was a quick way to add another shelf of storage.
Step 4: Determine the Enclosure and Install the Sides Pieces


Next I determined the way I wanted to enclose the table. I decided for this router table the best way for me to do that was to add a piece of plywood to the sides and back below the existing skirt pieces between the legs. The existing skirt pieces were 7/8" thick and 3 1/2" tall. They also had a 1/8" bevel on the edges of the piece.
I decided to install the pieces of plywood flush with the inside edge of the skirt boards and they matched up great with the bevel on the edge of the skirt boards. This enclosed the sides and back of the table.
For the front of the table decided I would have flip down doors.
I needed to partition the inside of the table into three sections with the middle section being used for dust collection. That section needed to be as tight as possible to make sure there wasn't a loss of suction.
The front of the table will be enclosed with three drop down doors. I was only going to have one door on the center section, but thought it would look better to have all three sections with doors.
Since the side pieces and the back piece are all the same width I decided to cut them at the same time on the table saw. I knew I needed 10-1/2" to 11" of clearance from the bottom of the table to the top of the enclosure to make sure I had enough room below the router. The existing table skirt pieces were 3 1/2" tall so I made the new pieces to go under the skirt pieces 7-1/2" tall.
Once I cut them to width I then cut them to length. I measured each opening for length and then cut them a little long. I then slowly cut down the length of the board to make sure the pieces were a tight fit between the table legs.
The side pieces was 3/4" x 7-1/2" x 17 1/2".
I used a Kreg Jig to add pocked holes to the pieces and attach to the existing legs and skirt boards. This was perfect for this installation. On the side pieces I drilled pocket holes 2" from the top and bottom of each end. I also added a pocket hole 3" from each end and one in the center on the top.
Step 5: Cut and Install the Back Piece


Since the side pieces and the back piece are all the same width I decided to cut them at the same time on the table saw. I knew I needed 10-1/2" to 11" of clearance from the bottom of the table to the top of the enclosure to make sure I had enough room below the router. The existing table skirt pieces were 3 1/2" tall so I made the new pieces to go under the skirt pieces 7-1/2" tall.
Once I cut them to width I then cut them to length. I measured each opening for length and then cut them a little long. I then slowly cut down the length of the board to make sure the pieces were a tight fit between the table legs.
The side pieces was 3/4" x 7-1/2" x 17 1/2".
The back piece was 3/4" x 7-1/2" x 25 1/4".
I used a Kreg Jig to add pocked holes to the pieces and attach to the existing legs and skirt boards. This was perfect for this installation. On the side pieces I drilled pocket holes 2" from the top and bottom of each end. I also added a pocket hole 3" from each end and one in the center on the top.
On the back piece I drilled pocket holes 2" from the top and bottom of each end. I also added a pocket hole 3" from each end, one in the center, and one between the center and the end pocket holes on the top.
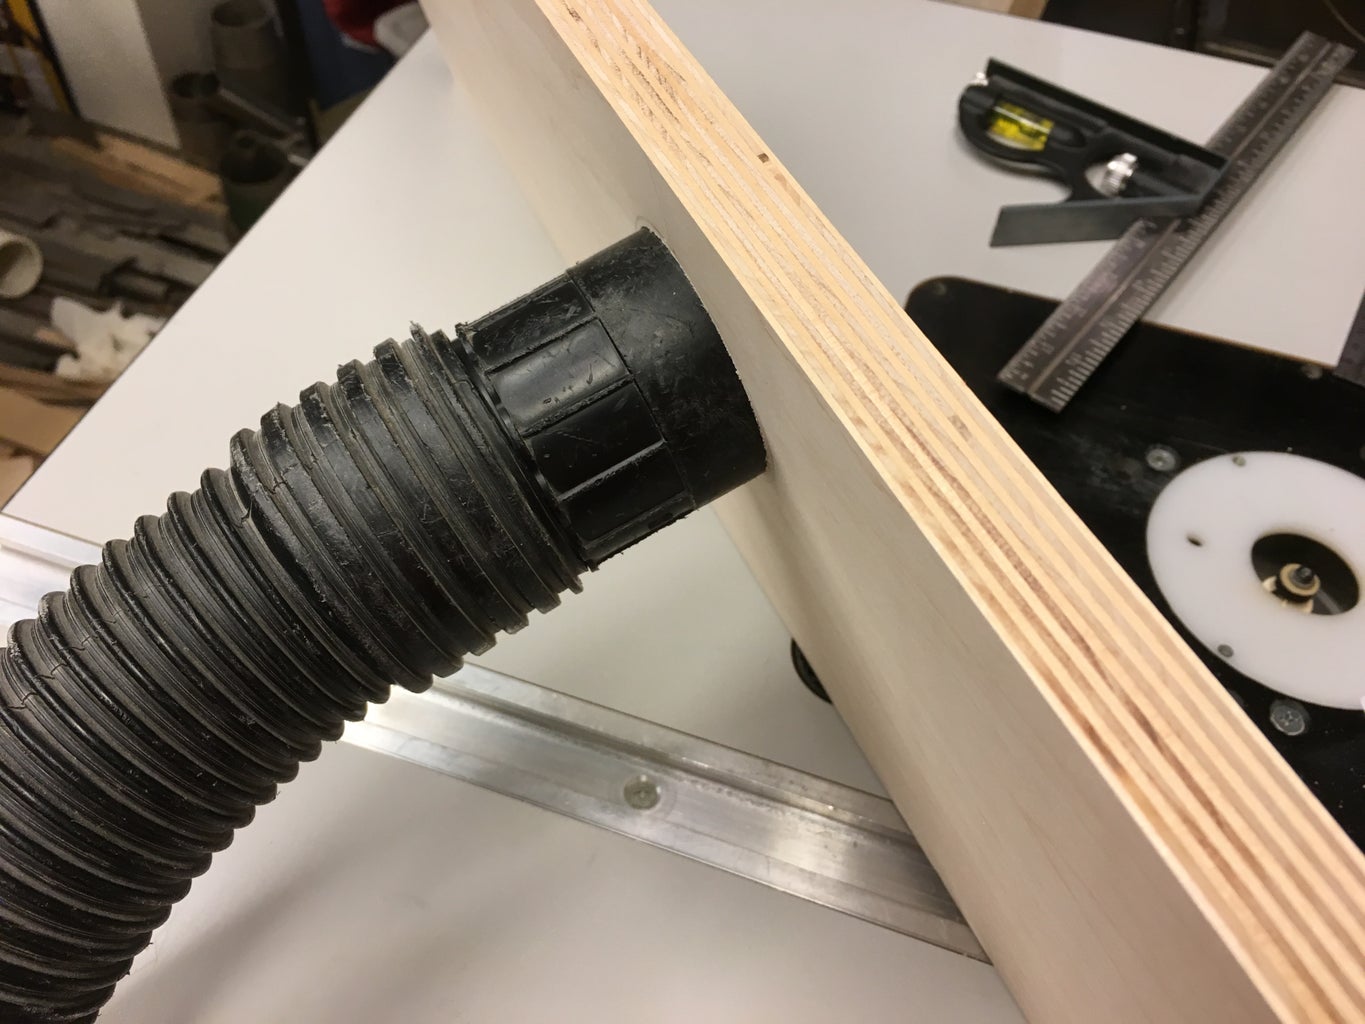
I drilled a hole in the bottom center of the back piece for a dust collection connection. The shop vac I use for the router table has a hose with a roughly 2-1/2" diameter hose. I marked a hole on the back piece that was 2-1/2" in diameter at 1" from the bottom edge of the board. Since I wanted the hose to be tight fitting in the hole I drilled a hole in the board with a 2-1/8" diameter forstner bit and then used an oscillating spindle sander to slowly make the hole large. I sanded the edges of the hole with a spinkle sander with an 80 grit drum and then checked it periodically using the hose from the shop vac I typically use when routing.
NOTE: Make sure you offset any pocket holes that connect to the same leg so the pocket screws do not run in to each other.
Step 6: Cut and Install Dividers


The divider pieces create the sides of the dust collected area and need to be placed wide enough apart so they are at the edges of the top plate that the router is attached to.
I drilled 3 pocket holes in the back, 2 in the top, and 1 in the front of each divider piece.
I used a clamp up through the router opening to hold each divider piece in place while I got it aligned and inserted the pocket screws.
Before I installed the screws in the front and back of the divider I made sure the divider was aligned vertically.
Step 7: Cut and Install the Bottom Piece


The bottom piece fits between the side pieces and the back piece. It is attached to those parts with pocket holes from underneath. This piece was a little hard to attach due to running the screws in from the bottom, but it went in and was rock solid.
Step 8: Cut and Install the Doors


The doors are made from one piece of poplar that I found at a local lumber supplier. I would have preferred a wood type with a little more character, but this piece was only 1/2" thick and much lighter than the other pieces of wood that I looked at. I didn't want heavy doors that would swing down and hit anything.
I thought it would look great to have all three doors cut from the same piece of wood so the wood grain go across all three.
I started by cutting the piece of poplar to the final width for the doors.
Next I cut one end off at 90 degrees. Then I measured over a little more than the width of the left door. I then determined the width of the center door and cut that from the poplar.
I added the hinges to the center door by marking their locations on the back of the door and then removing enough material using a rotary tool so the door would sit flush to the enclosure.
Next I installed the center door.
I then measured the width of the left and right doors and cut those to size, installed hinges and installed them on the enclosure.
I had a few left over knobs from installing cabinet door knows in our house so I drilled and added those to the doors.
I couldn't find hinges that were self closing that I liked so I decided to use some small rare earth magnet holders as magnetic catches. They worked really well and hold the doors without problem. I installed these in pieces that I glued at the top corners of the doors.
Step 9: Add a Power Cord Opening


One thing I missed when working on the layout of the pieces was adding a hole for the power cord to fit through. At least I figured it out now and not when I was totally done with the improvements.
I decided to route the power cord through the back piece. I drilled a hole through the back using a forstner bit. I made this hole a littler larger than the current electrical plug on the router in case I changed routers in the future.
I clamped a piece of scrap plywood on the inside of the back piece so when I drilled through it with the forstner bit it wouldn't tear out the edges of the hole when the drill bit broke through.
I created wood plate out of 1/4" thick plywood. I drilled a couple slots that would slide down over two #8-32 machine screws that were 2 inches long. I installed these in the two holes that I had drilled a little small so the screws would not turn. This way the wing nut tightens without the machine screw spinning in place.
I added a wing nut and flat washer on the end of each 2" machine screw to hold the cover plate in place.
Step 10: Add Dust Hose Hooks


I installed two garage storage hooks on the sides of the router table to hold two sanding hoses I had. I initially installed the hooks and hung the hoses only to find out that they would slide off the hooks easily. I solved this problem by adding a 24 inch long gear tie under each of the hooks so it could be wrapped around the dust hoses and hold them in place. I found that wrapping the hoses with the gear tie that the hose ribs actually lock them together. It is very difficult to pull the hoses off the hooks without untying the gear ties.
Step 11: Add Cord Hooks

I was looking for ways to keep the electrical cords out of the way. I decided to use a couple coat hooks to hold the extra length of electrical cord on the back of the router table. See the picture for the layout for the hooks. This worked very well and keeps the cord from hanging down and getting caught on something as I roll the table around.
Step 12: Add a New Stop Button


I didn't have a lot of room for a stop button on the front of the router table frame, but I decided to add one for the ease and safety of turning the router on and off without reaching into the new center enclosure. Since the legs on the table are fairly slim I ended up mounting the switch to the side of the front left leg as shown in the pictures.
Remember to always unplug your power cord to the safety switch when you are adjusting or changing the bit in your router. It's just not worth taking a chance.
Step 13: Final Thoughts


I am already thrilled with the project just with the addition of the caster wheels on the table as I found I was moving the table more often than I realized. Sliding around on the concrete garage floor was a big hassle and really lowered productivity. I should also mention it sounded horrible!
Since I frequently use the router table as a sanding table I now have the sanders, dust hoses, and sanding supplies all together and the hoses are now under control. Before they were all over the place and I would trip on them often.
Please watch the video for details of the improvements and don't forget to subscribe for upcoming project videos.
Now that everything is installed I think I will take some time to sand down the wood surfaces of the original router table and add several coats of polyurethane to help protect those surfaces. I should have done this before I started on the table, but got a little too excited to make the updates.
Please let me know in the comments if you have done anything like this as I would like to find out what worked best for others or hear about things that didn't work as planned.

Participated in the
Woodworking Contest


