

Introduction: Rust in Peace - How to Make Any Plastic Object Into a Realistic Rusty Detail Part, the SMARTT Way!


I originally wrote this tutorial for our SMARTT Newsletter Workbench column in January 2012. ---Raymond G. Potter
As much as we’d wish it were otherwise, the world is seldom shiny and new as a toy on a shelf. If you want your train layout or diorama to look realistic, you have to find a way to represent the wear and tear of the real world, showing what depredations the elements can wreak on unprotected surfaces. One of the coolest and yet easiest to create effects is rust.
There are a few ready-mixed multi-step products that can do the trick, like Rustall, but it is really not hard to create the effect of rust using a few simple techniques and paint colors. We will use the techniques of “the wash” and “the dry-brush” as discussed in earlier articles to achieve the desired rust effect.
Paint and supplies:
Burnt Sienna and Burnt Umber(we use water based Liquitex in the bottle)
Silver acrylic paint (we use Apple Barrel or similar)
Testors’ Dullcote spray in the 3 oz. can
Powder (We use Bragdon’s Weather System rust colors)
Brown or gray chalk pastels
Dish soap – to add to the wash
Isopropyl alcohol – also for the wash
Paper towels
Brushes
Step 1: Base Color

First paint your object the base color that you want. Black is good for pronounced rust. Once an object has been exposed long enough to the elements, the original color will be unrecognizable anyway. Paint the object with a spray paint that is not water soluble. We do not want our rust effects to remove the base coat. If you go with a glossy or semi-gloss base coat, the wash will tend to wander into the deepest cracks and recesses and avoid the high points. A flat sheen base coat will cover the surface with a more even layer of rust. Either can be good, so don’t be afraid to experiment.
We'll start our example piece with a simple, clean, HO scale (1:87) truck body. We could certainly pre-weather this by painting a panel or two in primer grey or a lighter, more faded blue.
Step 2: Burnt Sienna Wash

Prepare a wash of the Burnt Sienna. Cover the object with it and sop away any puddle spots with a paper towel. If you use a thinner wash, you may need to repeat this step several times, but that’s OK. This lets you build the effect slowly to a point of your choosing. Objects with steep sides may require you to do one section of a time and let it dry before moving on to the next area. I occasionally use a hair drier to accelerate the drying.
Burnt Sienna wash is the first layer of weathering, applied liberally over the whole surface. Don't worry about the windshield; we're using acrylics which can be wiped from the transparency later with alcohol. If in doubt of whether your wash will harm the surface below, be sure to test it first.
Step 3: Burnt Umber

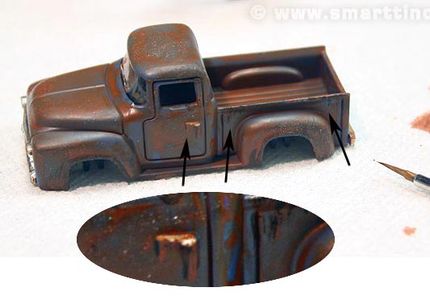
If you want a more severe rusting in a few spots, paint on the Burnt Sienna full strength in a few key spots. You can also paint in a bit of Burnt Umber, another good rust color, for that darker brownish type of rust. If there are a few interesting high spots on the surface, especially in areas that did not take as much of the rust, dry-brush them with one of your rust colors.
In the photo, we've dry-brushed a little Burnt Umber in a few sharp edged places like the running boards and the edge of the bed.
Step 4: Black Wash

Any shiny metallic parts on your object can be dulled down with an application of black acrylic wash. Black wash can also be applied anywhere else you feel the shadows need to be deepened.
In the photo, we've dulled down the shiny chrome with a black wash to get into the crevices and generally mute the shine.
Step 5: Subtle Streaks
Subtle streaks are added on the door handle and a few places along the top edge of the bed using black or one of our rust colors.
Step 6: Metallic Tones

If you want the object to have a slight suggestion of metal to its nature, dry-brush a thin layer of the silver acrylic across the surface. This will deposit the metallic specs in the paint across the surface for a subtle sheen. This works best with flat or semi-gloss base coats. We often do this with metal bridge components. Catching the hard edges with the silver will make them stand out as well, although you will probably be rusting them out later.
In the photo, we've made a light dry-brush of acrylic silver giving a subtle hint of the metallic nature of the truck body.
Step 7: Put Your Rusty Object in Its New Home

Now the rusty derelict can be moved to its new home, a weed filled ditch. Weeds and other junk go a long way to sell the illusion of wear and abondonment.
Step 8: Other Ideas for Rust

Another type of rusting you can do is with the Bragdon powders. These are not as precise but they allow a certain transparency to the rust. They are especially effective on darker matte surfaces. Seal the whole thing with Testors’ Dullcote.
Sometimes, the object to which you will apply rust is not metal itself, like a brick wall, but a metal object has been attached to it, like a ladder or sign. Here you may want to paint thin rusty streaks flowing down from the contact point. Use a thin pointy brush. The key here is subtlety. A little bit goes a long way and can be too easily overdone. The streaks should fade out quickly.
Perhaps you want to age a painted metal object with hard edges, like a 55 gallon drum. Dry-brush the hard edges with the rust colors and leave the rest alone except for a few vertical streaks as discussed above. The idea is that the hard edges would be where the object’s paint has scraped away allowing the exposed metal to rust, while the painted surfaces remain intact.
The Rustall effect is completed by dusting on some brownish dust to make the surface appear even more worn. You could also do this with the Bragdon powder of your choice, or even by getting some gray or brown chalk pastels from the art store and crushing them against sandpaper to produce custom weathering dust. Real dirt is probably too thick and granular to look good as a scale weathering product unless it is repeatedly sifted through progressively finer strainers. As with the other powders, sealing lightly with Dullcote makes the effect more resistant to damage.
In the photo is a tunnel portal demonstrating another example of rust adding character. Check out the streaking and staining on this O-scale Featherlite portal casting. No additional parts have been added; it's a single piece with elaborate but simple paint work.
Using this technique, it’s easy to build up a whole junkyard of rusty debris, but the uses extend much further. You can rust out rolling stock, or abandoned metal structures like signal bridges or water tanks. You can even bring life to a rusty fire escape on the side of a dilapidated tenement. The sky’s the limit, so just go out there and rust!

Participated in the
Hurricane Lasers Contest

Participated in the
Fix & Improve It Contest


