

Introduction: STM32F103 Getting Started (using Keil and STMCubeMX)


![STM32103: esp8266 NodeMCU ThingSpeak [using mbed.h]](https://content.instructables.com/FIN/4MND/IIEYTJZ0/FIN4MNDIIEYTJZ0.jpg?auto=webp&crop=1%3A1&frame=1&width=130)
![STM32F103: esp8266 nodeMCU Getting Started [using mbed.h]](https://content.instructables.com/F2V/D3SJ/IIDJE6ZX/F2VD3SJIIDJE6ZX.png?auto=webp&crop=1%3A1&frame=1&width=130)
In this tutorial, I will help you getting installing software's that you will need while developing your application using STM32 Board.
I will be using STM32F103RBT6. Most of this tutorial also applies to other STM boards, but you have to be careful about that.
I have divided this tutorial into 3 Main Parts which are further divided into different parts:
Step 1: Collecting Software's
Step 2: Installs Software's
Step 3: Connecting STM32 Board.
Step 1: Step 1-1: Downloading Software's:

I have zipped all software’s that you will require to get started with stm32f103 and uploaded them to Google Drive.
Here is the link: Download them all. (If asked, click “Download Anyway”) [Size: 869 MB]
After Downloading Please Make Sure that Downloaded File Size is 869MB. (Right Click -> Properties)
{ SEE FIGURE [1] }
Step 2: Step 1-2: Extracting Software's:

Now, Extract “STM32.rar” by Right Clicking it.
(If you haven’t Downloaded WinRar extractor yet, Click Here To Start Download)
{ SEE FIGURE [2] }
Step 3: Step 2-1: Installing JAVA


Open The Extracted Folder and Click on: “JavaSetup8u66” to start installing “JAVA”.
A window like this will appear: { see figure[2] }
Click “Install”. And it will start installing “JAVA” onto your computer: { see figure[3] }
After Some time, “java” would have been installed onto your system and a window like this will appear:{see figure[4]}
Click “Close”. (If asked for Java Version Check, Ignore That.)
Step 4: Step 2-2: Installing STM32CubeMX:


Open The Extracted Folder and Go to “stm32cubemx”. There, Click on “SetupSTM32CubeMX-4.11.0” to start installing the STM32 Cube MX Software. A Window like this will appear: { see figure[1]}
Click “NEXT”. You will see a window like this: { see figure[2]}
Click On Check Box before “I accept the terms of this license agreement” and “Next” Button will be enabled:
{ see figure[3]}
Click “Next”. Now they will ask you were to install. Click On ”Browse” to select where you want to install:
{ see figure[5]}
Click “Next”. A Message like this one, might Appear: { see figure[6]}
Click “OK”. They will ask few more question. Make Changes if you want to. { see figure[7]}
Click “Next”. And your installation will start: { see figure[8]}
After Few moments, installation will be completed. And you will see a window like this: { see figure[9]}
Click “Next”. At last, a window like this will appear: { see figure[10]}
Click “Done”.
Step 5: Step 2-3: Installing Keil:


Open Extracted folder. Double Click on “MDK517.exe”. A window like this will appear: {See figure[1]}
Click on “NEXT”. Now, they will show you license Agreement. {See figure[2]}
Click on Check Box before “I agree all the terms of the preceding License Agreement”. {See figure[3]}
Click “NEXT”. Now Select Where to install. {See figure[4]}
Click “NEXT”. Fill in details in the following Window: {See figure[5]}
Click “NEXT”. And then installation will start: {See figure[6]}
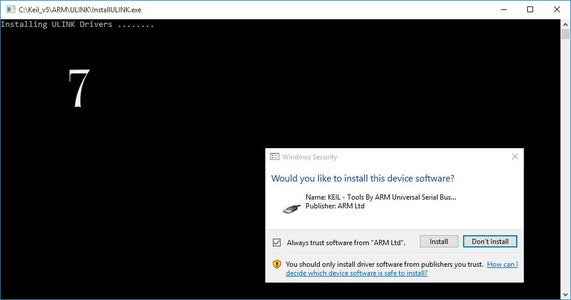
During installation, they will ask for Installation Permission: {See figure[7]}
Click “Install”. That will conclude installation: {See figure[8]}
Click “finish”.
Step 6: Step 2-4: Installing Keil Packages:
To Install Keil Packages, Download the attached PDF file and follow the Steps.
I will be modifying this Step Shortly.
Attachments

Step 7: Step 2-6: Installing St Link V2
Open extracted folder and open folder "stsw-link009". If your window is 64 bit select "dpinst_amd64" and if your window is 32 bit select "dpinst_x86". Then, Run this File as Administrator. Click "Next". Then you will be asked either you want to install drivers or not. Click "Install". and then click "Finish".
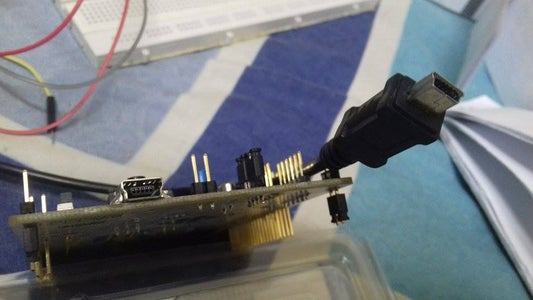
Step 8: Step 3-1: Connecting Your STM32 Board:

You will need a "USB type A to mini-B cable" to connect your STM32 Board to your PC as shown in the figure. Using this cable connect STM32 board to your PC.
Step 9: Step 3-2: Checking for Drives:

To Check whether you have correctly installed Drivers for your STM32 Board or not, goto "Control Pannel" > "Device Manager". There under "Universal Serial Bus Devices" you should find "ST-Link Debug". If you don't see anything like that it means you have not installed drivers correctly. Go to Step 2-5 to install Drivers.


