

Introduction: STUDIO MICROPHONE Build.. Similar to Glen Beck's.


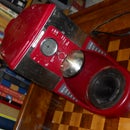
Glen Beck has an impressive big blue microphone on his desk during his show on Fox News. They are really cool looking, and you can buy one on ebay for way too much money. So I decided to make my own REPLECA with mostly junk parts and a little paint. My Giant Awesome Glen-Beck-ish microphone is also a WORKING microphone too.. but maybe not with the same spec's as a studio microphone. But the cool factor makes up for loss in studio quality specs. Total cost of the microphone was somewhere around $20 dollars.
Step 1: PARTS NEEDED to Build the Microphone:

Most of the parts needed are pictured here. A six inch piece of 2-inch pvc pipe. An end-cap for the pvc pipe. Round wood base available at hobby stores. Two 1/2 inch electrical box conduit connectors and a 2 inch piece of half-inch conduit. one tincan very small like the kind tuna comes in. A piece of felt cloth. Some Gold wire for the "grille" available at the hobby shop. An old microphone from a broken telephone or old answering machine. Some wire and a phone jack. Paint needed is some blue, gold, and also some epoxy glue. Some of the parts pictured I ended up NOT USING, such as the wooden dowel sticks. I decided to not build the "cats-cradle" microphone holder because I thought it would look better just sitting on a wooden base.
Step 2: Build the UPPER Microphone Assembly:


Remove the SET-screws from the conduit pipes. I used a grinder to grind the conduit connectors flat so the set screw holes would not be seen. I glued the 2 inch piece of conduit into the connectors with 5-minute epoxy. Then i drilled a hole into the tuna can and bolted the conduit piece to it. I filled the set-screw holes with epoxy and sanded everything lightly. I painted the whole UPPER microphone assembly with gold paint. Then I drilled out the PVC end-cap and bolted the conduit tightly to that. BE CAREFULL to drill into the PVC end-cap into the exact center of the top... otherwise your microphone will be sitting at some odd angle on top of the endcap... and it will not look good.
Step 3: CENTER Section of Microphone.


Using the 6 inch long PVC pipe... you will want to put some kind of tape around each end of the pipe because if you paint the WHOLE pipe, it will make it slightly more difficult to attach the PVC pieces to each other. Also, do NOT paint the PVC with brownish primer... because I did that and then when I painted it BLUE.... it came out BLACK!!! So I had to do it over. Just sand it down lightly so the paint sticks and paint it BLUE. When the paint dries... assemble the TOP section to the BLUE section. We are almost DONE.
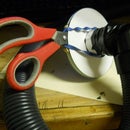
Step 4: Make It a WORKING Real Microphone.


Find an old or broken telephone handset or answering machine. Remove the microphone element. Preferably get one of the small capacitive mic elements as pictured for best audio. You could also just use a SMALL speaker as a microphone element. Solder the wires to the microphone element and your connector. The RED wire of the microphone should connect to the CENTER pin of the plug/jack. The black wire is ground. Route the wire UP into the upper microphone section. Cram some scrap felt-cloth or crumpled paper into the conduit pipe to help hold the microphone so the wire doesn't pull out. Cut a small piece of felt-cloth and white-glue it behind the microphone. I also placed a piece of felt cloth in front of the microphone so you can not see the little mic element when looking through the front "grille."
Step 5: Make the Front Grille:


This is the most difficult step.. I drew a circle the same size as the upper microphone can. Then drilled holes into the scrap cardboard. I placed the gold wire pieces into the holes then soldered them all together. It came out kind of crooked. I will probably re-do this part later when i can think of a better looking method of making the grille. For now, though, it is good enough. After clipping off the excess wires... i just HOT-GLUED the grille onto the tin-can.
BE SURE TO TEST YOUR MICROPHONES OPERATION before gluing the grille to the tin can.
Step 6: Building the Bottom Base/holder.


The original studio microphone uses a kind of "cats-cradle" to hold the microphone. The purpose of this is to eliminate vibrations from the table going into the microphone. If a newsman tapped his pencil... it might be a pretty loud thumping sound. So the microphone is SUSPENDED with a bungee-cord arrangement that dampens sounds coming from the desk. I decided I didn't want that feature because it doesn't LOOK good... and it is difficult to construct to look like the original. So i went for a less effective but better looking TRIPLE FELT cloth method of dampening desk-vibrations. I glued felt to the bottom of the microphone ... and more felt to the TOP and BOTTOM of the wooden base. I just used plain white glue (elmers brand) to glue the felt.


