

Introduction: Save Money on Your DIY Laboratory - Robust, Easy to Focus USB Microscope


There are plenty of examples of how to build a USB microscope from an old web-cam out there. This design builds on those examples by using a plastic twist pack (also known as 'Bolt cases' and often used for storing machine tool cutters) to provide a cheap, elegant, robust and easy to use focusing mechanism that also protects the camera from knocks and scrapes.
Because it's robust, it's great for use by kids and in school classrooms, and if you use a decent enough camera the resulting images are easily good enough to give much more expensive, shop bought microscopes a run for their money.
This scope also has the added benefit of being able to be used facing both up and down so it provides excellent image results regardless of whether you want to look down on solid specimens or upwards through transparent, liquid samples.
It's easy to make too, no specialist tools or skills are required and the project can be completed in about an hour and for less than £10/$15.
Step 1: What You'll Need

So, this is what you'll need to build your microscope:
1 x USB Webcam - I have used an xBox 360 camera from eBay
1 x 50mm diameter, plastic 'twist pack' or 'Bolt case' - if you know someone who works with machine tools they might have a spare. I've used a DP50 050, from Rose Plastics, but I had to buy in bulk.
3 x card or MDF discs - in my original designs I used 2mm mount board, which works fine. Templates are attached.
1 x 5mm, bright white LED
1 x 220ohm resistor
20cm of thin wire (single or multicore)
1 x piece of thin, flexible card - I used an old cardboard tube
Double sided tape
Impact adhesive and/or glue gun
Tools that you will find handy include:
Hot glue gun
Soldering iron and solder
A scalpel and blades
Steel rule
Wire strippers
Small phillips screwdriver
Step 2: Dismantle Your Webcam
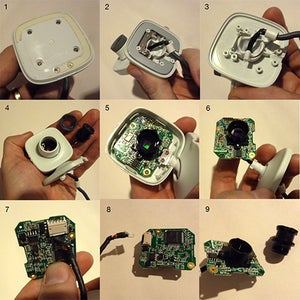
The first step is to dismantle your webcam. Your objective is to strip everything back until your are left with a small circuit board, some lenses and a USB cable.
The webcam I have based this project around is a surplus xbox 360 camera that can be easily dismantled with a small philips head screwdriver and a bit of mild prising apart. Through trial and error I have found this cam to be one of the most reliable, cheap to obtain and easy to repurpose. Please note that some experimentation may be required if you choose to use a different kind of webcam to complete this project (I've previously done this with old Sony EyeToy cameras which work well but aren't so hi-res).
If you do choose to use a different cam it should be reasonably easy to find what is holding it together and to take apart. A little tip is to look under stickers for hidden screws.
Step 3: Make Holes in the Twist Pack


When the webcam has been dismantled, the next step is to make holes, about 35mm in diameter, in both the top and bottom halves of your twist pack.
This can be achieved by scoring a circle with a compass and then gradually 'piercing' out a hole using a hot scalpel blade (obviously, you should take care doing this). Alternatively, if you have access to a laser cutter, you can make a simple jig (two holes cut in 3mm MDF) to hold the top and bottom halves in place an use the laser to cut the holes (the polypropylene of the twist pack I have used cuts beautifully). I've attached a template file you can use to help creating a jig, just select the flavour of file you prefer .
You should also cut a small 'notch' or channel about 5mm wide from the edge of the hole to the edge twist pack. This helps to keep the webcam USB cable below the top of the twist pack so that you can rest the completed microscope on a table facing up, which is useful if you want to observe water samples for example.


Step 4: Reverse the Lenses on the Webcam

Now let's return to the webcam. You should have already separated the lens barrel from the circuit board of the webcam during disassembly.
If you are using an xbox 360 webcam, simply reverse the lens barrel* and glue it back on to the lens mount i.e. the bit screwed to the circuit board that the lens barrel normally screws in to. You can use hot glue to hold the lense barrel in place, though personally I prefer to use contact adhesive to help keep things neat**.
And that's it! Your webcam is now a microscope (albeit a quite hard to focus microscope, but we'll sort that out in step 9).
*This principle is pretty much the same for most of the examples out there and the webcams I have tried out.
** Note that on the xbox camera the top edge off the lens mount is not completely flat. You should carefully sand this down before gluing.
Step 5: Create Three Discs From 2-3mm Card or MDF

Your now going to need three discs: top, bottom and center, made of 2-3mm card or MDF, to help hold your camera in the twist pack and finish your scope off when everything is finally in place.
The attached image shows (in order) the dimensions required for the top, bottom and center discs. If you are not using an xbox 360 webcam, you may find you have to modify the size of the centre hole cut in the centre disc.
If you have access to a laser cutter, I've provided template files in three flavours - .ai, .eps and .pdf. If you are making your discs from card and by hand, a cutting compass really helps. You can use a hole bunch to make the 5mm hole in the center card.
Step 6: Attach an LED to Help Illuminate Specimens


I find it beneficial to add a bright white LED to the webcam to help illuminate samples.
Simply solder a couple of short wires and a 220ohm resistor on to your LED, then find a 5v supply and ground on the webcam circuit board to solder your wires to (make sure to get your LED matched to the correct terminals). On the xbox 360 cam these are easy to find (see attached images), and you should be able to see a black wire and a red wire linking to ground and 5v respectively. If you are not sure, plug the webcam into a USB port on your computer and use a multimeter to check.
If you get this bit right, the LED should light when you plug the webcam in to a USB port. If it doesn't, check that you have the wires soldered to the correct terminals.
Step 7: Fix the Webcam to the Centre Disc

Now take the 'centre' disc you cut out in step 4, and fix your lens barrel to the middle hole*, again hot glue on the rear of the disc works well.
*If you are using an xbox 360 cam the lens barrel will poke through the centre hole slightly and you can use the small rim of plastic on the barrel that prevents it from passing all of the way through to help hold everything in place. If you are using a different webcam you may find that you have to experiment a little to get things right where you want them.
Step 8: Mount the Camera Inside the Twist Pack


You now need to create a ledge within the top half of the twist pack (the bit with the hexagonal end). This is basically a ring of cardboard (or some other material) that helps to hold the webcam in place, and holds the centre disc flush with the bottom edge of the top half of the twist pack*.
To create the ledge I use strips of card, about 5mm wide, recycled from toilet roll tubes to which I have applied double sided tape. I build the ledge up using two or three layers of card. The example shown uses two rings of card, you don't need to do this but I think it helps just to make things a little more solid. The bottom ring is set back about 3mm from the bottom edge of the twist pack half.
When you have everything in place, apply some contact adhesive to the rim of the card and to the back of the centre disc. When it has had time to go tacky, press everything together.
*Keeping the centre disc flush with the bottom edge works well with the xbox 360 webcam, other cameras might require you to set the centre disc further back, but you can experiment to get the right height for the ledge.
Step 9: How to Focus - a Simple First Test

We're almost done!
Join the two halves of your twist pack together and plug the microscope in to your laptop or desktop. Provided you have the right drivers and some compatible webcam software* you should be able to create an image on screen (you may have to set your microscope webcam as the source to make this happen).
With the camera mounted inside one half (what I refer to as the upper half) of the twistpack/bolt case, as you twist the two halves one way the camera lens moves up, away from the base, and if you twist in the opposite direction it moves down, enabling you to achieve a controlled focus as you view. Holding the top half steady as you twist the bottom half ensures that the camera does not rotate, and avoids changing your view of the specimen.
Note: At high magnification focusing is a fairly delicate process, so be prepared to persevere and don't get frustrated if you don't get amazing results straight away. With a bit of practice you will soon get the hang of it.
As a simple first test, try focusing your microscope on white area of your computer display until you get an image of the individual RGB LEDs that make up the pixels - it should look like the image above, if so you are in business!
*I have been successfully using MacCam webcam drivers and CamSpinner on a Mac to capture images and record video. If you are using a PC you might require something different, or you might already have everything you need :-) If not there is plenty of help available via the power of the internetz :-)
Step 10: Top and Tail Your Twist Pack


All that remains now is to glue your top and bottom discs to their respective halves of the twist pack to cap things off.
Again a bit of contact adhesive works well, just make sure that you have everything where you want it and that you have tested that your camera works before you seal everything up (though if you do need to open things up again its not the end of the world).
Step 11: Congratulations! You're Ready to Start Exploring a Microscopic World of Wonders!

So there you go, you've made yourself a powerful little USB microscope. Now all that remains is to get viewing the world up close!
Here are a few examples of images that I've snapped/filmed using similar cameras, I hope they inspire you to make and explore. Please vote on this Instructable if you've enjoyed it and stay curious!

Fourth Prize in the
Build My Lab Contest

Participated in the
Hardware Hacking


