

Introduction: Scrap-o-caster


building a guitar is no easy task but its doable and this insructable ill show you the steps to make one. you will need a certain set of tools and also prior woodworking knowledge.
Step 1: Planing

planing is an essential step to the process there are three options when building a guitar.
1. buy plans- not a bad idea if you have a few bucks to spare.
2. download free- there are many places where you can download free plans but check to see there full scale
3. make it up- for the more talented among us draw it in cad or on some large paper
once you have printed and cut the plans you can create templates to make more guitars, or transfer the design straight to the wood.
Step 2: The Lumber and Rough Cutting


Getting the right wood is a necessity with guitar building, whether you believe in "tonewoods" or not. Choosing a wood you like the look of is smart -- you don't want a guitar that you don't like the look of. There are woods that you should be cautious of, like pine or balsa (too soft) or iron wood or hickory (too hard). You can still use these at your own risk, but softwoods will dent easily and very hard woods can wear down your tools much quicker. For stratocasters, I like to use either alder or mahogany, two common woods for this style. One factor in selecting what kind of wood is availability. I receive cutoffs and surplus wood from my father's wood shop. The hardwoods I get from him would otherwise be cut up and burnt or wasted. Just as simply, you can buy the lumber from a lumber yard or hardwoods store. For this project, I was going to use alder but decided on this mahogany.
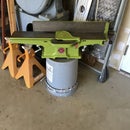
Once you have a piece large enough, in this case 14"x20"x2", you can mark and rough saw with a bandsaw or scroll saw. If you don't have a large enough piece, use some wood glue and make it work. Connect your template with either screws or double-sided tape.
Next, it's off to the router.
Step 3: Routing Body and Pockets


For this step, you should be very careful. Depending on the model, routers can spin at speeds of over 20,000 rpms. Also, if you use double sided tape, make sure you apply it correctly with lots of force. Use more tape than you think you need for good measure. When routing, the body should be no more than a 1/16” larger than your template in any point. If the body is too large, you want to sand it down; otherwise, the router will have to take off much more material. The smaller the amount of material the router has to remove, the better. If you try to remove too much material at once, problems will occur such as chip out, burns, and overheating of the router bit. Some of these things can also happen if you are trying to cut too fast. There are solutions; if you're going to paint your guitar body, you can fill chips and gouges with Bondo. It may take time but burns can be sanded out. The worst of the three is the router bit overheating; this can dull the blade and cause other issues. Once the routing is done, the control cavities can be routed and is where the electronics will reside. You want to remove as much material as you can with forstner bits.
As I said before, the less material you have to remove the better; if you have a set of forstner bits and a depth stop, it's much easier. Once you have removed a good amount of the material, you can start routing the control cavity. With a strat-type instrument, the rout for the pickups is not as deep as the rout for the other controls. The center needs to be just over ¾” and the rest at 1”. If you don’t want to use the router for this job, you don’t have to; again, you could use the forstner bits.
next we're off to the tremolo route
router bit set picture https://www.canadianwoodworking.com/sites/default/...
Step 4: More Routing (the Tremolo)


Next is the tremolo cavity, where the mechanism is housed; a tremolo is a series of springs that keep the bridge against the body. When force is applied to the lever, it loosens the strings, which changes the pitch of the note (see diagram above). You will also want to either rout this out, or use the forstner bits. For the demonstration, I used forstner bits to cut the cavity.
Step 5: Body Contouring


The body cutouts are quite a simple concept. It is removing material strategically so that the guitar fits to your body more comfortably. This is achieved with a saw, some rasps, and some sand paper. this is quite simple and very fast. add a 1/2" round over around the entire body.
Step 6: Finish Sand and Painting

Finish sanding and painting
The finish is a very important part of the overall look. Choose a color you would enjoy on your guitar. Before you paint, take care to fill pores and voids in the wood with either a sanding sealer, also known as grain filler. For larger imperfections, use bondo. Give ample time to dry, according to product instructions. Sand with 220 grit to a smooth finish. After wiping clean, it’s time to paint. I use acrylic paint in a spray gun, but you can use spray paint or oil-based paint. Let dry to product instructions. Between each coat of paint, sand with a high-grit paper (600-1000 grit) and repaint. Number of coats depends on preference, type of paint, and color. For instance, reds take more coats to cover. Once you’re happy with the coverage, sand with an extremely fine grit paper (800-2000 grit) to get rid of the orange peel look. If after sanding, you still have the orange peel texture, add another coat and repeat. Once the finish is perfected, you can start applying lacquer. If you want a matte finish, go with a matte lacquer. For a mirror-finish, use a high-gloss lacquer. Between each coat of lacquer, sand with a 2000-grit sandpaper, checking for any orange peel. Continue to sand and lacquer until it’s gone or minimal. This will take 5-7 coats of lacquer for a strong and clear finish.
Step 7: Shielding


This is a metal lining on the interior of the control cavity to shield from electrical interference. Generally, copper tape or paint is used, but I believe this is unnecessarily expensive. I use aluminum duct tape, which works just as well. This is a fairly straightforward process. See pictures for more details. clean up any tape that doesn't get covered by the pick guard.
Step 8: Wiring


For a beginner, a pre-wired setup is the smartest route. If you have a good understanding of electronics, you can wire it from scratch. The electronics consist of:
Pickups - convert the movement of the strings into an electrical signal Potentiometers - variable resistance controller to adjust volume and tone Switch - Selects which combination of pickups are being used at the same time Capacitor - helps stabilize the current And, of course, wires connect everything.
To buy the kit that I did, including wiring and hardware. visit this link:
Step 9: Marriage of Neck and Body


to join the neck to the body the alignment must be quite precise. to line the neck put the bolts through the back of the body, then use a string in the center of the bridge and neck. each of the fret dots should line up with the string then press the neck into the screws enough to leave a mark where each screw will go. take the neck and drill a pilot hole for each screw watch your depth here don't drill through your neck. you can now screw in the neck joining it with the body.
Step 10: Final Setup


you can now string and tune. remember to avoid overlapping strings and sharp string ends.
i hope your experience gives you as much joy as it gave me, thank you and i wish you happy playing.

Participated in the
Makerspace Contest


