

Introduction: Secret SD Necklace


I don't think there is anything more frustrating than going anywhere with family and friends with your camera only to discover that you left the memory cards at home. (My lovely wife agrees) That is just one of the reasons I made her this lovely necklace with a secret place to safely carry an SD card.
The other reasons include that I love her very much and think its nice to shower her with lovely gifts when ever possible and I would like to be Q from James Bond and make all sorts of spy gadgets. (I think James Bond could start a trend for fellas wearing necklaces... possibly?... maybe not)
Step 1: Slice Your Wood


The first step is finding some nice stable wood. I had some Rosewood left over from a project.
I created a guide fence using some scrap wood and altered the gap between it and the saw blade to just over the thickness of an SD card knowing that I would sand out the saw marks later.
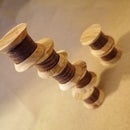
I needed 5 slices and I numbered the cards to show the sequence to help me match the grain for when I glued the slices back together.
Step 2: Sand Away Your Saw Marks


Here is a step which I had thought about a little more before I started the project.
I think the ideal tool for the job would be a drum sander but I don't have one of those. A better way than the one I ended up doing would be to tape a sheet of sand paper onto a flat surface and use a flat object... possibly a bit of wood to hold the wood flat to the sand paper.
The method I used was to hold the wood cards to a belt sander which wasn't ideal as the wood flexed and made the surface a little less than perfectly flat. (I recovered the mistake but it wasn't my finest moment)
The most important card to get right is the middle one which should be as close to the thickness of an SD card as possible (or what ever you would like to secretly hold in the necklace - extra points if its a small map to the hidden treasure)
Step 3: Cut Out Some Shapes


I used a scroll saw to cut out the shape of an SD card and a space for a leather cord.
If I was to make this again using the scroll saw I would use a scrap piece of wood to create a zero clearance base for the saw (the hole for the saw blade made me feel a little uncomfortable when using it as this is a relatively new tool for me)
If you don't have a scroll saw you might want to try a coping saw or another tool you feel comfortable and safe using to do this job.
Step 4: Its Glue O Clock


I decided to use super glue for this project as it cures really fast and I don't think the jewelry item will need the types of properties other glues offer.
I glued the peaces I cut to the wood card which came below it in the stack using the cards dimensions as a handy guide to where I should line up to.
Step 5: Cut in a Straight Line


I drew a straight line using my original saw marks as a guide to show where I should cut.
I then used the scroll saw to cut the line through slices 2,3 and 4 (or the middle 3).
Step 6: Glue It Again.. an Then Give It a Cut


I glued the middle part of the wood sandwich together fully holding the pieces together using my hand as the glue cured. I then glued the facing parts or slices 1 and 5 to the top part of the necklace and trimmed this piece to size.
Step 7: Drilling It

Its probably not necessary because we used the saw to make channels for the leather cord to go into but I found making the holes a little wider with the drill didn't hurt. The holes in the top part ideally should be a little bigger to allow it to move on the leather cord.
Step 8: The Last Bit of Gluing


This is the last bit of gluing - I promise
I had some leather cord left over from another project but any kind of cord would do.
Thread the cord through the top of the top part of the necklace reveling the two ends on the open part of the U shape then glue each of the ends into the holes on the inside hidden part of the necklace.
Step 9: Sand and Wax


You pretty much have the necklace made now and the possibilities for how you want your necklace to look are somewhat open. You could inlay a design or chip carve or anything from this part. I wanted to go with a minimal design with a wax finish because I thought it looked good. I used the wax on the entire necklace including the leather cord and I think worked nicely.
Step 10: Enjoy


I think the last step to any make is enjoying what you have made. In my case its giving it to my wife and seeing her smile because she wasn't expecting a present.
Incidentally when she isn't wearing it teddy Tubbs from Neko Atsume looks pleased with it.. and normally has a back up SD in case we cannot find one with room on it. Tubbs is thoughtful like that :3

Participated in the
Jewelry Contest

Participated in the
Homemade Gifts Contest 2015

Participated in the
Full Spectrum Laser Contest 2016


