

Introduction: Shipping Container Tissue Box


Hello everyone! I started my craft hobby building papercraft models. The reason is that it uses the easiest to find, flexible, and cheap material – paper. Another reason is that most of papercraft’s blueprint or template can be obtain online for free. And with paper, you can replicate your model as many as you can; so you don’t have to worry about messing up your first build.
Today I’m going to share with you guys how to make a miniature shipping container model out of paper. Well, not the ordinary printing paper but I use mounting board, a sort of card stock with a thickness of 1mm. To make the model useful I turned it into a tissue box cover. Hence the name Shipping Container Tissue Box.
I have to say the design was based on Shipping Containers by lasercutcard. They sell tabletop wargames accessories using laser-cut card stock. You can check them out here.
I draw my own template to fit in the tissue box’s size where you can download it in the next few steps.
Step 1: Gather Your Materials and Tools

Material:
- Mounting Board/Display Board.
- It’s a great material to work with; not too thick nor too thin, easily cut and fold, and stick nicely with PVA glue. I pick a black-colored board with an inner white side for this project. The black side will be the inner side instead, so that I can paint onto the white surface.
Tools:
- Craft knife/X-acto knife/cutting mat.
- White PVA Glue.
- The usual tools – marker pen/ruler etc.
- Paint and brushes – I use two types of paints for this project; a water based craft paint and acrylic paint tubes. Same goes with brushes, I use a mix of paint brush and sponge brush to do the job.
- Leather Hole Punch (optional) – this is for punching the small holes. Not necessarily to have but it’ll make your life much easier.
Step 2: Draw the Template


I made the template in its actual size in A4 paper, so you can print it out on paper and trace it onto the mounting board. Except for Part A1, since it’s too big for an A4 size. You’ll need to follow the dimension for Part A1 in the template to draw it on the board.

Step 3: Cut the Template

Carefully cut out the template. The number of parts are as follows:
Part A1 – 1 piece.
Part B1 to B4 – 4 pieces.
Part C1 to C7 – 7 pieces.
Part D1 to D9 – 9 pieces.
Total number of parts: 21 pieces.
Step 4: Draw the Shipping Logo


I choose to make a shipping container bearing MAERSK logo on it. I found that it’s easier to draw the logo before assembling the parts.
Step 5: Assemble the Parts


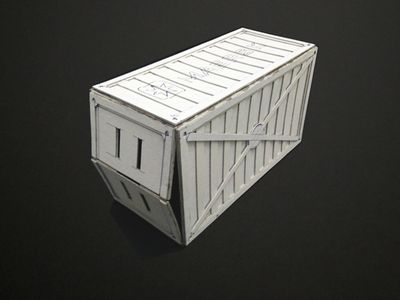


Follow the instruction steps from image above or refer to the animated gif to assemble the parts. Apply sufficient amount of glue to attach the layered parts. On one end of the container/box, the “door” can be open to place the tissue box inside.
Step 6: Paint the Box


Paint the whole box white with a sponge brush (2 layers) and the logo details with smaller brush.
Step 7: Put in the Tissue Box…and Done!!


I use a 170ply tissue box which fits perfectly in this shipping container. If your tissue box doesn’t fit just take out the tissue paper and place it inside the compartment.
Step 8: Add Rusty Effect (Optional)


Okay we’re actually not done yet. If you’re happy with your tissue box as in Step 7 you can stop there. I’m stepping up the game by adding a rusty effect to my shipping container. The inspiration comes from a blog post by miniaturecreationsbymatt72 on his Guntruck Factory Shipping Container.
(Sorry I don’t have the photos for this steps) First, add a light grey color to the box, apply a darker tone on the edges and a thinner layer towards the center. Next, use the sponge brush to carefully dab a small amount of brown paint to the edges, around the holes and circles. Those are the places where rust usually formed. Finally add a watered-down orange paint over the brown spots to complete the rusty effect.
I’m not that good at painting but I’m glad that it turns out to be okay – considering that I only use paint brush. Therefore it’s up to you to finish the box either as a shining-brand-new or old-and-rusty shipping container.
Hope you like it! =)
- ardee

Third Prize in the
Papercraft Contest 2017


