

Introduction: Shock Mounts for Eames Fiberglass Chairs


This project came about after I picked up a few Eames fiberglass chairs that needed new mounts. The shock mounts on these chairs are often cracked and squished after 30+ years of use, or the glue has failed and they've fallen off.
If you already have shock mounts, skip to the last step of this Instructable for Installation tips. The remaining steps will show you how to make your own mounts.
Since I had 4 chairs that needed new mounts, making them myself was a lot cheaper than buying reproductions. There's no waiting for shipping, I can have the mounts the next day, and I can control the quality myself. Aside from the mold rubber, the only cost is the weld nuts ($1.63 each for Stainless Steel or $.74 each for Zinc Plated). Stainless weld nuts are an improvement over reproduction or even the original mounts, because they won't rust if the chairs are being used outdoors.
Supplies:
- Precise Scale (to weigh out rubber and pigment)
- Hot Glue Gun
- 100% Silicone and a Caulk Gun
- 1/8" Drill Bit (more or less)
- Spray Adhesive like 3M Super 77
- Razor Blade / Utility Knife / Scissors
- Mixing Cups
- Sticks for Mixing
- Mold Release
Materials:
- Polyurethane Mold Rubber (like Polytek 75-60)
- Weld Nut with Holes (Rotaloc) 1/4"-20 Zinc Plated or 1/4"-20 Stainless
- Used Tube of Silicone (to make the round form)
- 3/16" Washers
- Black Pigment
Eames related links with nice photos and some history:
Step 1: Research


Almost everything you need to know about shock mounts is detailed in the FURNITURE SHOCK MOUNT CONSTRUCTION Patent (US2649136), submitted in 1947. Although the drawings in the patent are for a prototype DCM chair, the concept is very similar for the later chairs. The patent goes into detail about the construction, type of rubber, and adhesives used to make shock mounts.
There are different types of rubber shock mounts on the Eames chairs. The very early fiberglass chairs have a larger shock mount than the later, more common fiberglass chairs. The bent plywood chairs, like the LCW and DCW have wider and more rectangular mounts. The DCM and LCM with bent metal tube frames have similar mounts to what we're making here, but they are thicker. This process can be adapted for any of those mounts, but it is focused on making shock mounts for the fiberglass armshell and side shell chairs.
The cutaway view of the mount shows how the piece of hardware is cast into the rubber (this is what the bolt threads into, attaching the shell to the base). The closest off-the-shelf hardware available is called a weld-nut, and the ones used here are made by Rotaloc.
Eames Fiberglass Shock Mount Specifications:
- Diameter - 1-1/8" or 44mm (approximate)
- Thickness - 3/8" or 1 cm (also approximate)
- Color - Black
- Thread Pitch - 1/4" - 20 (coarse) or 1/4" - 28 (fine thread)
In the patent, there is this paragraph (emphasis added in italics):
"In this specification and the accompanying drawings, I have shown and described a preferred embodiment of my invention and various modifications thereof; but it is to be understood that these are not intended to be exhaustive nor limiting of the invention, but on the contrary are given for purposes of illustration in order that others skilled in the art may fully understand the invention and the principles thereof and the manner of applying it in practical use so that they may modify and adapt it in various forms, each as may be best suited to the conditions of a particular use."
I was surprised and delighted to read anything like this in a patent, because it's a philosophy that a lot of us here share, and it's one of the reasons this site exists in the first place. Open source design... in 1947!
Now, let's make shock mounts.
Attachments

Step 2: Cut the Tubing


Looking around the shop for something cylindrical and with the approximate diameter of the shock mount, I came across a tube of silicone. It's ever so slightly larger in diameter than the originals, but it saves the hassle of making a perfect rubber mold.
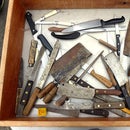
Measure down the silicone tube at about 3/8" and make the straightest cut you can with a very fine hand saw. Do this 3 more times until you have 4 plastic rings to work with.
Sand the edges to remove any ragged plastic.
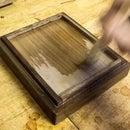
Step 3: Tack Rings in Place to a Flat Surface


The material for the base should be a smooth plastic, or metal, and it should be flat. I've glued a piece of plastic to a piece of scrap foam in this example. If you use wood, make sure it's sealed. The mold rubber will pick up any texture, so plastic or metal is preferred if you want them to be smooth.
Tack the rings in place with hot glue. Run a bead around the outside so the plastic ring is glued to the base. You can skip the next step if you don't mind the sharp edges, but make sure the bead of hot glue runs around the whole thing, because the mold rubber will leak out if it doesn't.
Step 4: Seal the Inside


This step will create a round-over on the top of the shock mounts you cast (the mounts are cast upside down).
Run a very small bead of silicone caulk around the inside of the plastic ring, and then tool it with a 1/8" drill bit.
The important thing here is that the silicone separates completely, so you can pull the excess off after it has cured.
Put it in the sun to cure and it should be ready to remove in 30 minutes to an hour.
Carefully pull the excess silicone out of the form and you will be left with a very small round over at the bottom edge.
Lightly clean the inside with denatured alcohol if necessary, but you can usually rub off excess residue with your fingers.
Step 5: Secure Hardware to Base


A 1-1/2" wide Rotaloc fastener will just fit inside the silicone tube (1-13/16" I.D.) with some space around the edges. The washer is 3/16" I.D. and 1/2" wide. The washer creates a depression in the center of the rubber, which seems present on the original mounts.
I've put masking tape on the Rotaloc in each of these steps to help keep it clean. Tape over the fastener, leaving room in the middle for the Super 77 spray adhesive to contact the surface. Spray the top of the nut on the Rotaloc and the washer and then squish them together. Make sure the washer is centered.
Now you should have the Rotaloc and the washer attached to each other. Tape off the edges again and spray just the washer with spray adhesive.
Stick it down into the form, making sure it's centered in the plastic ring.
Fill the threaded hole with silicone so rubber can't get inside when the piece is cast.
Smooth the silicone down so it's just even with the top of the Rotaloc. Put it in the sun again to cure if you have the time. Be very sure that the hardware is stuck to the base board, the silicone is there to help it stay put.
If you have a release like Pol Ease 2300 (or maybe an aerosol cooking spray), lightly mist the form so the rubber doesn't stick too much. If you skip this step, it's probably not a big deal.
Now the form is ready to pour.
Step 6: Weigh Out the Black Pigment

You can skip this step if you don't mind the mounts not being black. This mold rubber is usually translucent amber.
For polyurethane rubber, it's not recommended to exceed a 3% pigment load. This means if you mix up 100 grams of rubber, the weight of the pigment should be 3 grams maximum. This number will vary depending on the type of resin or rubber you're using, so consult the manufacturer to figure out the maximum pigment load if possible.
Make sure that you break the pigment down, especially any big clumps. Exceeding the maximum loading it is definitely weakening the rubber to some degree.
To make 4 of these shock mounts, I'm mixing up 120 grams of rubber total, which means the maximum loading is 3.7 grams of pigment. Use a precise scale if you have one. Make sure to zero the scale out to the container (the clear plastic cup) before weighing. If you don't have a scale, just go for it and see what happens.
Step 7: Mix Pigment With Part B


Type of Resin or Rubber:
I made the first mounts using a resin from Smooth-On called SmoothCast 60D. What I didn't like about this resin is all of the air bubbles that formed throughout the mount and it feels harder than the originals. What I did like is that it could be removed from the mold after only 20 minutes.
In this Instructable I'm using a two part Polyurethane Rubber from Polytek called 75-60. 60 is the shore hardness, which feels very close to the original mounts that I have. It is mixed 1:1 by weight and cures in about 12 hours.
There are a lot of castable materials out there to experiment with, some are very soft and others are very hard. A 60 shore hardness polyurethane is working fine for me, but it may be a bit softer than the original mounts. How this rubber will hold up after 50 years, I don't know.
Weigh out Part B and Add Pigment:
Weigh out 60 grams of the more viscous part, in the case of Polytek 75-60, that's Part B. Mixing the pigment into the portion that is the most fluid is better.
Add the pigment and mix, making sure to break up the pigment until it's a uniform black color. Scrape the sides and bottom of the cup to make sure the pigment is well mixed. Be thorough.
Step 8: Weigh Out Part A

Again, make sure the scale is zeroed on the cup you're using.
Weigh out 60 grams of Part A in a new container, being as precise as you can to match the weight of Part B (not counting the weight of the pigment).
Step 9: Combine Part B With Part a and Mix

Add Part A to Part B and continue mixing, quickly, but mix gently and try not to create air bubbles. After a minute or so, pour it into a second cup to make sure no unmixed material is left, continue mixing, and then you're ready to cast.
You have to work quickly, because the rubber will start to cure and if you wait too long it won't be very pourable anymore.
Step 10: Cast Shock Mounts


Make sure the casting surface is flat and level and then pour the rubber into the molds. Stop when the rubber is just even with the top of the plastic ring.
You may vibrate them slightly to help air bubbles rise to the surface.
If anything leaks out, don't worry, it will set up and stop the leak. If it leaks out a lot or if the hardware moves around, you will have a bit of a problem and may have to start over to get good mounts.
When the air bubbles rise to the surface, pop the big ones. You can spray mold release on the back to help pop the small ones.
Leave the rubber alone to cure overnight. If you touch the rubber and it leaves an impression, it hasn't cured enough to be removed.
Step 11: Demold and Trim


When the rubber has cured, move the plastic ring and mount sideways to break the seal and release the piece. It should slide out of the ring easily.
Then remove the silicone in the threads with a small flat screwdriver or with narrow tweezers.
Trim the bottom edge of the mount a little bit so it will sit flat.
Step 12: Installation Tips


If everything went according to plan, you now have some shock mounts to install!
The adhesive you use is incredibly important, but so is surface prep. If you're trying to re-install the mounts on a fiberglass chair, you first need to remove the mounts with a chisel and then sand away the epoxy that is left on the surface of the fiberglass. Check the links at the end of this page if you're in this situation.
The photos in this step show how to glue the mount in place, but instead of a chair, I'm using these mounts on a concrete tabletop so I can mount it to a contract table base.
Surface Preparation:
The best reference for surface preparation I've found is from Smooth On: Preparation of Surfaces for Epoxy Adhesive Bonding. It's like This to That but much more informative.
You might sand the bottom of the rubber mount to rough it up, and then clean it with soapy water.
You might also drill a few small holes in the bottom of the mount for the adhesive to grab into.
Epoxy Adhesives:
I've read that JB weld will work just fine to secure the mounts, but haven't tried it myself. I did use PC7, but it failed because it didn't adhere to the rubber (I may have shifted the mounts after too long).
Next I tried a military grade adhesive from Smooth-On called Metalset A4. This stuff is amazingly strong, and it's the only adhesive I can recommend right now (Douglas and Sturgess has it on the shelf if you're in the Bay Area). You can pigment it black, which is the color of most of the original adhesives (although I have a chair with white adhesive). Metalset A4 mixes 1:1, so just pour out a little bit of pigment and mix everything together until it's a uniform color.
Placing the Mounts:
Before gluing the mounts in place, I recommend making 'cross hair' marks where the mounts go, so you can still see where the mounts should be after the adhesive squeezes out and around the mount. Attach a base for the first few minutes to make sure the mounts line up, but be careful that the weight of the base doesn't cause the mounts to shift.
For more Tips on Mount Installation and Fiberglass Chair Restoration:
- The Original Shell Chair Restoration Guide - Chairfag
- Eames Chair Restoration - The Brick House
- Eames Chairs Restored - Plastolux
That's it. Enjoy your renewed chair with nice soft mounts.

Participated in the
Vintage Contest


