

Introduction: Shoot Out - Vacuum Forming / Reality 3D Capturing Scanning (2016)


PREMISE:
Shoot Out looks into the cultural and socio-political commentary within the context of political intervention, legislation, and registration of guns by citizens in the United States, Canada, and Mexico. The triptych brings out the concerns with the nature of guns in society, within the three countries, but also the details of gun decoration as a form of adornment made possible through technologies such as 3D printing. The project also questions the issues surrounding micro-aggression related to certain individuals that carry guns, especially, some who are looked upon as more promiscuous and/or inconspicuous due to their racial profiling.
FABRICATION:
Technologically, the project uses Autodesk Memento to 3D capture and scan a variety of water pistols, 3D printed, then vacuum formed between leather and the 3D printed formwork, made possible by the Autodesk Pier 9. Further studies were also made through vacuum forming leather (skin), an upcoming instructables in collaboration with Mikaela Holmes will debut soon.
Furthering the experimental process of leather vacuum forming as a means of fabrication, the clutch is playful replication and exaggeration of the nature of a gun, which is made through vacuum forming the relief a water pistol. The project will consider a photoshoot with individuals with various mixed-race and racial backgrounds to carry the clutch. This photoshoot will act as a commentary on the various interrogations commonly brought up by misconceptions of racial attention implemented by carrying a gun.
Designed by Wendy W Fok
Leather Clutch Collaboration by Mikaela Holmes and Wendy W Fok
Consulted with Lillian He / Jung Ahn / Mikaela Holmes
Copyright 2016 | WE-DESIGNS, LLC. All Rights Reserved.
Step 1: Vacuum Forming


The vacuum forming process is paired up with the reality 3D capturing and scanning process. The initial attempt was to 3D scan the guns, then 3D print a mold, to then mold the pieces after remodeling the piece in 3D CAD software. The vacuum form is effectively easy to use, but one should take caution when operating the machine, as it could be hot, and testing on various sacrificial water pistols are suggested.
Step 2: Techniques and Methods


To ensure that one has a good quality output, it would be suggested to make a few trial and errors, and most importantly vacuum form a few pieces, during the first three runs of the machine running, because, as the machine gets hotter, the HIPS plastics tend to get more soft quicker, and the control of managing the forming and the vacuum at the same time could prove a little difficult.
Step 3: Framing the Piece Within the Light Box


There are various low and high tech means of cutting the piece to fit into the light box. For this process, hand cutting and using a pencil to draw out the frame is one means of fitting the molded piece into the light box. Another method is to draw out the measured frame in Adobe Illustrator, and use a laser cutter to cut the piece out. Both methods are fair game, however, the laser cutting method may take a little longer for those who are not familiar with using the laser cutter.
Step 4: Assembly of Light Box


These light boxes were purchased from Amazon, and were originally used for LED lighting for Kitchens and office areas which require 24W 6000K lighting. For this project, since I prefer using more bright white light, I effectively used the light box that provided the best soft but white light. Basic electronic wiring techniques are required. Most kitchen and office lighting do not come with the wall plug. Therefore, one would be required to connect a breaker between the LED AC to the wall plug. This is a simple process, but safety and precaution for electronics should be made aware.
Step 5: Iterative Testing


Before making the final versions of the triptych, various iterations were made, to ensure the fit and effectiveness of form. Testing in variable lighting also informed the next steps of the design process.
Step 6: 3D Printing With Objet Vero Clear


To highlight the effective discussion on gun decoration and adornment, the three key symbolic representations of the flags of the United States, Canada, and Mexico were 3D printed with the Objet Printer in Vero Clear material. The prints itself were only 15 minutes for the batch, however, the 3D modelling process took a little longer than 1 hour. Each symbol extracted required to be modelled in the 2D vector into 3D CAD, then printed as an STL file on the Objet printers at the Autodesk Pier 9.
One could model the pieces in any 3D CAD software, such as Autodesk Fusion 360, or in my case, Rhinoceros 3D. These little symbols included:
- A Star to represent the United States
- A Maple Leaf to represent Canada
- An Eagle to represent Mexico
Step 7: Presentation

The final presentation of the triptych displayed at the Autodesk Pier 9 AiR 2016 show allowed the viewer to see the piece in context with the three countries from a distance. More importantly, the effect of the periodic on and off timer that works synchronous to backlit light boxes, blinks like a pulsating billboard to showcase the variability and lack of autonomous control of power of the passerby to the often political and cultural the issues surrounding gun rights.
Designed by Wendy W Fok
Consulted with Lillian He / Jung Ahn / Mikaela Holmes
Copyright 2016 | WE-DESIGNS, LLC. All Rights Reserved.
Step 8: Materials Experimentation: Leather


To further explore the capabilities and limitations of vacuum forming as a process for creating various commercial products we decided to try forming a very different material: leather. Veg tanned leather, when soaked in water can be sculpted and then dried to form reliefs that hold their shape. As well as being a practical sculptural material, we were interested in the idea of luxury inherent in leather as a cultural object, held in contrast to both the graphic and provocative nature of the subject matter, and the more synthetic nature of the plastic used in the light box project.
Using several types of leather, we performed experiments that tested the ability of the vacuum forming process to capture detail in wet leather.
We first soaked the leather in warm water, then draped it over objects in various materials positioned on the bed of the vacuum former. We then pulled sheets of thin heated plastic over both the leather and the forms beneath.


We found that using the vacuum former in this way did not effectively capture form and detail on either moulded plastic or plaster forms. In contrast, wet leather formed over objects by hand produced shapes with much more detail and allowed for much more control of the sculpting process.

More testing with different materials and forms will be needed to determine if an effective workflow can be developed for using the vacuum former to create sculpted leather forms. We are interested to try 3D printing forms that are specifically engineered with channels to control the air flow from the vacuum.
Step 9: Presentation: Leather Gun Clutch


We decided to use one of our hand sculpting experiments to create a clutch with a decorative insert in the shape of a moulded leather gun.
by deliberately choosing a small hand bag as the object to be adorned with the outline of the weapon, we hoped to explore narratives violence, concealment and
To create the design of the case I made a simple pattern for an envelope style clutch with a cut-out on one side where the moulded gun would be inserted. Leather that is best suited for moulding is thinner and softer than the leather that is a good choice for the body of a single layer clutch, so making the bag out of two materials was a good choice for this design.


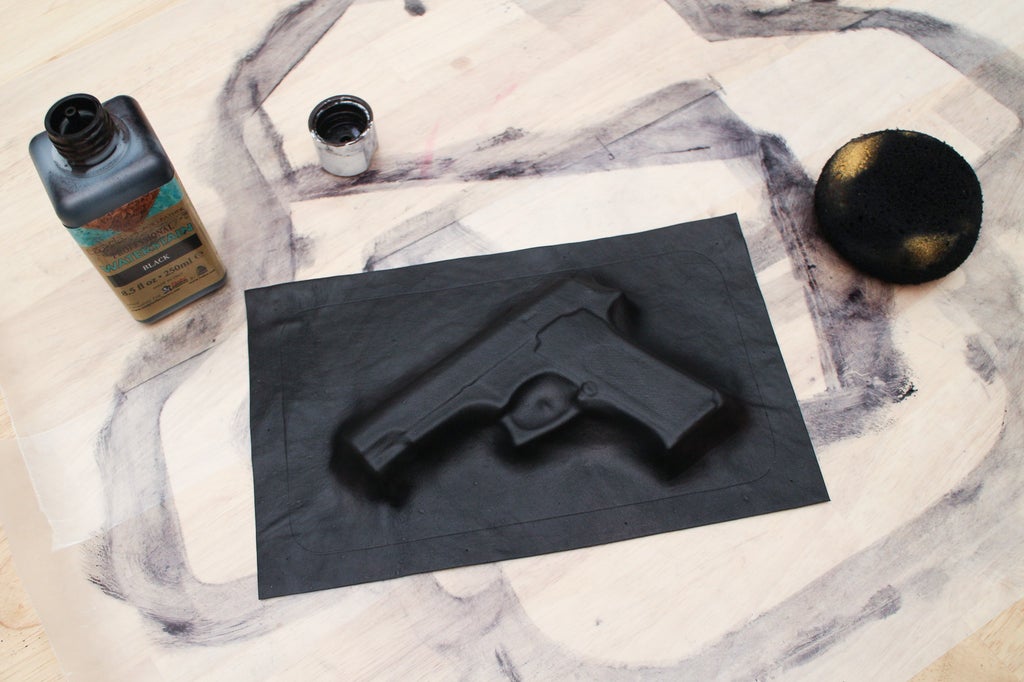
I cut the pattern out in thick veg tanned leather, and used traditional leatherworking techniques such as gouging, beveling, edge burnishing, and dyeing, to finish the leather.


We cured the hand sculpted gun relief by I baking it in a 250 degree oven for 15 minutes, which set and hardened the shape very effectively.

I cut around the gun shape so it would fit as a insert in the cut-out window of the clutch, then sealed it with leather dye and finish.
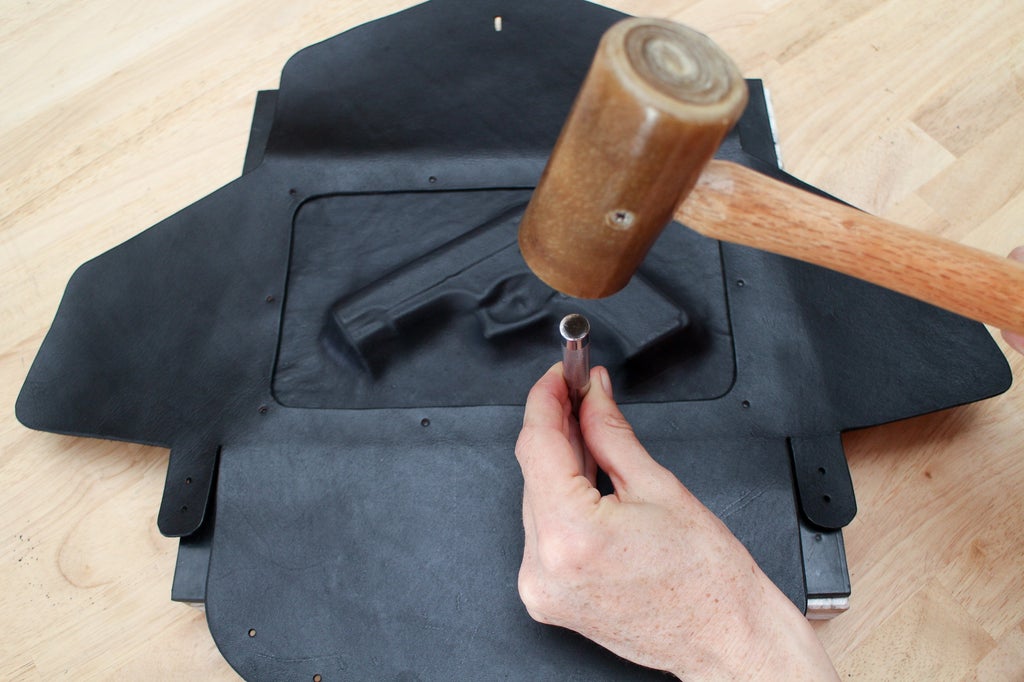
I attached the two pieces with leather contact cement and quick set rivets, and assembled the rest of the clutch with rivets. I also added a stud button closure.

Step 10: Final Presentation of Leather Gun Clutch


PREMISE:
Shoot Out looks into the cultural and socio-political commentary within the context of political intervention, legislation, and registration of guns by citizens in the United States, Canada, and Mexico. The triptych brings out the concerns with the nature of guns in society, within the three countries, but also the details of gun decoration as a form of adornment made possible through technologies such as 3D printing. The project also questions the issues surrounding micro-aggression related to certain individuals that carry guns, especially, some who are looked upon as more promiscuous and/or inconspicuous due to their racial profiling.
FABRICATION:
Technologically, the project uses Autodesk Memento to 3D capture and scan a variety of water pistols, 3D printed, then vacuum formed between leather and the 3D printed formwork, made possible by the Autodesk Pier 9. Further studies were also made through vacuum forming leather (skin), an upcoming instructables in collaboration with Mikaela Holmes will debut soon. Furthering the experimental process of leather vacuum forming as a means of fabrication, the clutch is playful replication and exaggeration of the nature of a gun, which is made through vacuum forming the relief a water pistol. The project will consider a photoshoot with individuals with various mixed-race and racial backgrounds to carry the clutch. This photoshoot will act as a commentary on the various interrogations commonly brought up by misconceptions of racial attention implemented by carrying a gun.
Designed by Wendy W Fok
Leather Clutch Collaboration by Mikaela Holmes and Wendy W Fok
Consulted with Lillian He / Jung Ahn / Mikaela Holmes
Copyright 2016 | WE-DESIGNS, LLC. All Rights Reserved.

Participated in the
3D Printing Contest 2016


