

Introduction: Simple Adjustable Glass Bottle Cutter


It doesn't matter if the bottle is half full or half empty. With this bottle cutter you can make half a bottle thats all full, and half thats all empty..... everyone's happy
There was a nice instructable on how to make a glass bottle cutter that was made at tech shop (https://www.instructables.com/id/Want-to-cut-wine-bottles-Build-this-jig/). It was simple and easy to make, however it only allowed for one size cut unless you re-made the entire rig. Another that was adjustable but used wheels and was a bit complicated (https://www.instructables.com/id/Glass-Bottle-Cutter/). Since I wanted the bottoms cut off for a light project, and my daughter wanted a bottle glass to hold her paint brushes and had most of the materials laying around, I came up with this.
Made from simple materials and straight cuts, its easy to make and inexpensive.
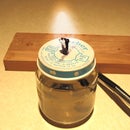
Here is a link to the denatured alcohol lamp. I am planning on using this to heat the bottles after I score them.
https://www.instructables.com/id/alcohol-lamp-on-a-shoe-string-budget/
Step 1: Material and Cuts

Materials you will need.
1 - 8" X 20" Piece of ply wood or particle board
1 - 2" X 4"
1 - 3/4" X 3" X 6" piece of hard wood
1 - 4 ft piece of 1 1/2" PVC pipe
1 - Kobalt glass cutter
3" deck screws
1 1/2' screws
1 quick grip clamp
Drill
Saw
3/4" spade bit
Cut the 2/4 into 2 - 17" pieces, 2 - 8" pieces, and 1 - 5 1/2" pices
Cut the PVC into 2 - 20" pieces
With the spade bit drill a 3/4" hole in the center of the ply wood.
Step 2: Assemble the Frame


Screw threw the 8" pieces into the 17" on both sides. (First picture)
Center the 5 1/2" piece between the 17" rails. (Second picture)
Place the ply wood with the hole in the center on the frame and mark the hole with a sharpie. (Third picture)
Step 3: Drill and Install the Cutter


First you will need to cut the plastic cover off the glass cutter. A small saw or dremmel works good for this. (first picture)
Next drill a hole at a ~30 deg angle just off center of the circle marked on the center board of the frame. The hole should be slightly smaller than the metal glass cutter shaft. You want a press fit.
Step 4: Install the Cutter and the Top

Use a scrap of wood to place against the cutter and hammer it into the frame, place the plywood top over the cutter pushing the cutter through the hole. Be careful not to hit the cutter wheel when driving the cutter in.
Step 5: Install the PVC Pipe

Drill a hole through one thickness of PVC on each end large enough to fit a screw driver in. Use a smaller bit to continue the hole. The smaller hole should be just larger than the screws you are planning on using to hold the pipe in place.
Place the first pipe against the cutter head. Space the second using a bottle. You want the bottle to just sit on the cutter and lean against the second pipe.
Drive the screws and fasten the top down with additional screws.
Step 6: Cut a Bottle

Place a bottle on the cutter positioned where you want the cut. Butt the board against the bottom of the bottle and clamp it in place. Apply slight downward pressure against the cutter and rotate the bottle. You should get a perfect score. You will then need to tap the bottle from the inside along the score line to get a good break. I still haven't quite got the hang of it.....
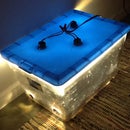
Good luck. Keep an eye out for my bottle light project...

Participated in the
UP! Contest


