

Introduction: Simple Arduino LED Color Sensor for Beginners


There are a couple different types of color sensors.
The one used in this instructable is a "reflective" color sensor it has a red light source a green light source a blue light source(a R,G,B LED would work) and a light sensor. The way it works is first the red light source is turned on and the value of the light sensor is recorded. then the red light source is turned off this happens for the green and blue light sources as well.
the R,G,B value are then finely compared to come out with the color of the object but why does it do this? because when red light shines on a red object it reflects more light then when green are blue light shines on it. so when a green object is held over the sensor the green value recorded is higher then the red are blue values.
The other type of color sensor is a "refractive" color sensor it works on the same concept as the one above except it is opposite. it has three light sensors with red,green,blue color filters and a white light source. the way it works is it turns on the white light source and compares the value of the light sensors if the red value is higher then the green and blue values then the color is red.
The code i used in this instructable looks until it sees a green object then turns on a LED. The way it does this is i take the red,green,blue values divide them by ten (to make them easier to manage). then i place a colored object (in this case it is a green object) and then i use the variable val1,val2,val3 (their are three variable for red,green,blue) to add and subtract from the red,green,blue values to make them all the the same value in the case of this instructable the value is fifteen.
red = (sensorValue / 10) + val1;
then i have a "if statement" that compares the values with a small bit of "space" around the value in this case two on each side. so if the values are around fifteen it turns on a LED if not it turns of the LED.
if(blue > 13 and blue < 17 and green > 13 and green < 17 and red > 13 and red < 17)<br> digitalWrite(led4, HIGH);
 delay(1000);

 }
 else{
 digitalWrite(led4, LOW);
 }
So now on to the build!
Step 1: Tool's and Materiel's
The materiel's we are going to need for this project:
(1) Arduino Mega
(1) Light sensitive resistor
(2) Red LED
(1) Green LED
(1) Blue LED
(4) 220 ohm resistor
(1) 12K ohm resistor
Wire
Cardboard
Packaging tape
The tool's we are going to need for this project:
Breadboard
Wire cutter/stripper
Scissors
Computer with Arduino.ino installed
Step 2: Building the Circuit
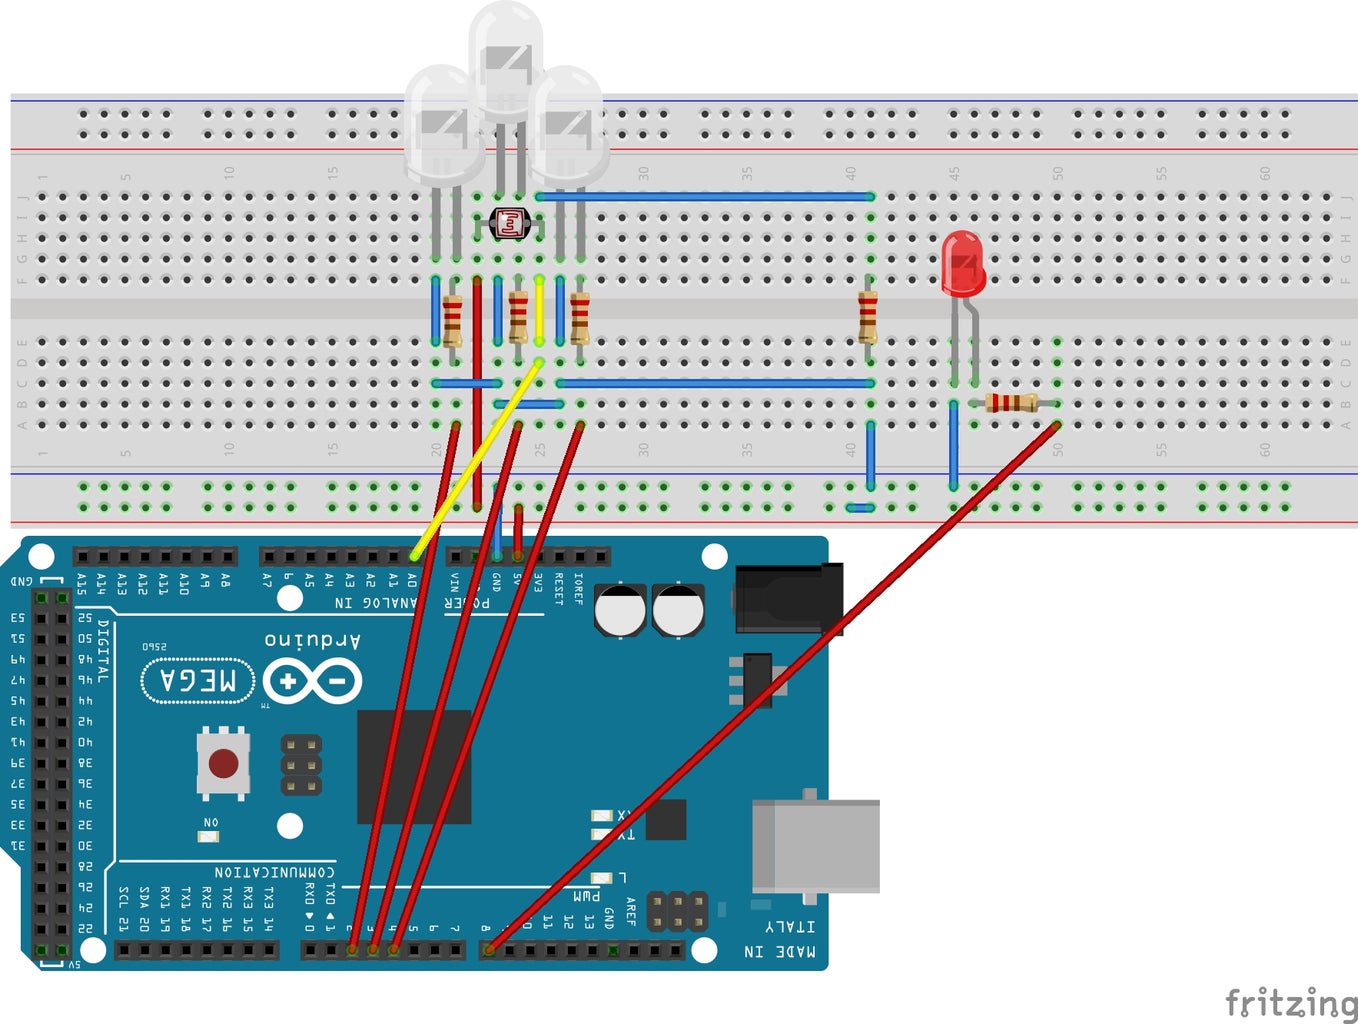
Build the circuit as in the photograph above.
Note: the clear LED on the far left is the red LED. the clear LED in the middle is the green LED.
the clear LED on the right is the blue LED
Step 3: Make a Cardboard Tube to Cover the Sensor
Cut a piece of cardboard two inches high and six inches long.
Roll the cardboard in to a tube one inch in diameter and tape.
Step 4: Codeing and Using It!
Upload the code to the Arduino Mega.
int sensorPin = A0;
  int red = 0;
  int green = 0;
  int blue = 0;
  int led1 = 2;
  int led2 = 3;
  int led3 = 4;

  int led4 = 8;
//The red,green,blue values have to be adjusted due to the fact that the LED's are of different
//  brightness.

  int val1 = -12;//Use this to adjust the red value
  int val2 = -4;//Use this to adjust the green value
  int val3 = -18;//Use this to adjust the blue value

  int sensorValue = 0;
void setup() {

  pinMode(led1, OUTPUT); //Red LED
  pinMode(led2, OUTPUT); //Green LED
  pinMode(led3, OUTPUT); //Blue LED
  pinMode(led4, OUTPUT); //Detection LED
}
void loop() {
  digitalWrite(led1, HIGH);
  sensorValue = analogRead(sensorPin);
  red = (sensorValue / 10) + val1;
 delay(50);
  digitalWrite(led1, LOW);
/////////////////////////////////

  digitalWrite(led2, HIGH);
  sensorValue = analogRead(sensorPin);
  green = (sensorValue / 10) + val2;
 delay(50);
  digitalWrite(led2, LOW);
/////////////////////////////////

  digitalWrite(led3, HIGH);
  sensorValue = analogRead(sensorPin);
  blue = (sensorValue / 10) + val3;
 delay(50);
 digitalWrite(led3, LOW);
 if(blue > 13 and blue < 17 and green > 13 and green < 17 and red > 13 and red < 17){
 digitalWrite(led4, HIGH);
 delay(1000);

 }
 else{
 digitalWrite(led4, LOW);
 }
}
Using it:
Place the cardboard tube over the LED's and light sensitive resister then place a dull green object over the sensor. and the LED connected to pin eight should come on.
Enjoy!

Participated in the
Make it Glow!

Participated in the
Formlabs Contest


