

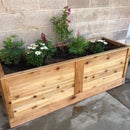
Introduction: Simple Cedar Flower Box


Introduction:
This cedar flowering box was crafted from old fence slats. I thought it up while in the shower thinking of a way to pass the time while I glue another project together. Obviously I wanted it to be nice but didn't want it to have lots of parts, take too much time to build, or make me think too much. End result is a beautiful flower box, made with less than 20 easy cuts on the miter saw (or skill saw).
Material:
2- 17" x 5" Side
2 - 7" x 5" End
1 ~ 16" x 3¹⁄₈ Bottom
Tools
Safety Glasses
Miter saw
Drill & drill bit
Screws
Measuring type
Square
Attention!
Please read, understand, and follow instruction manuals for all power tools. Wear your safety glasses.
Step 1: Give the Cedar a Fresh Look


The cedar is old and has been out in the elements for years, giving it a nice rustic look. The following steps
will give the flower box a "new" look but aren't necessary.
Step 1:
Run each side of the wood through the planner taking only a 1/16" each pass.
Or just sand it with 80-100 grit sand paper.
Step 2:
Joint 1 edge to create a flat/square surface to cut to width on the table saw.
Step 3:
Rip all the pieces on the table saw to 5"
Step 2: Cutting the Ends


The 45° cuts on the End and Side pieces will join together making a 90° "miter joint".
Miter joints are stronger and look much nicer than a simple "butt joint".
The 20° angle cuts are going to give the box a little style.
Check for cracks before making the pieces, especially the End pieces. They are only 7" long so even a small crack will make it very weak.
Step 1:
Turn/swivel the miter saw at 20°
Step 2:
Tilt the blade to 45° and make a cut on the edge of one of the boards. Removing any cracks or unwanted knots in the wood.
Step 3:
Measure 7" at the top, then using a quick square draw a line across the board at 20°. This is to make it easier to align with the saw blade making a accurate cut.
To Reduce waste visualize the cut before you make it.
Remember the Angles
The 20° angle will create a trapezoid shape. I swiveled the saw to the opposite 20°mark and flipped the board accordingly.
The 45° angle should be on the same side as the first 45° cut.
If you ended up with a parallelogram:
Just set up the angle correctly and recut.
If you have 45° cuts on opposite sides:
Retry...YAY for learning!
Step 5:
Repeat, because 2 End pieces are required.
Step 3: Cutting the Sides

Step 1:
Swivel the saw to 0°
Tilt the saw blade to 45°
Make a cut on one edge.
Step 2:
Measure&mark at 17" then make a line straight across with a square.
Be sure that the 45° cuts will be on the same side.
Step 3:
Repeat, because 2 Sides pieces are required.
Step 4: Trim the Ends


Step 1:
The end pieces are taller by about 1/2 inch because they were cut at 20°
Use a clamp or a brick to hold down one of the side pieces,
Align an end piece with the side piece at the top of the box (creating the 90° joint) so the extra material is at the bottom.
Make a mark
Step 2:
Swivel the saw to 20°and make the cut
Be sure to cut the bottom. If the top is cut it won't be 7" any more and won't match the opposite end piece.
Step 3:
Repeat - the other end piece needs to match.
Measure the new height or
Stack the 2 end parts aligning them at the top and draw a line at the bottom.
Cut
Step 5: Assemble

Step 1:
With a side piece clamped down (Like when trimming the End piece) focus on aligning the top and outside corners of the 2 parts
Pre drill holes for screws using a drill bit with smaller diameter than the screws.
Fasten the joint.
Use at least 2 screws or nails for each joint.
I used 1-1/4" sheet rock screws with an 1/8" drill bit
If holes aren't pre drilled it is likely that the wood will crack.
Step 2:
Unclamp the side piece, turn it, reclamp
Step 3:
Repeat step 1 attaching the second End piece to the Side piece
Make sure that the trapezoid shapes mirror each other creating a "top" and "bottom"
Step 4:
Attach the second Side piece to the End pieces using the same technique.
Remember
If you use a nail gun make sure your hands are clear in case the joint is missed or a nail follows the grain of the wood
and pops out.
Step 6: The Bottom


The bottom can be made at least 2 ways...
With the Miter Saw
Step 1.1:
Measure the inside of the box at the bottom. (~3-1/8")
Step 2.1:
Tilt the miter saw to 20°
The swivel part at 0°
Cut 1 end
Measure 3-1/8"
flip board to create proper cut
Cut
Step 3.1:
Repeat until the bottom can be mostly covered.
Because the box needs to be able to drain it doesn't need to be perfect. You want a couple gaps in the bottom.
But not so big dirt will fall through.
Step 4.1:
Fasten the bottom pieces. Leaving small gaps.
The angles make the bottom strong so the nails are mostly so they don't fall out when there isn't plants inside.
I just used 1 screw on each side of the box for each piece.
Alternative Method with Table saw
Step 1.2:
Measure the inside of the box (~3 1/8")
Length should be (~16")
Step 2.2:
Adjust saw blade to 20°
Step 2.2:
Adjust the fence to 3 1/8"
flip the board to cut 20° on the opposite side
Step 3.2:
Drill holes in the bottom to allow for drainage
Step 4.2
Screw into place

Runner Up in the
Gardening Contest

Participated in the
Instructables Green Design Contest


