

Introduction: Simple and Cheap Stitching Pony


Alternatively Titled: "The Almost One Board Stitching Pony" or even "The Six Cut Stitching Pony"
First things first, this is by no means the first or the best set of instructions for making one of these contraptions. What I'm going to strive to do here is impart to you just how incredibly simple and cheap this actually is to make.
I put off making a stitching pony for a long time because I saw so many beautifully crafted versions online and I thought this was something that would be difficult to make. Now, that's not to say that I think mine is a contender when it comes to looks but it should get the job done just as well and for right now that's what counts.
So, before we even get into the build itself I'm going to let you know that this project was made completely from scrap I had laying around and took a few hours total. Even if I had to buy the materials they would have cost under $12. I made a total of six cuts using a circular saw but a hand saw will work just as well, albeit a bit more slowly. All this is in exchange for a much easier time stitching in the future and not having to spend $30-$100 on one of the commercially available options. This is absolutely worth it in my opinion.
So let's get to it!
Step 1: The Plans

Overall, my plans for this were fairly straightforward; cut boards, glue/screw them together, pad with leather. The only semi-complicated thing about it was figuring out how to minimize the amount of cuts I had to make. I realized that if I measured a few inches away from the end of my board and did an angled cut I could simply flip the off-cut around and it would become the block* that holds the leather in place when stitching, thus minimizing the amount of cuts I had to make. This is great because it also minimizes the amount of mistakes I can make. If I'm not making it clear what I mean it should become clear when we get to that step. Suffice it to say, I drew this very rudimentary diagram of the assembled stitching pony and the parts that went into the assembly, made a list of supplies and set to work.
*I have no idea what these pieces should be called from here on out I will refer to them as "clamp blocks".
Step 2: Supplies


For this project you will need:
A 1"x3" pine board
A scrap of 2"x4"
Wood screws
Scrap leather
1 Hinge
1 Threaded metal rod with two wing nuts
Most of this I had on hand. I was actually going through some of my old things and decided to disassemble some old trophies to see what kind of useful things I could find. In the picture for this step you can see that I found a smooth rod with threaded ends along with an appropriately sized nut and a kind of threaded sleeve. I used these for the tension rod on the stitching pony instead of purchasing a threaded rod and wing nuts.
The only thing I ended up buying was the hinge. I had a spare one lying around but when it came down to it I couldn't find it and had to go buy one. I, of course, found it several days after I needed it.
The tools you will need are:
A saw (I used a circular saw)
Sandpaper (a palm or belt sander will make it go quicker)
A Drill/Screwdriver (to predrill holes and set screws)
A Drill bit the same diameter as your threaded rod.
Step 3: Making the Cut(s)


Lets all pretend there are no obvious safety issues with my set up here. We all know YOU won't be so stupid as to balance a board on top of a trash can so you can make your cuts!
My cuts went like this:
One long piece with an angled cut.
One short piece with a straight cut.
Another short piece with an angled cut.
Another long piece with a straight cut.
This, plus cutting a small piece of 2"x4" gave me the pieces you see in the third picture. You can just make out the marks I'm cutting in the second picture.
Step 4: Sanding and Attaching


I went over everything with a palm sander to get it all nice and smooth.
I did notice that my boards were sort of bowed inward long ways which was annoying and caused them to not sit flush against each other. I tried to sand them down some but ultimately became impatient and decided to make up for this defect later with some sort of filler. Scrap wood = not always perfect
I centered the piece of 2"x4" on the bottom board and affixed it firmly with two screws. Remember that it pays to predrill all of your holes so that the wood doesn't split. I also lined up the angled tops of the boards and screwed on the clamp blocks. Unfortunately, because of the way the wood was bowed, one of them split as I tightened the screw on that side. Not to worry! Yet another thing I can fix by filling it in with some kind of filler! I went ahead and filled all of the crevices between the boards before I attached them to the base. I used something I, once again, just had around. You could use wood filler, wood glue, caulk, or you could just use better boards and then you won't have too! Which is why I didn't include it in the supplies. Hopefully it won't be necessary for you.
Step 5: Adding the Tension Point


Another step I decided would be best done before attaching the vertical pieces to the base was drilling the holes for the tension rod. I measured how high I wanted it, drilled a hole right through both of them, and test fit it on the base. It worked!
Step 6: Leather Padding


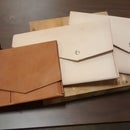
Last thing to do before attaching the vertical pieces is to glue on the leather padding. I started by tracing the boards onto the leather at the length I needed. I left the bottom edge the way it was because I thought it looked kind of cool. After cutting them out I used a contact cement to glue them in place. The way the contact cement works is that you spread it on both surfaces that you're gluing together, let it dry just until it loses it's shine, and then press the two pieces together.
Step 7: Finish Him!


With the leather padding in place it was finally time to complete the assembly. I screwed one board into the 2"x4" in a stationary position, set the second board in place, and screwed the hinge into the base and then into the vertical board. Putting the tension rod in place during this maneuver helps to hold that second board in place as you're attaching the hinge.
And you should be done! Now to use it you just loosen one of the "wing nuts" (or whatever you're using in its place) slide your leather in between the two clamp blocks and tighten it back up.
It's not the prettiest stitching pony I've ever seen but it gets the job done.
Step 8: Final Thoughts

If I had to do this again or if I wanted to improve on this design I would say that I have two main thoughts about what I would do differently. The first is that I would make certain that the boards weren't bowed in any way before beginning. This caused a couple different problems that were solvable but ultimately could have been avoided if I had simply bought a nicer piece of wood for just a few dollars. Second is that I would probably spend more time shaping the bottom board to make it more comfortable. Fortunately this is something that I can still fine tune but it could definitely benefit from rounding down the edges and potentially even thinning it down a bit.

Participated in the
Tandy Leather Contest 2016

Participated in the
Trash to Treasure Challenge


