

Introduction: Simple and Intuitive Web Interface for Your Raspberry Pi


The Raspberry Pi is an amazing 35 dollars mini-computer. It allows you to do everything you could do with a regular Linux computer (Connecting to the internet, watching videos, launching applications, ...) but also to interact with the world surrounding it, just like an Arduino. That's why I qualify it as a mix between a computer and a micro-controller.
That's also why I chose it for this project. I'm going to show you how to control LEDs with your Raspberry Pi. Firstly directly from the Raspberry Pi itself, then from any device in your house like your Smartphone or your tablet.
Here is a very good example of what you can achieve after reading this Instructable: https://www.instructables.com/id/Web-Controlled-8-Channel-Powerstrip/. Thanks to Rleddington for his amazing project.
Update: French version here
Step 1: The Electronic Part


The electronic part is nothing special, it's only 8 LEDs with their protecting resistor. The only hard part is to connect the LEDs to the good pin on the Raspberry Pi. Indeed, I'll be using later a library called Wiring Pi made by Gordon Henderson (You can visit his website at: http://wiringpi.com/) and the pin's numbers used in this library aren't the same than the ones on the Raspberry Pi. See this page for matches: http://wiringpi.com/pins/ (just be careful about your Raspberry Pi revision, the pinout isn't exactly the same). I'll be using Wiring pins 0 to 7.
Concerning the resistors, they should be 270Ω but since I don't have this precise value, I'm using 560Ω resistors (LEDs are just less bright).
Finally, I've made two schematics to make it simpler. The first one (with the complete Raspberry Pi) is showing you the real pins as they are shown on the board. The second one is a simplified version, it's showing you only the useful pins and their matches in the Wiring Pi library (GPIO Wiring number/Actual number on the board).
Step 2: Installing and Using the Wiring Pi Library
As said before, Wiring Pi is a library. It simplifies a lot using the Raspberry Pi GPIOs (one command instead a long process). It also means that you can use it in any of your C codes. However, we won't build and use a C program but the Gpio utility. It's a software made by Gordon and coming with the library. It allows you to control the GPIOs in a bash script or directly in a command line. Using this utility is however a lot slower than a C program.
We first need to install it. Gordon himself is explaining it very well on his website: http://wiringpi.com/download-and-install/. You just need to download it from GIT then to build it using the ./build command.
You should now be able to use the Gpio utility, type the "gpio mode 0 out" command to test it out. If nothing special appears, everything's fine. Else, if the board is printing "command not found error" or something like that, be sure that you've followed the guide and build the library.
Let's turn on and off the first LED (Wiring pin 0). You first need to set the pin as an output. Use the "gpio mode 0 out" command to do so. "0" is the wiring pin number and "out" simply stands for output. Now, use the "gpio write 0 1" command to turn on your LED. "0" is again the pin number and "1" is the status (1 for ON and 0 for OFF). If everything's fine you should see your LED shining. To turn it off, simply use the "gpio write 0 0" command.
Just a little tip, if you want to use the actual pin number (GPIO-17) instead of the Wiring Pi number (0 is corresponding to GPIO-17), use the -g flag in your command. Ex: "gpio -g write 17 1" instead of "gpio write 0 1".
There is also the "gpio read" command which allows you to read the pin's status. It may seems useless when the pin has been set as an output but it allows you to be sure of the pin's status when you can't see the LED. Using it is as simple as before, just type "gpio read 0" where "0" is the wiring pin number. The command is returning the pin's status (again 1 for ON and 0 for OFF).
Finally the Wiring Pi library is containing a lot of other commands/functions but I'm not gonna cover them in this instructable since there are not useful here. See this page if you are more curious: http://wiringpi.com/reference/ (library's functions) and https://projects.drogon.net/raspberry-pi/wiringpi/the-gpio-utility/ or the "man gpio" command for the Gpio utility.
Now that you can use this utility, let's play a little bit with it. You can first, if it's not already the case, control remotely your Raspberry Pi with SSH. You can use Putty for Windows or ServerAuditor for your Smartphone. Then have fun with bash scripts such as this one which is turning on LEDs 0 to 7, waiting 2 seconds, then turning them off again:
#!/bin/bash
#set mode to output
for i in 0 1 2 3 4 5 6 7;
do gpio mode $i out;
done;
#turn on LEDs 0 to 7
for i in 0 1 2 3 4 5 6 7;
do gpio write $i 1;
done;
#wait 2 seconds
sleep 2;
#turn LEDs off
for i in 0 1 2 3 4 5 6 7;
do gpio write $i 0;
done;
Step 3: Installing a Web Server Then Transferring Your Website to It

Controlling the LEDs remotely with SSH is pretty cool but the interface (console) isn't very user friendly and typing the commands every time is long and annoying. That's why we need a graphical interface for our project.
Programming an app for each OS (IOS, Android, Windows phone, Mac, Linux, Windows,...) would be too long and would require to know a lot of different languages for nearly nothing. It would also require to do an application running on the Raspberry Pi. Making it this way would be overkill and time wasting.
That's why a website is the best solution, it's compatible with all devices and you "only" need to know four languages: HTML (for the page's skeleton), CSS (page's style), PHP (interactions with the server) and JavaScript (interactions with the user).
We indeed need to install a web server on the Raspberry Pi. In our case, we don't need a MySQL database, only a HTTP server and its PHP extension.
After updating your Raspberry Pi with the "sudo apt-get update" command, type "sudo apt-get install apache2 php5 libapache2-mod-php5" to install Apache HTTP server and PHP5 extension. You can now test if your server is working by typing the IP of your Raspberry Pi in your browser. You should now see a "It works!" page with two other lines. If you don't, then check your board's IP, try re-installing Apache or rebooting your Raspberry Pi. This page is showing that your Apache server is working properly but not its PHP extension. To check it, navigate to your "/var/www/" directory by using the "cd /var/www/" command. If you use the "ls" command, you should have only one file named "index.html". This file corresponds to the "It works!" page. You can now delete it ("sudo rm index.html") and create another one called "index.php" (use "sudo nano index.php"). Then type the following text:
<?php
    phpinfo();
?>
After saving it using ^o (Ctrl + o), exit nano editor with ^x (Ctrl + x). Now if you refresh your browser, you should see a long page with lots of information about your server and PHP. If you don't, check the index.php file, try re-installing PHP or try to understand the error displayed instead of the page (Google it if necessary).
If both pages were correctly displayed, then you now have a fully functional Apache/PHP server but using nano every time is annoying and not very comfortable. We indeed need to transfer files from your computer to your Raspberry Pi. You may want to install a FTP server but it isn't necessary, you can already transfer files using the SFTP protocol. All you need is an SFTP client on your computer. I'm personally using WinSCP for Windows but there are Cyberduck for mac and Filezilla for Linux. If you try transferring files before reading what's next, you'll probably have issues such as "access refused" or "cannot write here". It's due to the fact that the user pi isn't owning the www directory. Indeed, if you try the "ls -l /var/www" command, you'll see that only root (the super user) is owning the www directory. You can (like I did) use the "sudo chown -R pi /var/www" command to change it or create a group named www-data in which you place the pi user then use the "sudo chown -R www-data /var/www" command. The -R flag is standing for recursive, it means that the user/group isn't owning only the directory itself but also everything inside (index.php as example).
You now have your server ready to work and to receive web pages. Have fun with it if know HTML, CSS and PHP.
Edit:Apparently, apache's default folder has been changed to "var/www/html" so may need to adapt the previous commands.
Step 4: Controlling the LEDs With PHP

We now have a web server and a library, let' put them together.
PHP stands for "PHP: Hypertext Preprocessor", It's a server side scripting language. It means that the PHP code is executed once (each time the page is requested) by the server and cannot be seen by the client. I used this language because it's the most popular (and that's the only one I know) but you have to know that they are other server side languages like Python, Ruby, Lua, Perl, ... However, I don't know if the functions we are gonna use have their equivalents in these languages.
Executing applications with a PHP code can be done with two different functions: exec (for execute) and system. Firstly, the "system" function. It takes two parameters: "system ( string $command, int $return_var )", as you guessed it, the first parameter is the command to execute and the second one is the returned status of the executed command. The second parameter isn't compulsory. You can use this function if you don't expect an answer from the command executed. Thus, you can use it if you need to execute "gpio mode 0 out" or "gpio write 0 1" commands. Example:
<?php
     system ( "gpio mode 0 out" );
     system ( "gpio write 0 1" );
?>
Then, the "exec" function. This function is making exactly the same work than "system" but it reads and stores what the command printed. It takes three parameters: "exec ( string $command, array $output, int $return_var )", again $command and $return_var are the same parameters and the only difference is the $output array. As it's name says it will store the command's output in an array. Thus, you can use this function if you need what the command prints like with the "gpio read 0" command. Example:
<?php
     exec ( "gpio read 0", $status );
     print_r ( $status );
?>
You can now execute nearly whatever command you want but let's make a little PHP example to practice: We will turn on LEDs 0 to 7, then wait 2 seconds, then turn them off. Just like we did with the bash script. Edit the index.php file with the following code:
<?php
$status = array ( 0 );
//set pins mode to output
for ($i = 0; $i <= 7; $i++ ) {
     system ( "gpio mode ".$i." out" );
}
//turns on the LEDs
for ($i = 0; $i <= 7; $i++ ) {
     system ( "gpio write ".$i." 1" );
}
//reads and prints the LEDs status
for ($i = 0; $i <= 7; $i++ ) {
     exec ( "gpio read ".$i, $status );
     echo ( $status[0] );
}
//waits 2 seconds
sleep ( 2 );
//turns off the LEDs
for ($i = 0; $i <= 7; $i++ ) {
     system ( "gpio write ".$i." 0" );
}
?>
Step 5: Making the Interface


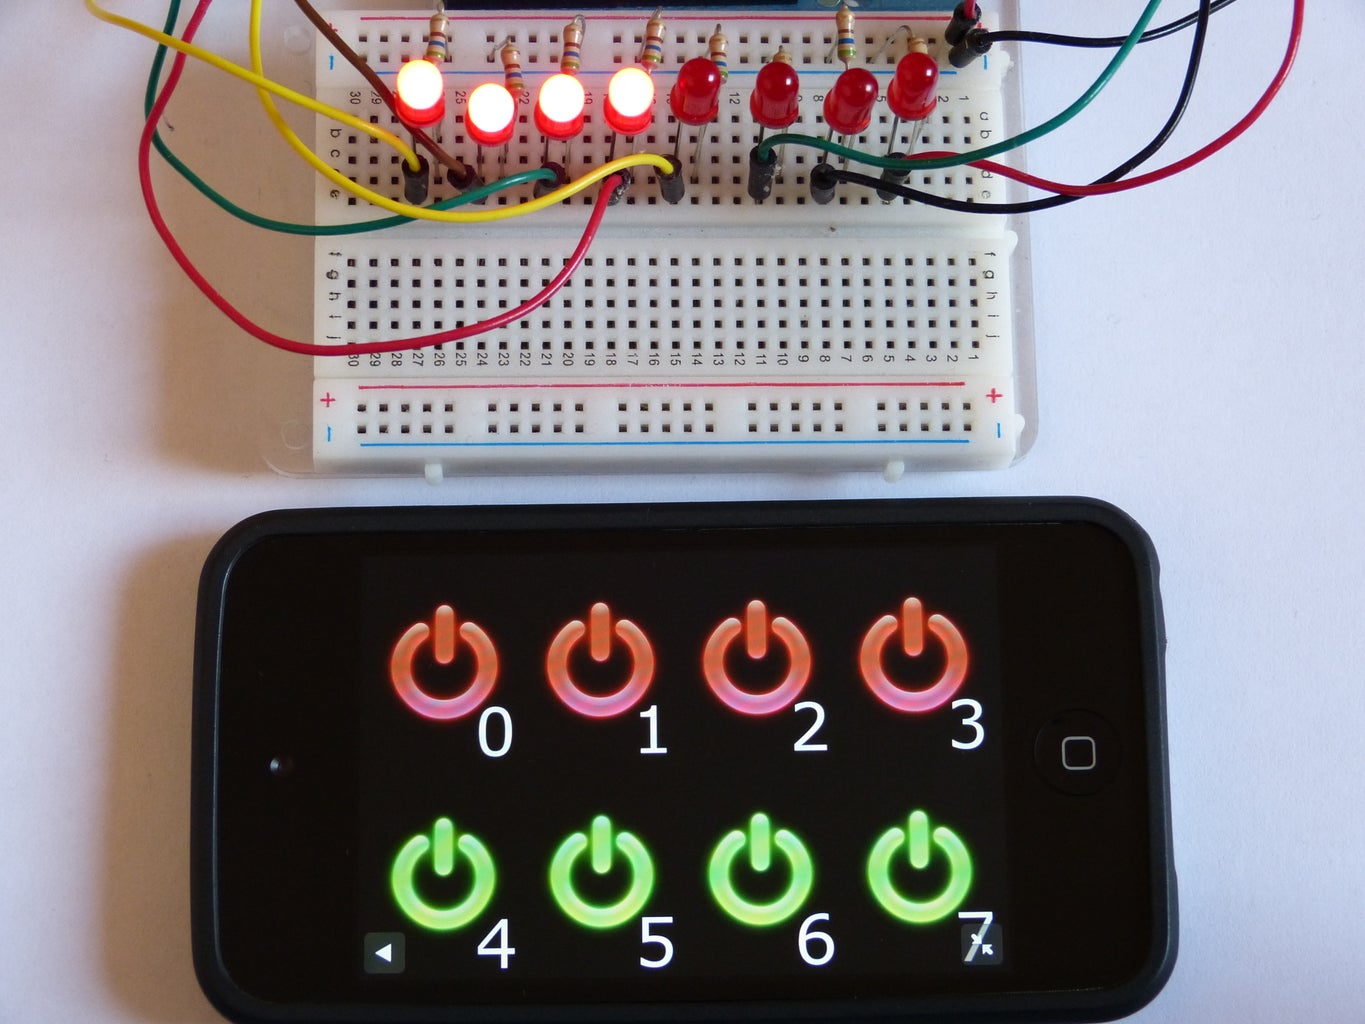
We can now control our Raspberry Pi with simple PHP scripts but there is no interaction with the user and thereby we can't choose the LED to turn on/off. Let's make the interface!
It's composed of pictures I've found on Google images (search for "on/off button"). One was green and the other one red, I just added the number using The Gimp. Each picture/button is corresponding to its LED, so if you click on one of these, the corresponding LED will be turned on/off and the picture will be changed to its green/red version. The page's skeleton will be made with HTML, the server interactions and page's generation with PHP and at last JavaScript to manage interactions with the user and page's animation. If you don't know, JavaScript is a client side language and unlike PHP, it's executed not once, but continuously by your browser. That's why you can change the page's look without reloading it or accessing to an other. If you are wondering why I spoke about CSS before, it's just because we need it for some style and page-layout like the the black background. I didn't make a full .css file because it wasn't necessary here.
We first need an "index.php" file (extension is .php and not .html cause we will use PHP code, it helps the server to know if there is PHP to execute before sending the generated page). This page is the main page containing the 8 buttons. These buttons are first generated with a "exec ( "gpio read ".$i, $output );" in a for loop. Then we need to detect when the user is clicking on one of these buttons. That's where the JavaScript is useful, I put it in a separate file called "script.js" but it's still included in index.php. The script is simply adding an event listener to all of the eight buttons and each time one of these is pressed, it uses a function which is asking for gpio.php, receiving the answer then returning it. Finally, in function of this, the JavaScript changes the button to red (for OFF) or to green (for ON). Now, the last page: gpio.php. It contains the PHP code to turn on/off the LEDs in function of what the JavaScript function sent. The user shouldn't normally ask for this precise page but there is one golden rule when creating websites and you should always remember this one: "NEVER TRUST THE USER". In other words, never think the user is always gonna do what you think he's gonna do. Thus, I added some securities at the begin of the PHP code like making sure the user gave a correct value and not a letter as example. I made a small diagram to sum up all this text.
You can download the full project directly on this website below.
Attachments

Step 6: Conclusion and Ideas of Improvements
This small but long explained project was fun and I learned a lot. I hope you did the same. However, controlling LEDs isn't very useful. That's why what we made is rather a tool than a real project. Christmas is soon (about one and a half months from the day I wrote this instructable) so why not replacing LEDs by relays and controlling lights around your house. There are some pretty good relay boards for the Raspberry Pi on Ebay and more generally on the Internet. Alternatively, and if you're not scared about working on your house, you can even control your house's lights, garage door, coffee machine, heating system, ... The only limit is your imagination.
There are also a lot of possible improvements like changing the interface, adding more LEDs via a shift register, using vocal recognition, ... In addition, with PHP, you are not limited to gpio write or read. You can use the full Gpio utility and thus interact with other devices with UART or any other implemented protocol. You can also use PWM (Pulse Width Modification) to control servos, ...
Writing this Instructable and sharing my little knowledge was a great pleasure for me and I hope it was the same for you to read it. I tried to keep it simple but at the same time to teach the most possible. I didn't want to do a simple and dumb step by step: "download this code, run it, you're done". I think that something is useless to learn until you understand how it works or why you do this and not that. Let me know if you think it's the good way or if I should do it otherwise.
PS: This is my very first instructable and English is not my native language so if you have any comment, advice, suggestion, idea, ... Just let me know, I'll be glad to answer you and of course to learn.


