

Introduction: Single Wheeled Bike Trailer


Tired of bumbling along single track trails with two tires on your trailer fighting for the track? Too full of pride to plunk down the dough for a store-bought one? Never again. With this instructable, you'll be the envy of the trail.
I built this trailer to use on my recent ride down the C&O Canal Towpath. The trail is 184.5 miles and runs along (you guessed it!) the C&O Canal, from Cumberland, MD, to Washington, DC. For the most part, the trail is hard packed dirt, although there are places where it's mulch, crushed rock and even paved in a spot or two. I decided to build this after having gone online and found that, while two-wheeled trailers would work, single-wheeled ones are recommended. I looked at buying one, but at ~$325, I didn't look too long.
That's when I decided I could do better. I think I did...what do you think?
I wasn't sure how to go about building it and thought of a couple different ways to do so. PVC was considered, as was copper tubing, but I finally settled on electrical conduit after seeing I could get a 10' length for $2.50! I settled on brazing the pieces together after perusing the conduit connectors and realizing they probably weren't going to be strong enough. The only problem with brazing was that I had no idea how to go about it. (Sure, I learned in 8th grade shop, but that was ages ago!) I did some searching on the web and finally decided to just go for it. In the end I found out it wasn't that difficult (looking at the trailer, you can tell which joints were brazed early in the project and which were done last -- the learning curve isn't' that steep).
Excluding tools, this can be made for less than $20. What you do with the savings (~$300) is up to you.
Step 1: Ingredients
You'll need the following ingredients to make this trailer:
Parts
4 x 10' 1/2" electrical conduit
front fork of junker bike*
rear wheel triangle of junker bike*
head tube and seat post of junker bike
wheel (16" or 20" -- I used a 20" tire off my daughter's old bike)**
1" to 3/4" conduit step down washer
1/2" screw-type conduit connectors (3)
*This was made using a 26" mountain bike since it's going on to be used behind 26" mountain bike. I recommend using the same size (or larger) fork/rear triangle as you have on the hauling bike.
**While you could use the wheel from the junker bike if absolutely necessary, having the smaller diameter tire allows the trailer to be parallel to the ground.
Tools
brazing torch and rods (I used MAPP vs. propane for a quicker job)
bench grinder
drill*
hack saw (w/ metal blade)
conduit bender
*This is used to cut the holes in the fork. A metal bit is required. I used a Lenox 3/4" Arbored Hole Saw Drill Bit and it work liked a champ.
Extras
Bungee cords
carrying bins
And now, a word of warning, courtesy of Fletcher:
A word of caution about working with electrical conduit: Conduit is generally galvanized, meaning it's got a thin coating of zinc. Zinc is toxic; grinding, welding, brazing, etc. will vaporize the zinc, raising the risk of inhalation. Before working with galvanized pipe, remove the zinc layer (it's thin, so sanding/use of a wire wheel or brush will do it) in an area with good ventilation. A fan would be a good idea, as would a quality respirator (a simple filter mask won't do.) Conduit is a good, inexpensive basis for building all sorts of things ; just remember to take the proper safety precautions.
Step 2: Remove Unwanted Bike Parts


The first thing I did was strip the old frame of parts that I needed for the trailer. I got an old mountain bike from a local freecycle member and immediately stripped off (and saved) everything I didn't need.
Once the bike was stripped of unwanted items, I took the hacksaw out and started cutting off the rear triangle. I wasn't sure how long I needed the "arms" to be, so I cut as close to the seat tube as possible.
Using the conduit bender, I bent the bottom arms of the rear triangle so that they were parallel to the top arms of the triangle. See the second picture for a look at what I mean.
I also cut off the head tube from the frame for use in the pivot point assembly.
I then ground off the residual metal from the head tube and tapered the rear arms so that they fit together nicely and provided a larger surface area for brazing. (I didn't braze this together at this point, although it could be done here.)
Step 3: Trailer Frame Parts

The next step was cutting the following pieces using the electrical conduit:
bottom frame (1)*
top frame (1)*
horizontal supports (3)
angled support (1)
vertical supports (2 large, 2 small)
fork supports (3)
stress spars (2)
wheel guard (1)*
*These are U shaped that required being bent with the pipe bender.
I wanted to have a trailer that was 16" wide (to accommodate the tub I had planned on using) so I took a piece of electrical conduit, cut it to length (~72") and then, using the pipe bender, bent it so that it was a U shape. I had a little difficulty getting the U to be even (the bend was tighter on one side vs. the other, as seen in the picture), but after a few attempts at bending/straightening, I was able to get it close enough.
Once I got the bottom frame cut and bent, I did the same thing for the top frame. I cut a piece of conduit that was ~48" long and bent it to match the bottom frame.
NOTE: The radius of both the top and bottom frames is 8" (to make a 16" frame). If you want a different sized frame, make the radius of your frame 1/2 the width.
I then measured and cut the horizontal, angled, vertical and fork supports to size, followed by the wheel guard. I found it easier to measure and cut these pieces once I had the two frames cut and shaped vs. cutting everything to plan and then having to figure out how to deviate from the plan if the frame wasn't true...which it wasn't.
(At this point in the process, I didn't realize I was going to use stress spars and had only planned on three vertical supports, so I didn't cut them yet. That being said, if you're making your own, you might as well cut these now.)
Step 4: Grinding Conduit

Once the pieces were cut out, I needed to grind the ends of the various support pieces so that they fit snugly with the frame. By tapering the ends, I ensured there would be maximum contact between the supports and the frame in order to increase the strength of the brazing bond.
I used the course grinding wheel to do the initial cut and then the fine wheel to finish it off. After a while, I had the horizontal supports, the fork supports and the wheel guard tapered and fitting nicely with the frame. (When it came time to add the stress spars, I tapered one end of each spars -- see note below.)
The picture below shows the trailer towards the end of the build. The tapered edges can be seen on the three vertical supports. The top frame will rest on the top of the three supports. The tapered edges will allow the vertical supports to better fit the top frame (similar to a ball sitting in a bowl) vs. having the top frame rest on a flat surface (like a ball sitting on a plate).
NOTE: I did NOT grind one of the horizontal supports. Instead, I flattened both ends and brazed them onto the bottom of the bottom frame to provide a spot where the two stress spars could be attached. I didn't plan on this during the build, but when I decided to add the stress spars later on, having this attached in this fashion made it easier to attach them to the trailer.
Step 5: Let the Brazing Begin!

After the horizontal supports were cut and fitted, I began the brazing process by brazing the support piece that I didn't taper to the bottom of the frame. In order to increase the surface area and thereby increase the strength of the bond, I flattened out each end of the support (using a vise). (As I said in the previous step, I didn't plan on using this for anything, but it worked out in the end.
Once this was in place, I worked my way down the frame, putting the next horizontal piece in place. (See pictures for the orders in which the support pieces were added.) Once the first "interior" cross beam was in placed, I tapered the angled support bracket so it would fit at a 30 degree angle to the horizontal support. I then put the second horizontal piece on, fit the angled support piece in place and brazed that in place. Once the angled one was done, I brazed the third horizontal support in place.
Other than 8th grade shop, I had never brazed before and you can tell by looking at the joints. The first few I did are butt ugly. The last ones I did, while not commercial quality, are much better. I used MAPP gas (vs. propane) to get a higher temperature and (hopefully) decrease the time it took. I ended up going through ~1.5 bottles of gas. (I took the torch and a few brazing rods with me on our trip in case I needed to make emergency repairs on the trail. It turned out they weren't needed.)
NOTE: Not being an engineer, I have no idea whether an angled support brace is required or not, but I figured I should add it in order to increase the side-to-side strength of the trailer (since it's only a single wheeled trailer). This is also where the bulk of the weight will be when carrying items.
SUB-NOTE: My dad is an engineer though, and he thought it was pretty good idea.
Step 6: Attaching the Wheel to the Trailer


Recall that I used the front fork of the castoff bike to hold the wheel in place. That was the easy part (I simply removed the wheel from my daughter's bike and attached it to the castoff bike's fork -- although I did have to increase the diameter of the hole in the lawyer lips from the junker bike as they didn't fit around the axle of my daughter's wheel). The hard part was attaching the fork to the trailer itself.
At first I decided I would drill a pair of holes in the fork stem and put two fork supports through the hole. I would then braze the fork supports to both the fork and the trailer. After further consideration, however, I figured three supports was better than two, so that's how I ended up with three sets of holes.
Once the holes were drilled in the fork, I slid the supports through the holes. Before brazing the fork supports onto the frame, I cut the conduit connectors in half and, after filing down the inside so they'd fit, slid them on the supports so one was on each side of the fork. I straightened out the fork (as best I could) and tightened each connector so that (in theory) the fork would remain straight and true with the rest of the trailer.
The fork assembly was now ready to be attached to the rest of the trailer, which was simply a case of brazing each support onto the bottom frame in the desired location. Once the fork assembly was in place, I adjusted the fork again so that the wheel would be perpendicular to the trailer (again, in theory) and then brazed the connectors to the supports. The last step in this process was brazing the fork to the supports. (As it turned out, the wheel wasn't completely perpendicular to the trailer...I guess I only measured once vs. twice.)
NOTE: You should properly prepare surfaces being brazed by cleaning them and removing any paint with a wire brush, a wire brush drill bit or wire wheel (on the bench grinder). This will not only allow the brazing material to adhere better to the metal, it will not release paint toxins into the air.
Step 7: Attaching the Top and Bottom Frames


After attaching the wheel, I then added the top frame to the bottom frame. I used the hacksaw to cut the top frame ends at an angle (to match the angle it would meet the bottom frame) and then used the grinder to taper the ends (again, to increase the contact surface area between the frames).
Once the top frame was sized properly, I brazed the vertical supports to the bottom frame and then, using a clamp, held the top frame to the bottom frame and attached it to the supports as well. The last step in attaching the top frame was brazing the ends to the bottom frame. In order to maintain contact, I used clamps to hold the top frame taut against the bottom frame.
After brazing the frames together, I decided to add a couple more vertical supports so that the top rail was more secured when attaching bungee cords. Measuring is much easier when you have a specific place in mind, so 15 minutes later, they were cut, tapered and brazed into place.
NOTE: I had originally planned on using three vertical supports in the front of the trailer, but took one off after I came up with a better solution for attaching the trailer to the bike. You can see the support that was removed in the pictures.
Step 8: Bike/Trailer Connection (The Hitch)


This was the most difficult part of the project. I scratched my head for a good week or so in trying to figure out how to connect the two before I even started this project. While I had a general idea on how to connect them, I didn't have a specific solution. I knew I would use the rear triangle of a mountain bike as I needed it to fit around the rear tire of my mountain bike.
With that in mind, here's how I made what I've come to call...The Hitch.
I originally settled on using a rear axle used for the B.O.B. Yak and Ibex trailers (what I used as inspiration) and ordered a couple online. This would allow us to switch the trailer between bikes on the trail and share the load. After they arrived, however, I realized this wouldn't be feasible as the dropouts were too small and, even after enlarging them, they still got in the way of the rear derailleur.
I also tried opening up the angle of the arms of the hitch, but that caused a reduction in the length and the wheel ended up rubbing against the frame. It's never good when that happens.
I've since packaged the axles back up and sent them back to the store.
It finally came to me when I realized I could use the braze-ons to connect the two.
As I said earlier, I cut off the rear triangle of the junker bike as close to the seat-tube as possible and used the pipe bender to bend the bottom portion of the frame so that it was similar in length to the top of the frame. A picture is worth a thousand words here. Please see below.
As you may recall, I originally had three vertical supports for the trailer. I came to the realization that it would be easier to attach the hitch to the trailer if I used the center post as the pivot point. (This appears to be similar to how the B.O.B. trailers are connected as well.)
With that in mind, I cut a length of the seat post (from the junker bike) so that it would fit between the top and bottom frames of the trailer. I then cut two notches on either end of the seat post so that it would be cradled by the top and bottom frames.
I brazed the head tube to the hitch and then slid the seat post into the seat tube. I placed the washers on top of the seat post and fit the assembly between the top and bottom frame. (The washers served as to keep debris out of the down tube as well as to take a little pressure off of the joint between the seat post and the top frame.)
Before attaching the hitch to the trailer, I finalized how to attach it to the bike. (I figured it would be easier to do this before it was attached to the trailer as grinding the hitch by itself would be much easier than grinding it with the trailer attached!) I ended up having to cut off one of the dropouts so that it didn't interfere with my derailleur. I also had to drill the braze-on hole a little larger so that the screws I was using could fit into both the hitch and my bike.
After finishing the hitch/bike connection, I attached the hitch to the trailer by tilting it and sliding the seat post so that the notches were in the center of the trailer (a hammer came in handy here). I used a pair of vise-grips to flatten the notches (again, to increase the surface area with which the brazing material can form a bond) so that they were somewhat snug against the top and bottom frames. I then brazed the top and bottom frames to the seat post (allowing the down tube to pivot around the seat post).
NOTE: Make sure you use strong screws to attach the trailer to the bike. The braze-ons aren't very large so having a screw made of zinc or copper (or other soft metal) might cause failure if the stress from the trailer causes them to sheer off. I splurged on some stainless steel screws and they worked like champs.
Step 9: Bottom Braces and Wheel Guard


At this point, I thought I was done, but a quick test ride gave me second thoughts. Since I was going to use the trailer in the immediate future (and away from civilization), I didn't want anything to break.
In looking at the trailer, I determined that there were basically two catastrophic points of failure: the pivot point and the fork. If either of these broke, the trailer would be no good.
I didn't think there was anything else that I could do to reduce the stress at the pivot point, so I focused on the fork. With the fork attached to the bottom frame in two places (via either side of the three fork supports), the stress would be transferred to the bottom frame in only two places. With that in mind, I decided to spread the stress around by adding a couple of supports that (almost) run the length of the trailer.
I cut two supports, tapered one end on each of them and brazed the tapered ends to the front support (the one with the flattened ends). Once this was in place, I brazed each point where the supports intersected.
Satisfied that this would do the trick, I then finished the last piece of the trailer: the wheel guard. This would serve to keep whatever was on the trailer from rubbing against the wheel. I bent it into a semi-circle, tapered the ends and brazed it on the rear-most fork support at an angle.
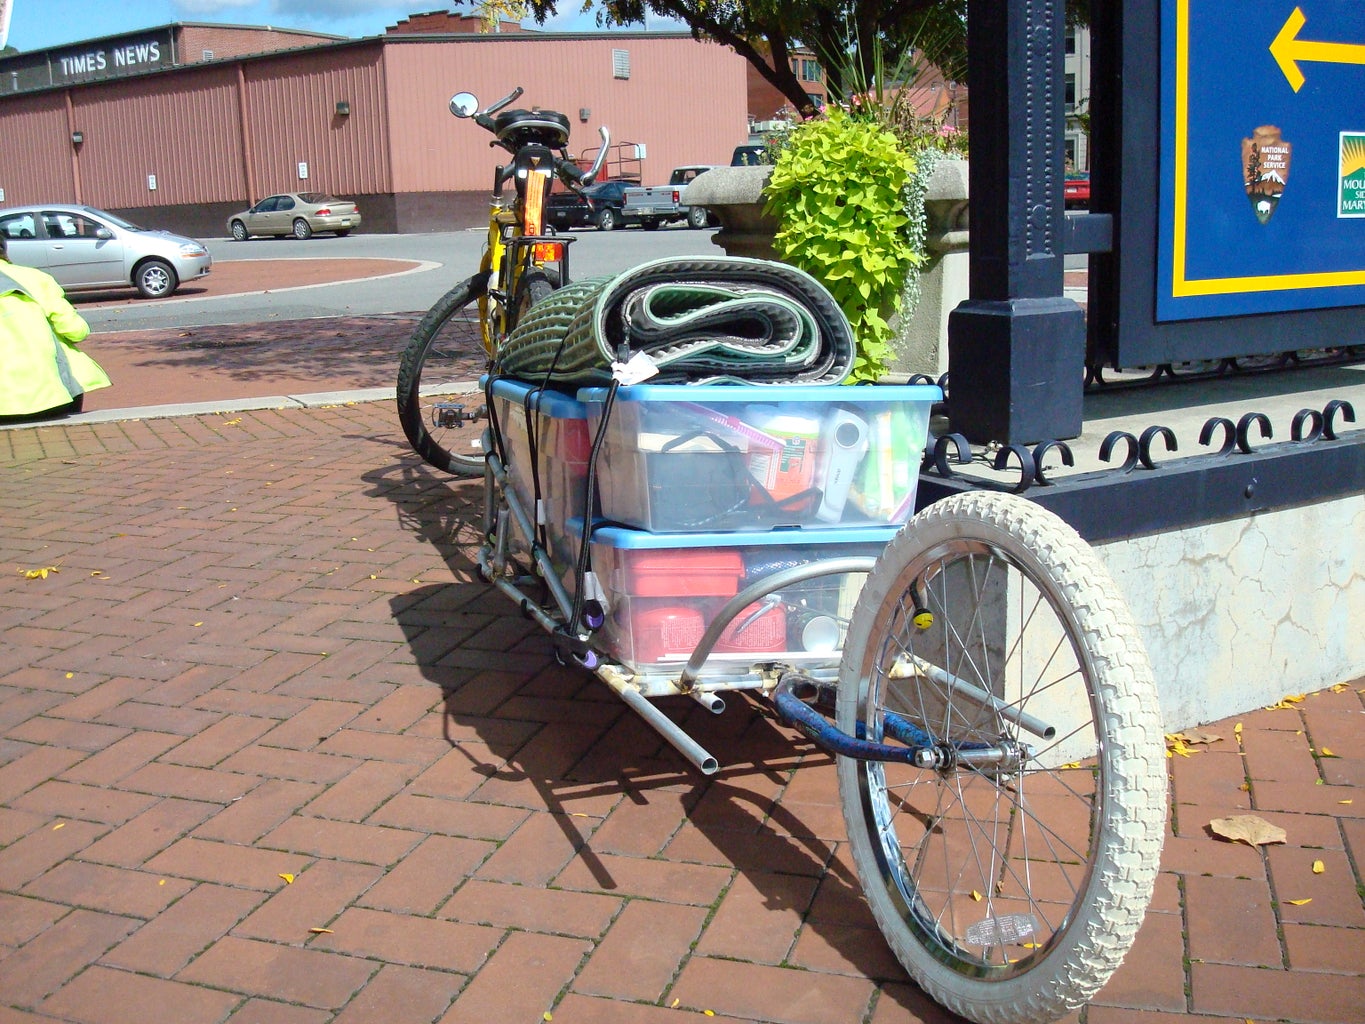
Step 10: Storage Bins and Bungee Cords


The last step in creating the trailer was adding the storage capacity. I used three bins for storage: one 56 quart bin and two 16 quart bins. These fit perfectly between the curve of the front of the frame and the rear wheel guard. I used bungees to hold the bins to the trailer. I was somewhat careful not to place the bungees too near any brazing joints, but by the end of the trip, I didn't care where they went. I was pretty sure it was going to make it regardless of where they were.
What I didn't plan on, but found out on the road, was that a six-pack fit nicely between the front of the storage bin and the front of the trailer. Perfect for picnics!
Step 11: DONE! (and Lessons Learned)

Alright, there you have it...a working trailer!
To test it out, I took the two pavers (40 lbs) on the trail for a 15 minute spin. The trail is unpaved that consists of mulch, crushed rock, washout and hardpack dirt. It was the perfect test for what I'd be experiencing on the C&O Canal towpath. After returning home, I inspected the brazed joints and they seemed to have held up well.
Of course, the real test was day one of the trip. When we pulled into the campsite that first night, I inspected everything and it all looked good. The only problem I encountered on the trail was when the wheel guard bent a little (I still haven't determined exactly how that happened) and started rubbing against the tire. I bent it foward a little bit and that fixed it for the duration of the trip.
The only thing that wasn't done prior to the trip (and still has yet to be done) is paint it. I've decided on painting it yellow and am toying with the idea of adding a cut out of flames for the sidewalls. That would be cool.
Things I would do differently next time:
1. Make sure the fork is straight so the wheel is perpendicular to the ground.
2. Decrease the length of the trailer. Sure, it worked for our trip, but it also allowed us to bring more because the space was there. (I'm not sure how much the gear we took with us weighed, but it was far more than the 40 lbs. the pavers weighed!) It would also (probably) make it easier to handle, especially when going down hills.
3. Adding a way to stand the trailer upright (without having to lean it against something) would be beneficial.
4. While the way I secured it to the bike worked, it wasn't easy to get on and off. I would come up with a quick-release mechanism so that it could switch from one bike to another w/o having to unload the trailer and take the wheel off. (In order to take the screws out of the braze-on, the rear wheel of the bike needed to be moved forward so that the screw wouldn't hit the cogs of the cassette.)
5. When I was stripping the bike, I tossed the sets of bearings in the head tube. I should have kept them as they would've helped decrease the stress at the pivot point by allowing the head tube to move around the seat post in a smoother manner. I'm not sure if it mattered, but it's something to think about in the future.
So....there you have it: a single wheel bike trailer. I hope you enjoy making one as much as I did!


