

Introduction: Sith Holocron


"Sith holocrons were devices used by the Sith that were capable of containing information. Although their function was similar to that of Jedi holocrons, they usually were pyramids or tetrahedrons, whilst the Jedi holocrons were of cuboid shape, and were accessible only to those who were able to control the dark side of the Force. The Jedi Order considered these to be some of the most dangerous artifacts in the galaxy". (Obtained from http://starwars.wikia.com/wiki/Sith_holocron)
Sith Holocrons seem to be all pyramid shaped with gold accents and ominous red glow, a perfect contrast to the cube shaped Jedir Holocron with a calming blue glow.
In this instructable I will show you how to build your very own Holocron using Fusion 360, 3D Printing and a plain old 2D Printer.
Step 1: Creating the Pyramid


Browsing DeviantArt I came across this template http://ajb3art.deviantart.com/art/Sith-Holocron-T... This image was perfect to use as a reference, so after obtaining further reference images it was time to start modeling.
I imported the template into Illustrator but you could do the same with Inkscape or even withFusion360, and traced the main shape of the holocron. I was planning a roughly 100mm holocron, so the interior "electronics" were just too thin to be successfully printed, so I took a different approach, printing a transparency with the "eletronics" that would then be glued to the pyramid.
After solving that issue, another one popped out, the writing in the holocron, I knew there was a Aurabesh font available, but it seemed different somehow so after a bit of research I found out that the writing was in fact Aurabesh but inverted, in fact what it says is "In Umbris Potestas Est" wich is latin for "In The Shadows, There Is Power". So I grabbed the fonts available at: http://boards.theforce.net/threads/updated-new-aurebesh-font.50009464/ installed them and placed the text at the correct place.
I then started the actual modeling, by importing the svg I exported from Illustrator in to Fusion360. The next step was extruding the outer triangle two times, rotating one of the shapes 90 degrees and then combining both shapes intersecting them, this then left me with the basic pyramid shape.
Step 2: Gold Accents


At this point I came across a problem, how to project the the drawing I had into the pyramid? Fusion 360 has a project tool and it does work, but a couple of letters weren't being project correctly and I couldn't get them to close, something that I would need for the next step, so I used a different technique.
I extruded the design and using that extrusion I cut into a copy of the basic pyramid. I then obtained the countour that I needed, so I proceded by extruding that sketch out and with that I had the gold accents for the pyramid almost completed.
Step 3: Flat Bottom


After the extruding, cutting and sketching I was left with two bodys that weren't flat on the surface, so I proceded by cutting both until they were perfectly flat.
Step 4: Base


I now needed a base were the pyramid would sit, so I placed a construction plane at midpoint and traced the contour of the model. With this sketch as a foundation I drew the interior shape of the base, this was essentially a small lip that would align the pyramid correctly.
Once again I extruded the sketch two times, rotated one of the shapes and intersected both, leaving me the interior shape that I was looking for.
Step 5: Base Continued


Continuing from the previous step, I traced the contour of the pyramid with the gold accent, using the top view, this gave me the outer shape for the base, so I extruded that and combined it with the interior lip I had designed, finally I extruded a bit into the interior shape as it was a bit too big.
The modeling phase was finished, I had the pyramid, the gold accent and the base ready for printing. Do notice that I just modeled one of the gold accents, all other four would be exactly equal so no need to waste time, I just need to print 4 copies of the one that I created.
Step 6: Printing


It was printing time, so I started with the 2D Printing. Using Photohop I edited the template I had found, by removing all parts that I had recreated in 3D and inverting the colors so that the "electronics" were in black. I printed four copies of this triangle in a transparency, you can find this type of transparency online or in a office supplies store, just beware that you need a transparency for the type of printer that you are using, in my case it was a laser printer, so I bought transparencies for use with laser printers, if yours is a inject printer you need a transparency for that type of printer.
For the 3D printing part, you need to print one base, four gold accents and a pyramid. I printed all parts in pla, with 220c on the nozzle, 0.2mm layer height and 20% infill. The pyramid however was special, as I didn't have translucent red pla or petg, I opted for printing the pyramid in spiral/vase mode, this mode allows you to print only the outer shape with zero infill and one continuous strand of plastic, so I setup my printer to print using vase mode with 0.3mm layer height, 220c on the nozzle an 0 solid bottom surfaces. This gave a pyramid shape that was translucent enough that I could see the electronics through it without any kind of interior light.
Next step was gluing, so I glued the gold accents using a couple of superglue drops onto the sides of the pyramid and then cut the shapes from the transparency and glued them to the interior (I used white wood glue, by applying a thin coat on the transparency and then placing it on the pyramid) using the gold accents as a guide. To illustrate the look you can achieve I opted for gluing only two of the "electronics".
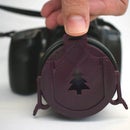
Step 7: Final Look


So the Holocron was now finished. I simply added a led tea-light and placed it on the base, to achieve the classic Sith Holocron look. There's enough space in the Holocron for you to place bigger and more intense lights, or to put real electronics, for instance a arduino and speakers, to make an actually working holocron.


Runner Up in the
Sci-Fi Contest 2016

Participated in the
Make it Glow Contest 2016

Participated in the
Epilog Contest 8


