

Introduction: Slice Up Your Face (Again)


This one is related to https://www.instructables.com/id/Cutting-Out-Your-Face/
The idea is you have a picture of a face (or any image) and you want to cut it into metal or wood using a CNC tool or paint it on something or carve it into something.
You need some way to turn this really complex picture into a collection of simple shapes without losing the ESSENCE of it.
This time, I want to demonstrate a trick that involves GIMP. GIMP is a free paint program (GNU Image Manipulation Program). Find it here: http://www.gimp.org/ GIMP has a filter that I couldn't find in Photoshop that's kind of cheesy in just the way I need it be.
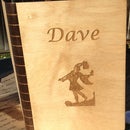
This time, I'm going to actually cut it out of something just to demonstrate that you can actually do that. The first image on this intro is a piece of 14"x14" matte board laser cut with the image described and then held up against a blue wall.
I made it at Techshop! www.techshop.ws
Step 1: Open Your Image in GIMP

You can download GIMP from www.gimp.org; it's free.
Run GIMP and then open your original photo in it.
Step 2: Focus on the Part You Want

In GIMP, cut out everything but the face (or whatever the important part in your picture might be) by selecting the part you want with the lasso tool, then do select->invert and then press delete.
This is an artistic choice, allowing you to focus on the most important part of your picture. Mostly though it's practical; if you do this now, you can focus all your work on something that fits on the screen.
Use image->autocrop to select just the image and cut out the white space. Then use image->scale image to make it larger -- 2000 in it's smallest dimension should be good.
Step 3: Grayscale

Now use image->mode->grayscale to remove all the color.
It's still a breathtakingly beautiful and complicated image.
Step 4: Brighten Your Day -- and Your Image

Now you need to brighten your image. Use colors->brightness-contrast... to call up a dialog box. Enter a number (or slide the slider) for brightness. You want it to look kind of faded or washed out; it probably isn't bad to go "too far".
For this image I used 70. An image with a lot of white in it should get less; a darker image more. The key is that the dark parts should be dark gray and the light parts almost white.
Step 5: Slice Your Image

Use filters->distorts->newsprint... to bring up the newsprint dialog box. Set cell size to 40, set "spot function" to "line". You might, depending on preferences and artistic license, set the angle to something other than 45 degrees -- I set it to -45 because I thought it looked a little better. Now click "OK".
Now go to the bottom of the window and change the zoom (it has a percentage). Click on the little pulldown and select 12.5%. Does it look like your image?
Now select 200%. Are there any parts where the white lines are either completely cut off or very narrow?
If you can't recognize your image then you need to do ctrl-z (undo) and try again with a lower number.
If you can recognize your image but the black lines touch (or come very close) go back and try again with a higher number.
If you have both problems go back to the brightness and brighten it more.
You may have to play around a bit to get this to work the way you want it.
Step 6: Maybe Dots Are Better


There is another way to do this using the same tool: "round". Round will probably look better but it may take longer to cut. You might be able to have the image be darker and have it still work.
To use round, change "spot function" to "round". You can probably change the cell size to a smaller number; I used 30.
Once again, you need to make sure that there is enough white space for your material to hold together.
An interesting option here is to print this pattern on to a piece of paper, lay it over your material and then drill out all the black stuff with an ordinary drill. Since I have access to techshop, I can use their CNC machines to save myself that trouble.
Step 7: Save Your Work

Use Export (ctrl-E) to export this file to a jpg. Then run coreldraw.
Select file->new to get a new document and then import your image into coreldraw using file->import.
Step 8: Turn Bitmaps Into Vectors


Most CNC tools need a vector, not a bitmap.
In Coreldraw, right click on the image, select "outline trace"->detailed logo. Make sure "delete original image" and "remove background" are checked.
Right click on the object and select properties. In the properties panel (to the right) select the pen tab and set with to "hairline". To see what just the lines look like, go to the bucket tab and select the "X" under "fill".
The 2nd and 3rd images shows the tool path and the cut away respectively. This is instructive because the tool path image doesn't look like anything but it will produce a result very much like the other one which looks like the original in some strange way.
Step 9: Same Again But With Dots


Ok, again with the dots. You get this exactly like the lines but just use the dots image you created in GImp.
Step 10: Ready, Set, Cut

I'm going to cut this on the laser cutter because I think the lines are too close together for the plasma cutter.
Export it as a coreldraw file, put it on a thumb drive and then use the computer connect to the laser printer to "print it" .

Participated in the
Epilog Challenge V


