

Introduction: Small Pattern Welded "Damascus" Steel Kife (With NO Power Hammer)


I've been into blacksmithing for a little under a year now, and now that I've finally managed to make and acquire adequate tools, I've been able to really start making things (my initial setup was using a small sledge hammer for an anvil and beating on it with a smaller hammer). This project is an Instructable on how to make a small, forged–not stock removal, knife with only a homemade forge, anvil, a hammer, and determination. I am by no means a professional, and this is definitely not the only way to achieve pattern-welded steel, but it is how I managed it.
Modern damascus steel is a name for what is also known as pattern welded steel, which is the metal equivalent of folding different colors of clay together to get swirly patterns. When placed in an etching compound, the dissimilar metals will etch at different rates, bringing out the beautiful contrast.The original Damascus steel was made with a different and very specific process (though similar-looking, which is why the modern definition arose) that precious few know how to achieve, and gave Damascus the reputation of near magically strong properties. The reason for this is similar to Katanas/Samurai swords–the process allowed for a much more homogenous and therefore controlled steel than other methods allowed, making it possible to turn fairly crappy and varying grades of high/low carbon steel into a controlled substance. This yielded a much more effective blade.
**This knife is dangerous, don't get stab-happy**
Step 1: Materials and Tools


Materials:
- Two or more steels (preferably high carbon) which will contrast each other. I used 1095, a very high carbon steel, and 15n20, a steel with a lot of nickel in it, which will offer bright and shiny contrast when etched.
- Flux (Borax, can be bought at the grocery store. Traditional "20 mule team Borax" will be perfectly fine.
- Rebar, long scrap rod (to be welded onto the billet as a handle)
- Wood of choice for handle
- Epoxy (5 minute is fine)
- Brass Pins
- Finishing medium for handle, I used Linseed oil
- Quenching oil (vegetable oil)
- Ferric Chloride
Tools:
- Anvil (Preferably a "proper" steel anvil, though with enough persistence there are many other objects you could use if you don't have access to one. Things that can be used are: RR Track pieces, Big hammers, Random metal chunks, crappy "anvils" from Harbor freight, a big hard rock, really any hard and flat surface. Remember, we started out by hitting things with rocks on top of bigger rocks.)
- Hammer (I used a 3 pound cross-pein)
- Tongs
- Welder (optional, but helps to hold the billet together and onto the handle for the initial weld. If no welder, wrap the pieces tightly with wire)
- Forge *Capable of reaching forge-welding temperatures* – this is very important in order to successfully fuse the layers together. I'll explain more about my forge later.
- Belt grinder/files and a ton of patience
- Oven/method of tempering
- Drill/Drill press
- Vise (very helpful)
Step 2: Assemble the Billet


Cut your steels into the desired dimensions. I chose about 1/2" x 3"; the bigger the billet, the harder it is to form with a hammer. Be sure to remove all oxidation and scale off the sides of the metal so a clean weld can be made. Alternately stack the layers, I used 7–3 15n20 and 4 1095.
Then, align them all and tack weld the layers together (Don't look closely at my welds) and weld a temporary handle on so that it can be moved in and out of the forge easier. Not a big deal, especially after the first weld, tongs can just be used. I accidentally hammered mine off anyway.
Step 3: Forge the First Weld.


About my forge: My forge is homemade. It is made from an EMPTY (bought new for extra precaution) propane tank, lined with 2" Kaowool and a layer of refractory cement. It is heated by a Ron-Reil style burner, for which there is an excellent instructable already existing. This forge is fairly small and has no problem getting to the proper temperatures.
Heat up the billet to a low cherry-red. It doesn't need to be super hot here. Sprinkle the borax on and let it melt and seep between the layers. What this does is it dissolves scale, prevents oxidation, and keeps oxygen from contacting the metal. This will all help achieve a clean weld.
Replace the billet in the forge and repeat this process a couple times, being sure to brush scale off when needed. Now heat the billet up to forge-welding temperature. I'm not sure of the exact temperature, but I believe it is around 23-2400 degrees Fahrenheit. It will be a very bright orange-yellow, even in moderate to bright light. Be sure to have your hammer and tongs ready along with a clear workspace, as you can't waste any time. Quickly move to the anvil, and with LIGHT blows, gently hammer evenly over the whole billet to set the initial weld. Replace in the forge and heat it up to the same temperature again, then continue welding it with moderate to hard blows.
Now it's time to draw it out (stretch it) so that it can be folded.
Step 4: Fold That Billet


Now it's time to increase the layer-count. Hammer the billet out into roughly twice the original length, making sure to hammer all sides so you lengthen it, not just spread it out. Measure halfway and cut it with a hot-cut hardy, chisel, or any other method you have about 3/4 to 4/5 of the way through. Then bend it backwards with the hammer over the edge of the anvil, flip it over and gently tap it all the way onto itself, making sure to turn it on its side to align it.
Now repeat the exact process of the first forge-weld. Flux, heat, set, heat, weld, forge. Repeat this step until you have your desired layer count. I folded it 4 times to achieve a layer count of 112. (If you want to do more, go ahead, it will have a tighter pattern. If you want to calculate the number of layers for any given number of folds, use your initial layer count (7) times 2^number of folds. 7 x 2^4 = 112)
I then put it in the vise at forge-welding temperatures and gave it a nice twist, which I then forged back into a rectangular billet. Before twisting, however, knock off the corners to achieve an octagonal to circular shape, because twisting and forging back into itself could create inclusions and impurities if it folds over onto itself while not at welding temperature.
Once finished welding (I did it several times along the way, too) cool it off and grind one end slightly to make sure a homogenous billet has been achieved. When forging, especially early on, it is important to keep the temperature high and be carful, otherwise it is easy to tear the layers apart (Called delaminating–not good).
Step 5: Concept and Rough-forging the Shape


Plan out the profile of your knife and then rough-forge in the shape. The more accurate you can be while forging the profile and bevels, the less time you'll spend at the grinder (or files, shudder...). There are plenty of tutorials by much better blacksmiths than I, so I won't really get into forging techniques. The easiest thing to remember is it moves exactly like a dense clay when hot, you push it into the direction you wish.
Step 6: Grind the Profile, Start Filing


Fine-tune the profile with the grinder and files. Grab a big drink, you'll likely be there for a while filing unless you have a very nice grinder.
Step 7: File Some More, Start Forgetting Who You Are and Pondering Life Itself. . .


Step 8: FINALLY, Done With the Profile.


Once filing is done, sand it to a fairly high grit, I took it to about 400. File the edge close to, but not all the way sharp. You want a little bit of material on the edge so it doesn't warp in heat-treating. Now drill a couple holes for the pins and trace it to make patterns for the handle.
Step 9: The Scary Part


Heat Treating.
This is the part that will either make or break your blade. It's very important to focus and be very careful or you could end up warping or shattering your blade. The process I used is not the most precise way of heat-treating, but it's what I was capable of with my tools and it was the best oil I could get.
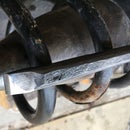
Before the heat treat, normalize the blade. This releases stresses built up during forging and twisting and will decrease the likelihood of warping during the quench. To do this, heat the blade up to above its critical temperature (where it isn't magnetic anymore, it's helpful to keep a large magnet around), then let it air cool. Repeat this 3-5 times, I did 5. This step also helps you practice removing the blade from the forge, because there can be no hesitation when moving to the quench. These are the pictures of me dangling the knife. This part is also cool, because as oxidation builds up it will start to reveal the pattern of the steel.
The Quench: Heat it up one more time to above its critical temperature, then quickly move and quench it, edge-first, in warm vegetable oil (if similar steel to mine). To heat the oil, simply heat up a piece of scrap metal and toss it into the oil. I used a RR spike. Gently move it around so you get an even quench. If you're using a high carbon steel, DO NOT quench it in water, as this could crack your blade–water cools it off much too quickly for high-carbon steels.
Now, treat it like a piece of glass, because if it was hardened correctly it is so hard that it could shatter if you drop it.
Time for tempering.
Step 10: Tempering

Tempering is the process of drawing out some hardness to increase the durability and strength of the blade. This is achieved by heating the blade to specific controlled temperatures. I tempered mine in the oven for 1 and a half hours at 400 Degrees Fahrenheit. A lot like baking, you cook it until it's "done."
Step 11: Etch the Blade

I apologize for the lack of pictures of this and the following steps, but the process here is fairly simple. Dilute the Ferric Chloride as specified on the container and then marinade the blade in it for the length of time it recommends. For me it was 3 parts water to 1 part Ferric Chloride for 3-5 minutes. This is the really exciting part, the result looks like something Batman would carry.
Step 12: Handle and Hone the Edge


There are plenty of instructions and methods on how to handle a knife as well as sharpen it, so I won't go into much detail here. I used two Cherry scales adhered with 5 minute epoxy and held in place with two brass pins. Sanded to 400 grit, finished with linseed oil.
I don't have a very robust sharpening process/setup, so I mainly used a basic oil stone.
Step 13: Time to Pat Yourself on the Back, It's Finally Finished.


My finished knife was about 6 inches long. It's quite fun to show people, most have no idea how that pretty swirling pattern got there.
Thank you for reading, I hope this helps anybody it can!
If you enjoyed this and want to see more of my work (including Damascus!) make sure to check out my instagram at www.instagram.com/AntonsenForge :)

First Prize in the
Epilog Contest VII

Second Prize in the
Survival Contest


