

Introduction: Small Pet - Quick Kennel


With a few lengths of CPVC pipe and some chicken-wire, you can build a fenced area for your small pet. It can be placed in the garage, the basement, the yard, or anywhere else you may need a doggie-playpen. It can also be disassembled and stored if you only glue part of the ends and clip the ties.
I would not recommend this project for any pet that digs under fences, jumps over fences, chews aggressively, or is big enough to just knock the kennel down. This is for small timid animals that would be too scared of the fencing to try and escape.
Step 1: Cut Your Pipe

You will need eight pieces of pipe for the horizontal sides of the frame and 4 vertical side bars. I used 3/4-inch CPVC for this project. I purchased eight 10-foot sections and cut 2-feet off of each one. A hack-saw works just fine for cutting the pipe.
Cut eight 1-inch pieces from one of the short sections to use for the corner joints.
Step 2: Clean Pipe Edges

Clean the edges of the pipe you cut using a file, sandpaper, or grinding wheel so they will fit into the end joints.
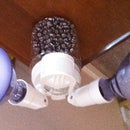
Step 3: Glue End Joints


The end joints are made from a "T", a 1-inch cutoff, and an elbow. They are all glued together, but they are not all the same. The picture shows all the end joints when finished.
Step 4: End Joint Assembly


First glue the 1-inch pieces into one end of the "T" fittings.
Step 5: Joint Elbows

Then glue the joint elbows on as shown in step 3 so you make all the corners for the top and bottom of the kennel. Make sure the open ends are at right angles to each other. Use a block of wood or a t-square for this. You must be quick because the PVC glue dries very fast.
Step 6: Glue Sides

Once all the end joints are glued, the sides can be glued. If you only glue two of the sides, then the kennel can be disassembled and stored when not in use.
Step 7: Assemble the Rest of the Frame

The rest of the frame can now be assembled (with or without glue). The picture shows one complete corner.
Step 8: Attach the Chicken-wire to the Frame


Once the frame is complete, unroll the chicken-wire (or poultry-netting as it is now called) and attach it to the frame with plastic wire ties.
Step 9: Lots of Ties

Use as many wire ties as needed to keep from having any open areas for the animal to escape. I put a tie about every foot down the side and extra at each corner. clip the end of the ties after so there's nothing to chew on.
Step 10: That's It !

Your quick-kennel is now complete. If you feel the need, add some bricks on the corners, or pound some posts in the ground to tie the structure down.


