

Introduction: Smart LED Window


A fake window, powered by LED strip lights, controlled by a Raspberry Pi
Like most basements, mine was dark with only a couple tiny windows letting in almost no light. In order to brighten it up and make it feel a little less claustrophobic, I created a fake window to let in some natural-looking light.
The window is controllable via web interface. The LED strip brightness can be manually, or automatically set according to sunset/sunrise times and the weather pulled from the Yahoo! API. If it's sunny, the window is bright, if it's cloudy, the window is more dim. It fades on at sunrise, and fades off at sunset.
Materials Needed
- 2 - 8ft trim boards for frame
- 2 - 8ft 1x4 boards for sides and sill for frame
- 2 - 8ft 1x3 boards for sides for frame
- Old sheet, or canvas (to cover the back of the frame)
- Tin foil (to cover the canvas)
- Spray glue
- Short nails, or staples for staple gun
- 1.5in screws
- Window shade
- 2 - 16ft LED strip lights, daylight white (Amazon)
- 12 volt power supply for lights (Amazon)
- Extra wire (2-3 ft.)
- 2 jumper wires (male to female) for Raspberry Pi GPIO
- Raspberry Pi (vers. 2 or newer)
- MOSFET for controlling LEDs (Arrow)
Tools Needed
- Saw (handsaw or table saw)
- Screwdriver or drill
- Staple gun
- Soldering Iron
Step 1: Build the Window Frame

Determine the exact dimensions needed for the window. My window shade dimensions were 31x44 inches, so that was my starting point. I used the 1x4 board on the two long sides, overlapping the shade by 2 inches. This will allow the shade to move up and down while keeping it approx. 1 inch away from the LEDs to provides better diffusion of the light. If the shade is too close to the LEDs, you'll be able to see the LEDs through the shade.
Measure and cut the 1x2 board, and the trim board to match the length of the 1x4 boards. Then affix these boards to line up with the outside of the 1x4 board.
Now we'll need to measure and cut the 1x3 boards for the top and bottom of the frame. The top should be same width as the frame, and the bottom (window sill) should be about one inch longer on either side. Attach these with screws.
Last, measure and cut a trim piece which will go under the sill. This is typically the same width as the window (not the sill).
Step 2: Attach the Canvas Backing and Tin Foil
With the frame created take the canvas (or sheet) and use a staple gun to staple and cover the BACK of the frame. Stretch it relatively tight before stapling. Put a staple every 3 or 4 inches. When complete, cut off any excess material.
Now, using the spray glue, spray the canvas from the FRONT side and then cover with tin foil. Make sure the shiny side is pointing out. Cut off any excess tinfoil when done. This will help more of the light from the LEDs to be reflected out, and create a nice even diffusion of the light.
Step 3: Attach and Wire the LED Strip Lights, Raspberry Pi and MOSFET
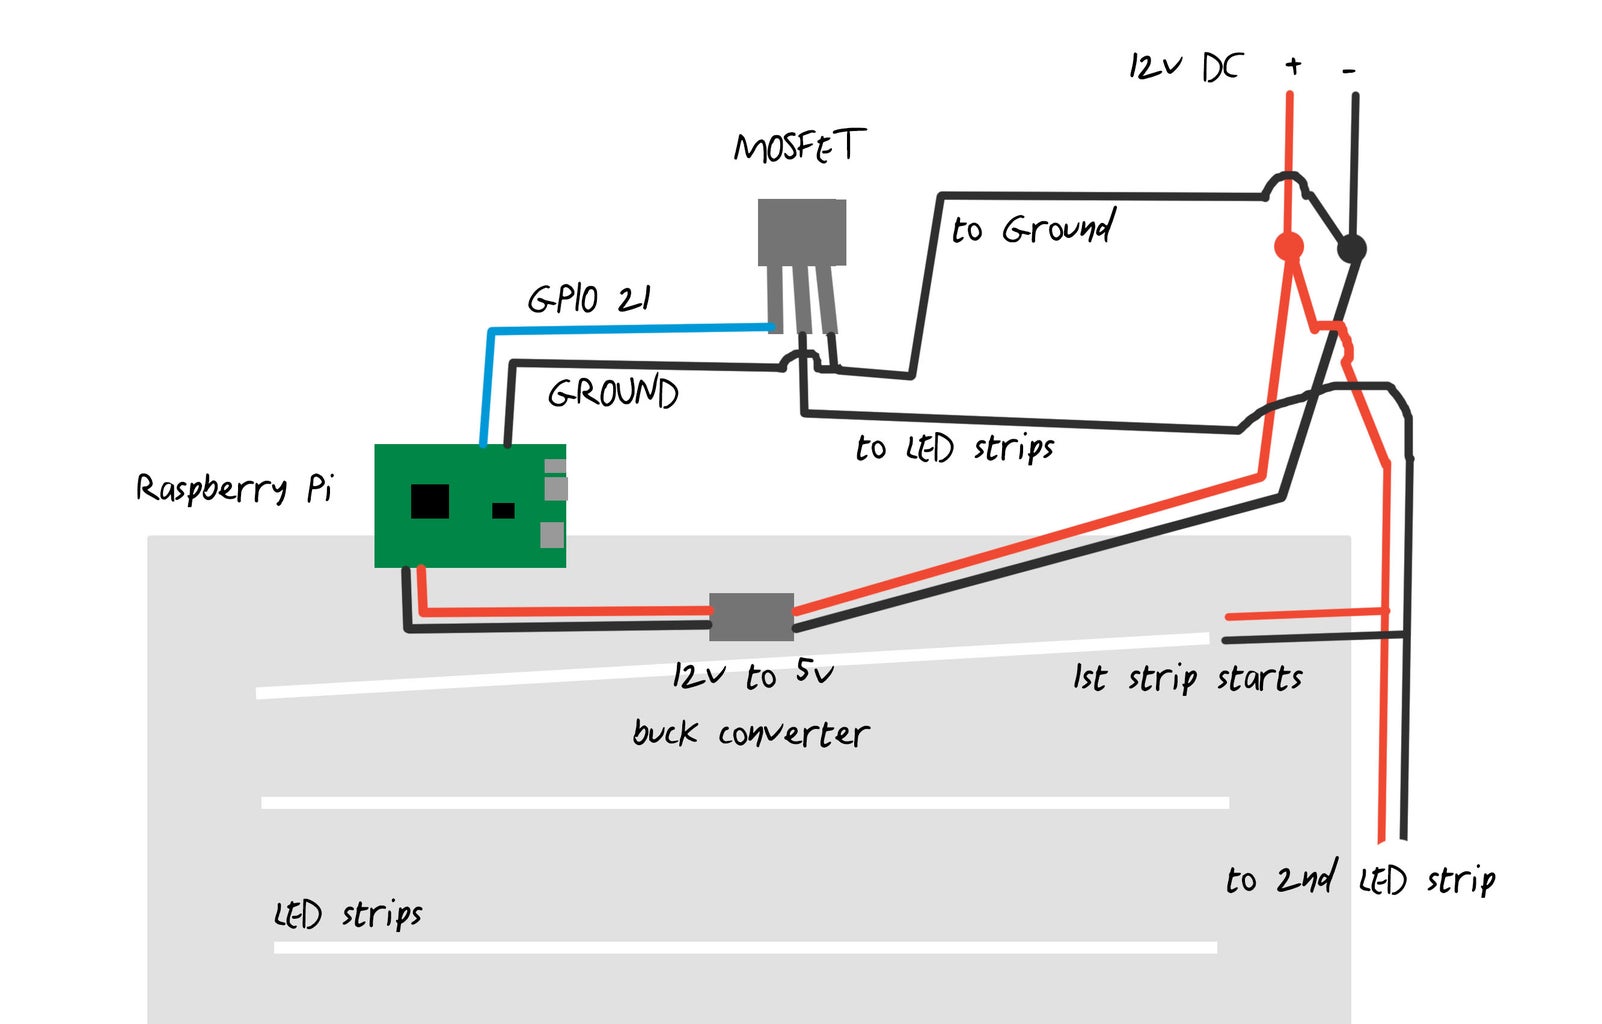


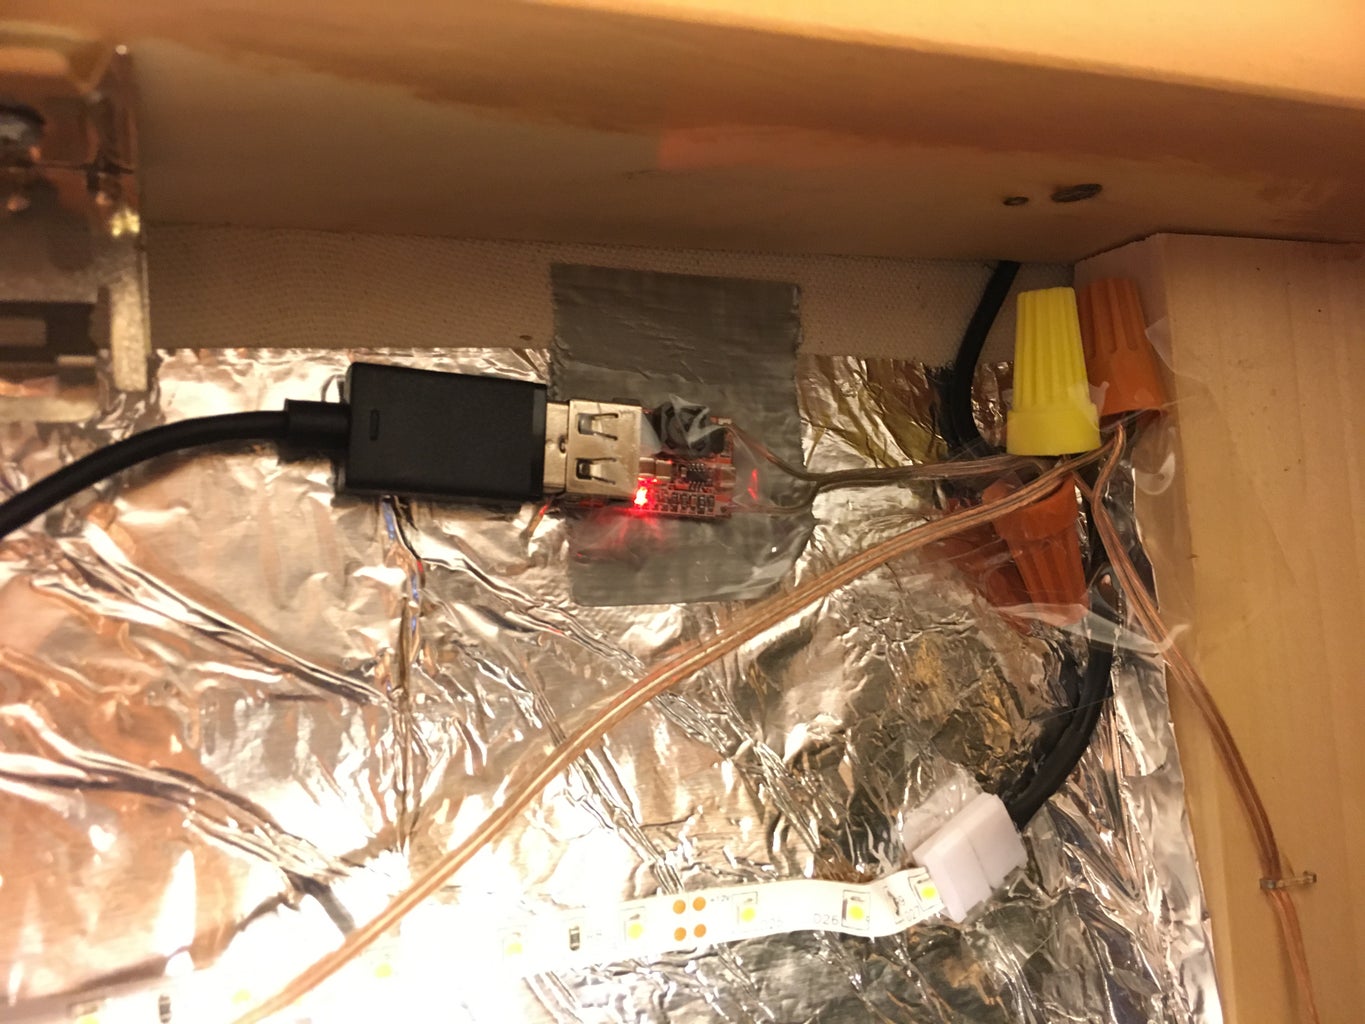
Make sure the power is UNPLUGGED while wiring everything up! We don't want to short out the power supply, or kill the Raspberry Pi while setting everything up.ds
We need to attach the LED strip lights to the canvas/tinfoil backing. For the size window I was creating, rows of about 3-4 inches apart worked perfect. Start in the upper right, and work your way down, peeling the adhesive backing off the strips as you go. Once the first strip is attached, begin attaching the second strip where the first strip left off. DON'T connect the strips to each other. The second strip will be VERY dim by the end if you do this. We'll want to wire them up in parallel instead.
Each strip should come with a plastic connector wired to a female plug. Cut off the female plug, and strip and expose the black and red wires. Connect the plastic connector end to the strip lights. Then connect the wires as shown in the diagram.
Using the MOSFET wired to the Raspberry Pi, we can control the lights. See the wiring diagram above. I used GPIO 21, and the ground pin right next to it for this. Any GPIO and ground will work. I got the MOSFET from Arrow, about $0.50 (link).
To power the Raspberry Pi, I used a 12v to 5v DC Buck Converter (Amazon). This is not required, any Raspberry Pi power supply can be used. But using the Buck converter, I can power the whole setup from the single LED Strip power supply.
Step 4: Install and Configure Software on the Raspberry Pi

I'm assuming the Raspberry Pi is at least version 2 or newer, with the latest Raspbian/Pixel OS installed, and Wifi already configured. Open a terminal, or SSH in for the following steps.
Install the web server
I used Lighttpd for the web server, and a combination of Python and PHP for functionality.
sudo apt-get install lighttpd php5 php5-common php5-cgi
Next, set some privileges on the web directories:
sudo chown -R www-data:www-data /var/www
sudo chmod -R 775 /var/www
sudo usermod -a -G www-data pi
Now enable PHP
sudo lighty-enable-mod fastcgi-php
And restart the server
sudo /etc/init.d/lighttpd force-reload
Grab the code from Github
I've published all the code for the web interface, and auto-brightness script on Github. Download the files. Place the html directory in /var/www/, and put window.py in /home/pi/
Add some cron jobs
We need the pigpiod program to start on boot, and also we want our "auto-brightness" script to run every 10 minutes. Lets add these to the root cron:
sudo crontab -e
And then add the following:
# Auto adjust the window brightness
*/10 * * * * /home/pi/window.py
# Start Pi GPIO Daemon on reboot
@reboot /usr/bin/pigpiod
Reboot and Test
Reboot the Pi. When it comes back up the web interface should be accessible on your computer or smartphone by going to http://IP_ADDR in a browser.
Step 5: Enjoy

Enjoy your window, and the extra light!

First Prize in the
IoT Builders Contest

Runner Up in the
Circuits Contest 2016

First Prize in the
Dorm Hacks Contest 2016


