

Introduction: Arduino Soil Moisture Sensor


***Edit***
Please use resistors when connecting the LEDs to your Arduino!
This Instructable is old. I have not had the time to update any of the information. You will find a lot of GREAT information in the comments please read them after reading the instructions.
Intro
In this instructable I will show you how to connect the an Arduino Nano and a moisture sensor. The information will then be displayed with 5 LEDs. This is very easy build and I would class it as a beginner project.
Step 1: Things You Will Need

1 - Breadboard (http://www.ebay.com/itm/171705651308?ssPageName=ST...
5 - LEDs
5 - 1k resistors
1 - Soil Moisture sensor kit (http://www.ebay.com/itm/171705525756?ssPageName=ST...
1 - Arduino Nano (http://www.ebay.com/itm/171728876932?ssPageName=ST...
~8 - Assortment of jumpers.
Step 2: Arduino


The Code:
<p>/* </p><p>Innovativetom.com
Flower Pot Soil Mosture Sensor</p><p>A0 - Soil Mosture Sensor
D2:D6 - LEDS 1,2,3,4,5</p><p>LED1 - Green
LED2 - Green
LED3 - Green
LED4 - YELLOW
LED5 - RED</p><p>Connect the Soil Mosture Sensor to anolog input pin 0,
and your 5 led to digital out 2-6</p><p>*/
int led1 = 2;
int led2 = 3;
int led3 = 4;
int led4 = 5;
int led5 = 6;</p><p>int mostureSensor = 0;</p><p>void setup() {
  // Serial Begin so we can see the data from the mosture sensor in our serial input window.
  Serial.begin(9600);
  // setting the led pins to outputs
  pinMode(led1, OUTPUT);
  pinMode(led2, OUTPUT);
  pinMode(led3, OUTPUT);
  pinMode(led4, OUTPUT);
  pinMode(led5, OUTPUT);
}</p><p>// the loop routine runs over and over again forever:
void loop() {
  // read the input on analog pin 0:
  int sensorValue = analogRead(mostureSensor);
  // print out the value you read:</p><p>  Serial.println(sensorValue);

 if (sensorValue >= 820)
 {
 digitalWrite(led1, HIGH);
 digitalWrite(led2, HIGH);
 digitalWrite(led3, HIGH);
 digitalWrite(led4, HIGH);
 digitalWrite(led5, LOW);
}
else if (sensorValue >= 615  && sensorValue < 820)
 {
 digitalWrite(led1, HIGH);
 digitalWrite(led2, HIGH);
 digitalWrite(led3, HIGH);
 digitalWrite(led4, LOW);
 digitalWrite(led5, LOW);
}
else if (sensorValue >= 410 && sensorValue < 615)
 {
 digitalWrite(led1, HIGH);
 digitalWrite(led2, HIGH);
 digitalWrite(led3, LOW);
 digitalWrite(led4, LOW);
 digitalWrite(led5, LOW);
}
else if (sensorValue >= 250 && sensorValue < 410)
 {
 digitalWrite(led1, HIGH);
 digitalWrite(led2, LOW);
 digitalWrite(led3, LOW);
 digitalWrite(led4, LOW);
 digitalWrite(led5, LOW);
}
else if (sensorValue >= 0 && sensorValue < 250)
 {
 digitalWrite(led1, LOW);
 digitalWrite(led2, LOW);
 digitalWrite(led3, LOW);
 digitalWrite(led4, LOW);
 digitalWrite(led5, LOW);
}
  delay(1000);        // delay 1 second between reads
}</p>
Step 3: LEDs


***Edit***
Please use resistors when connecting the LEDs to your Arduino!
***Edit***
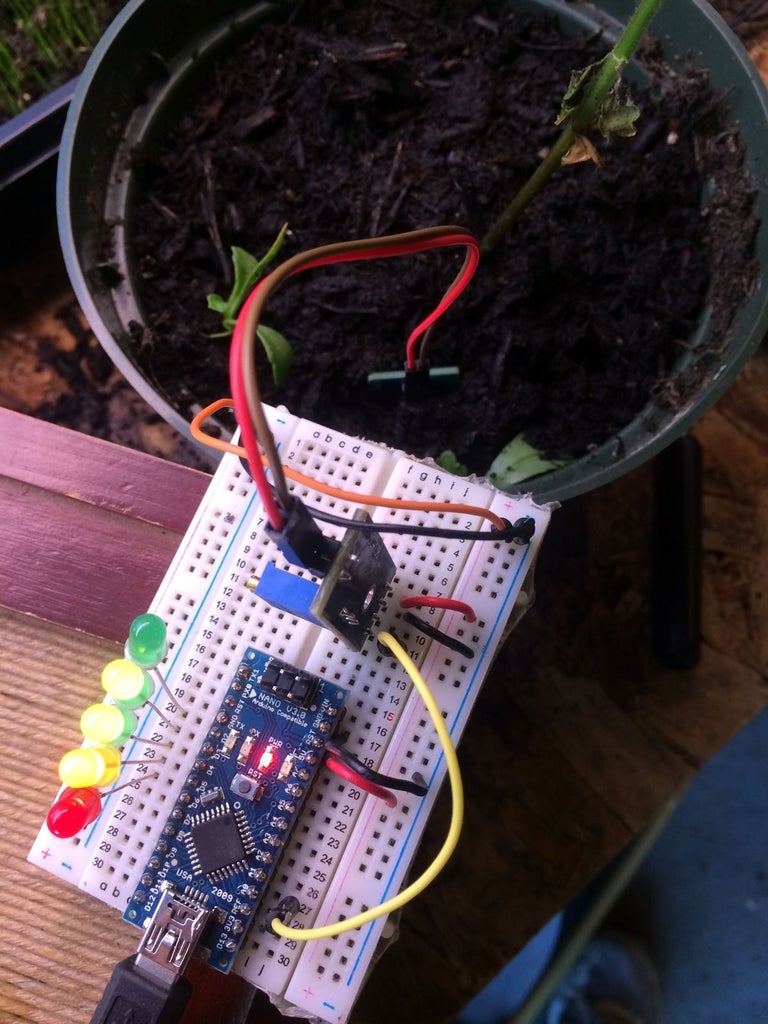
Connecting the LEDs;
Digital Pin 2 Green.
Digital Pin 3 Green.
Digital Pin 4 Green.
Digital Pin 5 Yellow.
Digital Pin 6 Red.
Connect the cathode or (-) lead from the LED to the Arduino.
**Here you must put a 1k resistor between anode (+) and the positive rail.
Connect the anode or (+) lead from the LED to the + positive rail of the beadboard. **
Step 4: Wiring


In this step we connect the power and ground rails.
From the arduino ground pin connect a short jumper to the blue rail on the breadboard.
From the arduino 5v Pin we connect a short jumper to the red rail on the breadboard.
Bond both rails together.
Step 5: The Moisture Sensor


The moisture has very well defined pin out.
Connect the ground to the ground rail, power to the power rail.
Connect the "AC" Labeled pin on the moisture sensor to analog input 0 pin on the Arduino.
*note, the moisture sensor I have has two outs one labeled "AC" and one labeled "DC". The "AC", is a serial signal 0-5 volts that when fully dry it outputs 5 volts, when fully wet, 0 volts. The "DC", is configured with the trim pot and is brought high when the moisture level reaches a desired point.
Step 6: Your Done.


Participated in the
Sensors Contest


