

Introduction: Squirrel Proof Bird Feeder


Ever since purchasing my first tube bird feeder I've found myself constantly at war with squirrels. I've tried various strategies; baffles, elaborate ways of hanging feeders from trees, separate squirrel feeders, dousing the bird seed with a hot pepper wash, etc.. all of which proved to be ineffective. I love nature, however it got to a point where 14 squirrels were ravaging the bird seed a day, and I stopped feeding the birds. I thought my bird feeding days were over, however after some much needed additional research I was able to design / build a very affordable squirrel proof bird feeder that really works! I have been so pleased with the design that I now have 3 such feeders in my yard, and built a 4th for my brother in order to put together this instructable. There are some guidelines below that need to be followed to ensure that squirrels cannot gain access, though they are fairly obvious as this feeder has a lower bottom side baffle.
Feeder Guidelines:
a. Feeder should be placed 10 feet away from any trees, overhanging branches, roofs, etc... anything that a squirrel could use to jump down onto the feeder. As you can see from the photo, one of my feeders is fairly close to the tree line ( ~10ft ) so it shouldn't be impossible to find a good spot for this feeder in your own yard.
b. Feeder should be 5ft off the ground, though the first feeder I setup was around 4 1/2 feet. The pole used in this instructable is 6ft tall so you should be good to go. You simply want to ensure that the squirrel will not be able to jump from the ground to the tray directly. The lower baffle has a large enough diameter that the squirrel will not be able to climb it.
How this squirrel proof feeder works:
Since the feeder should be placed 10ft away from trees, roofs and overhanging branches, and has it's tray roughly 5ft off the ground, squirrels should only have one route to get to the feeder's tray; up the pole. The baffle under the tray will be 2 feet tall and have a diameter of 6 inches. I have found ( through trial and research ) that a squirrel cannot climb up a pipe of this size diameter. Also the baffle is open at the bottom allowing squirrels to climb up into the baffle into a dark chamber where they are confused as to where to go and inevitably return back down the pole.
I cannot guarantee 100% that this squirrel feeder will work for you, however prior to using these types of feeders my yard was infested with squirrels. Now that I am using these style feeders I at most see 2-3 squirrels in the yard at a time, and have noticed that unlike other setups I have tried they lose interest in trying to get to the seed rather quickly.
Accompanying Video:
I have created a video to go along with this instructable that can be found at the below url:
Part 1: http://www.youtube.com/watch?v=3Qdm747cols
Part 2: http://www.youtube.com/watch?v=xxdxdck4Syo
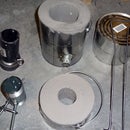
Step 1: Tools & Supplies


Parts Needed:
a. 6 inch diameter stove pipe cap ( fits on outside of stove pipe )
b. 6 inch diameter, 2 foot long stove pipe
c. 2x4, ~12 inches long ( use scraps if you have them lying around )
d. 3/4 inch, 6 foot long copper pipe
e. 16 inch diameter plant pot base ( can use other size )
f. 8 - 2 1/2 inch #8 deck screws
g. 4 - 1 inch #8 screws
Tools Needed:
a. miter saw w/ miter box ( can do without box )
b. power drill
c. 7/8 inch spade drill bit
d. 3/16 inch drill bit
e. center punch
f. hammer
g. work gloves
h. tape measure
---
The tools and parts should be fairly straight forward. The work gloves are recommended when putting the stove pipe together as the seam is fairly sharp and can cut your hands ( it happened to me ).
Step 2: Prepare Baffle Supports


Prepare Baffle ( Stove Pipe ):
If you haven't joined the seam of the stove pipe now is the time to do it. It is easiest to transfer the inside length of the pipe to the supports using the pipe itself.
The stove pipe will be aligned such that the rippled inside edge will be at the top and the smooth open end will be at the bottom. This is such that the stove pipe cap will fit at the top and the bottom will be left open.
Cut Baffle Supports:
Take the length of 2x4 and rest the end on the inside of the top ( rippled ) pipe lip. You should be able to rest your weight on the 2x4 just enough for the lip of the stove pipe on the other side to leave a mark in the 2x4. Taking the shortest distance measurement from the end of the 2x4 to the mark made ( ~5 inches ) you can draw a straight line across the 2x4 with your tape measure. Use the miter saw and box ( if you have one ) to cut the 2x4 to size.
We need 2 supports and you can either do the same procedure above or use the 1st support and transfer the length to the remaining length of 2x4.
Find and Mark Centers Of Supports:
Once you have your 2 support pieces find the center dimensions with your tape measure and mark out the centers on both support pieces. Both support pieces should be fairly identical though some deviation is acceptable - we do want the feeder pipe to be as level as possible through the baffle.
Drill Center Holes In Supports:
With the 7/8 inch spade bit in your power drill, carefully drill out the the center holes of the baffle supports trying to keep the power drill as level vertically as possible - a drill press would be ideal for this task if you have one. Be sure to rest each support on a junk piece of 2x4 to ensure that you do not drill into your floor.
Fit & Test Supports:
You should now fit the supports inside the baffle ( stove pipe ) and run the 3/4 inch copper pipe through both supports in order to verify that the baffle will be fairly level vertically. If it is not it is best to make new support pieces before moving forward.
It might be hard to insert the supports at the top ( rippled ) end of the stove pipe, and my recommendation is flipping the pipe over and inserting them from the bottom. Push one to the top of the pipe and the other roughly in the middle.
Step 3: Anchor Supports to Baffle


Finding Top Anchor Points:
With the top cap fitted on the baffle mark 2 points, 2 inches apart, 3/4 inch down from the top of the cap on one side of the cap. Repeat this on the exact opposite side of the cap - these will be the points that will anchor the cap to the baffle to the support.
With the center punch and hammer, punch the marked points while the cap is fitted to the baffle - this should transfer the punch to the baffle as well making it easier to drill through both the cap and baffle. If you do not center punch these marks the drill will wander on the surface of the cap making it hard to drill the holes.
Drill Top Anchor Point Holes And Mount Top Support:
With the 3/16 inch drill bit in your power drill, carefully drill the center punched points.
Insert the top support into the baffle by flipping the baffle over and pushing the support down to the top of the baffle. You should align the support such that the anchor holes will line up with the ends of the support such that you will be screwing the anchor screws into the end grain of the support pieces. It is easiest to align the support piece before pushing it down into the baffle. ** Removing the top cap before doing this can help you verify that the support is lined up with the top anchor holes; if you do this when putting the cap back on the baffle ensure that the anchor holes line up.
With the top cap on and the top support in the inside of the baffle, use 4 - 2 1/2 inch #8 deck screws to anchor the cap to the baffle to the support.
Locate, Drill & Anchor Bottom Support:
Insert the 3/4 inch copper pipe into the now anchored top baffle support. Now feed the bottom support down the pipe into the bottom of the baffle ( we do this with the pipe as it will help keep everything in alignment ).
Before pushing the bottom support into the baffle, align the end grains of the support with the screws in the top support - we will use the top support screw locations to mark where to punch, drill and anchor the bottom support.
With the bottom support aligned, and your tape measure ready - push the bottom support into the baffle 12 inches. With a tape measure you should be able to do this fairly accurately - simply push the support down a short ways and measure the distance from the support on the inside of the baffle to the bottom lip - repeat until it is 12 inches inside the baffle. Be sure to keep the alignment of the support when pushing it down - the fact that the copper pipe is running through it's center hole and that of the top support should help with this.
With the support 12 inches up from the bottom of the baffle, lay the assemble on the ground with one set of top anchor screws facing up. With the tape measure on the outside, and the nub fixed over the bottom lip, measure up 12 3/4 inch from the bottom ( should be centered on the end grain of the bottom support ). Keep the tape measure in alignment with one of the top anchor screws and make a mark with a sharpy. Do the same thing for the 3 other anchor points.
With the bottom support anchor points marked, use a hammer and center punch on those marks such that the drill will not wander when trying to drill the holes.
With the 3/16 inch drill bit in the power drill, drill out the bottom anchor holes. Make sure not to drill into the bottom support too far as we want to provide good bite for the screws.
With the holes drilled anchor the bottom support with 4 - 2 1/2 inch #8 deck screws.
Step 4: Anchor Feeder Tray


We will now remove the copper pipe from the baffle in order to anchor the feeder tray to the top baffle cap. The fit of the pipe may be snug, so you may have to wiggle it out a bit.
The feeder tray I used is molded plastic and has a clearly defined point where it's center point is. I believe a lot of plastic plant pot bases are like this, so if you are using one of those this step will be easy, otherwise find the center point with the following directions.
Finding the tray center point:
With your tape measure set to the diameter of the tray ( mine is 16 inches ) place the catch end of the tape measure at one point on the tray and sweep the tape back and forth until the extreme point on the other side of the tray measures the tray diameter. With this point found draw a line with a sharpy across the top of the tray roughly in the center. Now do the same measurement except perpendicular ( in the opposite direction of ) the line that you just drew. The intersection of the two lines is your center point.
Locating the tray anchor points:
I chose to place my anchor points 1 inch away from the center point, 2 inches away from each other ( should form the boundaries of a square ).
I didn't use the method above to find my center point since I had a plastic tray that already had it marked, however if you did use the method above simply mark 4 points 1 inch away from the center point along the drawn out lines ( would be a more exact method ).
Center punch the marked points and place the tray on top of a piece of junk wood ( don't want to drill through to the floor ). With the 3/16 inch drill bit in your power drill, drill out the anchor points.
Attaching The Feeder Tray To Baffle Cap:
With the baffle sitting on the floor ( baffle cap at the top ), place the feeder tray on the baffle cap and center it as best as you can. You can use your tape measure to do this by determining the distance from the baffle to the outer edge of the feeder tray ((tray diameter - baffle diameter) / 2) - for a 16 inch tray this would be 5 inches. With the tape measure on the underside of the tray, resting against the baffle, test a few points to make sure that the calculated distance is what you are measuring to the edge of the tray.
With the feeder tray centered on the baffle, and power drill in hand, hold the tray in place with downward pressure and drill through one of the pre-drilled holes through the baffle cap. Do not drill all the way through, we need the wood in the top support bracket for the anchor screws to bite into. Once you feel the drill go through the metal baffle cap stop, you don't have to apply too much pressure - let the drill do the work.
With one hole drilled out, use 1 - 1 inch #8 screw to anchor that point of the feeder tray to the baffle. If things moved around a bit in the process you may want to check and make sure things are still centered - if not make adustments before the next hole is drilled.
Continue to drill each of the 3 remaining holes individually as you did the first, anchoring the tray with another 1 inch #8 screw for each hole drilled, after each hole is drilled. This will ensure that everything will line up properly as the tray can slide when drilling.
Re-Fit Copper Pipe:
With the top feeder tray now anchored on the baffle, you can re-insert the 3/4 copper pipe to complete this squirrel proof bird feeder.
It is easiest to flip the top baffle upside down and feed the pipe into the supports bottom up. If the fit was snug when removing the pipe for this step it might take some effort to relocate the top support hole, however it is there and you should be able to get the pipe to go through both supports.
Installing The Bird Feeder:
Find a good spot 10ft away from any trees, overhanging branches, roofs, etc... It is easiest to use a short length ( 24 inches ) of 3/4in copper pipe to make the hole for the feeder. Simply locate the hole and with the short length of pipe held vertically level hammer it in about 12 inches. Remove the pipe making note of where the hole is, and simply insert the feeder into that hole. This helps reduce any damage to the feeder from trying to hammer the feeder itself into the ground.
Step 5: Upgrades
This bird feeder works great as is, however some modifications can be made to improve it even further as listed below.
a. If you have a deep tray ( which is best for holding lots of bird seed ) you might want to drill out drain holes along the perimeter of the tray such that when it rains water will not pool and collect in the feeder tray. Make the holes small enough such that the bird seed will not go through them.
b. You can easily attach a tube feeder to the top of this bird feeder, I have done it with two. I currently use droll yankee feeders which have mounting points on the base of the tube feeder. If you have something similar to this simply place the tube feeder in the center of the tray, mark the anchor holes with a sharpy and drill through the top base cap. You can then anchor the tube feeder to the top tray, through the baffle cap and into the top support. This is a great way to double your seed capacity, and gives the smaller birds some seed to get to when the blue jays are ravaging what is in the tray.
---
Good luck with this project, it has worked great for me and I hope it works for you too! It is made from easily accessible parts had at any hardware store.
If you need further help building this feeder, take a look at the accompanying video here:
Part 1: http://www.youtube.com/watch?v=3Qdm747cols
Part 2: http://www.youtube.com/watch?v=xxdxdck4Syo


