

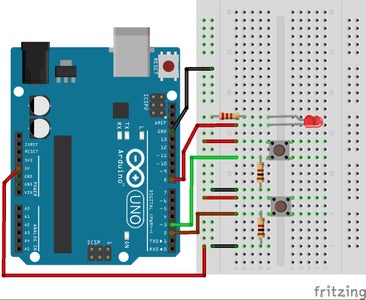
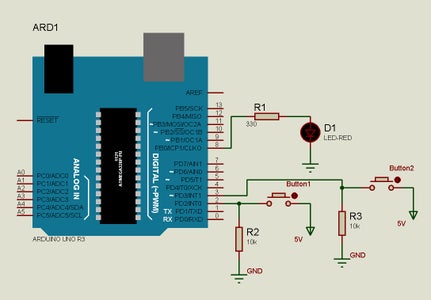
Introduction: Start-Stop Button Switch With Arduino


/* These circuits are just build for educational purposes so high
school students of electronics and electrical engineering
can implement real circuits and practice logic expressions. Any other ways of writing this script is welcomed*/
int buttonPin1 = 2; //Start button
int buttonPin2 = 3; //Stop button
int ledPin = 8;
int buttonStatus1 = 0;
int buttonStatus2 = 0;
void setup() {
pinMode(ledPin, OUTPUT);
pinMode(buttonPin1, INPUT);
pinMode(buttonPin2, INPUT);
}
void loop() {
buttonStatus1 = digitalRead(buttonPin1);
buttonStatus2 = digitalRead(buttonPin2);
//Check(==) if the first button(START) is HIGH, AND(&&) the second button (STOP) is LOW, if yes turn the LED on.
if (buttonStatus1 == HIGH && buttonStatus2 == LOW)
{ digitalWrite(ledPin, HIGH); }
//Check(==) if the first button (START) is LOW, AND(&&) the second button (STOP is HIGH, if yes turn the LED off.
if (buttonStatus1 == LOW && buttonStatus2 == HIGH)
{digitalWrite (ledPin, LOW); } }


