

Introduction: Steampunked FM-receiver Running With Amplifying Tube


Hi everybody
Here I am again to present you my latest steampunk project.
It is called the amazing Steampunked Aethervox-machine.
This is my first construction kit project to build an FM radio. This special radio works with an amplifier tube. A very good friend of mine, Horatius Steam, gave me this kit as a present but it also can be ordered here.
You can imagine that my box housing of this radio should be a stylish steampunked one.
So I chose a former salad bowl from ikea made of bamboo some pieces of red vulcanized fiber, an old bulb horn from ebay, some parts of copper tubes, the body of a spray bottle, a burner made of brass from an old petrol lamp and some screws made of brass.
Now my instructable can start. Please follow me to my steampunk-laboratory (in german called „Dampfkraftlabor“) and watch step by step what had been created with all these things.
Hope you enjoy it
Yours Aeone Junophor
Step 1: Wood Working


For the box house I used a salad bowl made of bamboo which I found at IKEA.
A plate of vulcanized fiber is fixe with wood glue at the top and an piece of plywood covered with vulcanized fiber will be the bottom.
Step 2: Metal Working


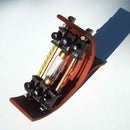
The old bulb horn has to be put into a new form. I heated the parts with a gas flame then arranged the form new by turning the parts as you can see and soldered them again. Please wear good leather gloves to protect your hands against the heat while working with the very hot metal parts.
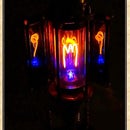
The special radio tube which is working as an amplifyer will be put into a steampunked "smoking-tube" which you can create with the parts of a petrol lamp burner some pieces of brass wire (2mm) and an ediscon "centra"-socket E27 as you can see at the pictures below.
Step 3: The Way the Sound Comes Out of the Horn


The sound made by the loudspeaker will be caught by a sort of feed hopper which I cut out of the body of a spray bottle. The smaller end is connected tight to the coppertube and then the sound runs through the rearranged horn.
Step 4: Electronic Working


The radiokit from FRANZIS can be soldered together as it is said at the description. The only thing I changed was placing the radio tube with its socket at an other place. I put the tube socket into a coppertube and soldered some wires to connect the tube with the circuit board.
To get an another impression of placing the tube you can see ist at step 10 of this older instructable of mine.
Step 5: Final Works


As final works I covered the two adjusting knobs with very new Edison E27 sockets made of brass and installed an extra spool made of vulcanized fiber to carry an antenna wire of exactly 75 cm.
And now bearly everything is done except.....
........listening to this wonderful "brassy" sound of the Steampunked Aethervox-machine.
Thank you very much for studying this instructable
Yours Aeon Junophor

Participated in the
Instructables Design Competition

Participated in the
UP! Contest


