

Introduction: Striped Speakers


Having recently (ish) set myself up with a new amplifier and media system, I wanted a pair of speakers that were more than just nice to listen to, but were also a piece of furniture as much as anything else. along side that I love good speakers and had always wanted to make a pair so I got to the drawing board.
my basic criteria were that they should cost about £600 to produce, go with the furniture in the room and finally produce clear sound.
having started with absolutely no knowledge about speaker cabinet building and with even less knowledge about the properties of the drivers I would be putting in them I had to start from scratch
ill be taking you briefly though the process I took to go from idea to speaker.
Step 1: Ideas and Drivers

After four pages of A3 full of ideas I finally settled on a design which I then took to development.
skipping that step out I then selected the drivers, with almost no knowledge about what divers are best I had to do a lot of research into the subject. I wanted the speakers to have a flat response, but also have a reasonably wide frequency range i.e. low lows and clean highs.
there are a HUGE range of drivers out there and a lot of research is required to find the ones that are best for you, that's why its best to start with a budget so you can have an idea of the range you can look at. Articles on-line and forums are always a good place to start then you can always ask the people you're buying them off because they are usually hardened professionals in the subject!
drivers and crossover
I decided to go with a two part speaker with a woofer and tweeter after a lot of deliberation I decided to go with Aurum cantus AC-130 woofer and Fountek Neo X 1 tweeter because they were within my price bracket, including their ridiculous shipping costs to the UK, and had good response curves. the tweeter I chose is a ribbon tweeter which should meant that the speaker has a much broader range of mid to high range frequencies and has the added bonus of being very hard wearing compared with a traditional dome tweeter.
next was the crossover, I decided on a crossover point of 2.5 KHz at 12dB per octave and sourced the parts from a more local supplier.
Step 2: Cabinet


I wont give a guide to the basics of cabinet building from my limited knowledge because there is just so much to know, but there are a lot of resources such as this one from audioholics and there are a lot of free calculators (they are free for a reason though!). I decided to go with some amateur software called Bass Box pro which had everything that an amiture like me could ever want. it calculates the cabinet and port sizes based on the parameters of the the drivers that you're going to be putting in it and even gives you a predicted frequency curve.
cabinet
after some button pushing and fiddling about, I came up with the dimensions of the cabinet. the cabinet needed to be 11.5L in volume and the port
port
there are loads of articles and forum discussions about ports and the different types of port. some drivers dont even need a port and work better with a sealed cabinet, but my woofer is going to need air flow. I went with a slot port because of its larger area for air flow which will reduce the chance of port noise where too much air is trying to pass though a small hole. the port will need to be 25-80-249 mm to have the right tuning for the cabinet
design
This was one of the longest parts of the whole process because of my criteria of the speaker being like a piece of furniture I had to get the design stages right whilst still working within the parameters for the size of the cabinet.
Starting with the basic shape I fiddled with the sizes until I was happy with the volume of the cabinet, this was more difficult because I had to take into account the space taken up by the port and the drivers in the cabinet. The port I went with needed to be bent in order to fit into the cabinet and still get the right tuning point of the port, but this did have the advantage of acting as a place to put the crossover and a bracing point. The bracing in the cabinet only needed to be simple because I would be using 15mm ply and MDF which is fairly ridged as it is.
cladding
Most speaker cabinets are covered with a veneer to hide the ugly MDF or ply that they are made from, but I wanted something special on the outside of the cabinet to make it more of a piece of furniture and more unique.
concept I have seen some beautiful things done with hard woods in furniture some of which are right here on instructables! I wanted something eye catching and contrasting, but still natural and crisp.after some deliberation about style and colour I decided that contrasting stripes were the answer, strips of mahogany separated by thin strips of oak which wrapped around the cabinet.
I wanted the stripes to go up the sides and over the top of the cabinet, in order to do this I had to angle the stripes to get them to align with eachother on the sides and the top, Ill explain this later, but thats what the templates are for. The front and back of the cabinet will be clad with pieces of mahogany without any stripes.
as well as the cladding I want some surrounds around the drivers firstly to make them stand out and secondly to hide the fixing points and main body of the drivers. I went with aluminium for the surrounds which was cheaper than stainless steel and can still have a nice shine with some buffing.
other stuff
After looking at some other more professional hi-fi speakers I noticed that a lot of them had legs or spikes on which they stood, this apparently is to reduce their contact area with the surface they are on so there is less chance of the speakers vibrating the surface. the legs will also make it easy to compensate for uneven surfaces so they don't wobble.
Step 3: Parts


with design in hand I drew up a cutting list for the parts of the speaker.
I chose to make my own legs for the speakers just for that personal touch and I've always wanted to use a metal lathe.
I also ordered the drivers and crossover parts from their various locations around the world so it took a good 3 weeks for them to arrive!
Step 4: Cutting the Parts


Because of the nature of the project and it needed precision, that and I'm lazy, I decided to make use of a CNC router to cut out the parts for the cabinet.
cabinet
Unfortunately i dont have a lot of photos of this stage, but I cut out the front, back, top, bottom and bracing parts with the router and cut the ply sides with a band saw. once I had cut the sides of the cabinet I then put a 10° angle on the ends so that they would fit flush against the front and back of the cabinet.
having cut out the parts they then needed a rub down to remove frayed parts and rough edges before they were good to go.
cladding
although I didnt know it at the time, this was going to be one of the longest parts of the project.
- cut 48x 25mm strips from the 5mm mahogany boards
- 50x 5mm wide strips of oak which would make up the sides of the cladding.
- once cut I then had to sand down every single cut strip to make sure the sides were flush before gluing them together so there were no gaps.
- I cut the front, back, bottom and top templates of the cabinet with the laser cutter using some acrylic to make an offset guide to make sure the cuts were parallel with the sides of the wood.
- cut 6x 15mm wide strips from the off off cut bits of mahogany to make the edging strips
legs and surrounds
I cut the half meter long bar of M10 bar into 8 30mm long lengths of bar to cut the legs from.
I also went down to a local engineering firm with a water jet cutter to cut out the surrounds. I almost stupidly had them cut 0.5mm too big to make sure the fit was tight into the front of the cabinet, I regretted that later when I had to sand them down to a perfect fit.
Step 5: Build the Cabinet


port
I started with the port before anything else as everything else would almost be built around it.
- glued together port in two parts
- sand down edges ready for painting
- prime MDF (this is key, if you don't MDF has a tendency to swell!)
- paint with air brush for an even coat
- glue two halves together
- fit middle (larger) brace half way up the port and the smaller brace flush with the bottom
- build the crossover in two parts, high pass above large brace on back of port and low pass below large brace
cabinet
having built and painted the port I then turned my attention to the main cabinet.
- glue small scrap strips of wood 15mm from top of each side wall of the cabinet, this is to support the top whilst gluing
- fit the port mouth into the hole in the back panel of the cabinet, make sure it is flush with both sides
- use the drivers to make holes for the M4 tee nuts to hold the drivers and surrounds in place
- drill holes in front for drivers and also drill holes in the back for the binding posts 50mm from the bottom (sorry I dont have a photo of this)
- glue the port with the braces onto the back panel of the cabinet (make double sure that the sides and front will go on with the port fitted!)
- drill hoes for the M10 tee nuts for the legs then inset the holes with a forstner bit so that the nuts fit flush on the bottom of the cabinet
- cut the acoustic foam to cover the inside walls of the cabinet, this will reduce reflected sound waves and stop unwanted noise from the cabinet
- finally stick the cabinet together, another nerve racking moment
Step 6: Cladding


Next job was to make the cladding, this is what took all the time and energy. having cut all the strips and sanding them down then next job was to stick them together to form the sides and top of the cabinet. having tested this step out before actually doing it I found that covering what ever surface you will be gluing parts together on needs to be covered in packing tape to make sure they dont stick to it and that no general rubbish is stuck to the wood when you take it off.
- glue the strips together on a stiff ply board covered in packing tape, also use some other blocks of wood to make sure one edge is straight. I found the best way to glue the strips was to put some heavy weight on top of the wood then clamp them horizontally with clams, the weights will stop the wood from bowing whilst it is gluing.
A week later with 6 glued boards in hand I then cut the excess off with a radial arm saw, it is important at this stage to make sure that both ends are parallel and that all the boards are the same length.
- plane off excess wood then sand all the boards down untill flat
- cut out the top cladding templates with the laser cutter
- use templates to mark out left and right sides of the top cladding, make sure they line up properly!
- cut out top cladding parts out
- put a 45° on the long edges of the top cladding and the top edge of the side panels
next comes the gluing stage, I naively didn't make any jigs for this step so I had to do it all by eye.
- using the surrounds and the port jig, glue the front and back pieces of mahogany onto the cabinet
- glue the top cladding parts on. make surethe front is straight otherwise the sides wont line up properly
- glue the side panels on, again making sure all the stripes line up with the top as best as possible
- glue the bottom onto the cabinet leaving some excess on the edges that can be sanded flush
- glue the front and back edging strips on, sanding them flush along the edges again
- glue the side edging strips on, again sanding them flush with the front and back
- cut out the holes in the bottom of the cabinet for the legs, I had to do this with a scalpel so as not to damage the tee nut underneath
Step 7: Finishing Up


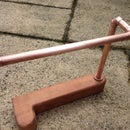
legs
finally I got round to making the legs. its not a particularly complex or involved step, it just takes a while to get them all the same and finished properly.
- face off both ends of the bar
- cut a 20° point onto one end of the bar
- cut the leg down to 30mm in length
face off the point 2.5 mm from the sharp end of the point so there it has a flat end
cut a 45° chamber 3.5 mm from the centre of the flat end of the leg
polish up the leg
final touches
with all the major step of the speaker done there were a few final touches to be done to the cabinet.
I wanted to put a flare on the port, firstly to make it look better and secondly to give better air flow. I used the table router and a round-over bit to flare the port.
having marked the holes for the binding posts at the base of the cabinet I then drilled the holes for them, make sure the holes are slightly too small so that they fit really tightly so you don't have to rely on the nuts on the other side.
Next was to apply the oil to the cabinet, linseed oil is really easy to apply and you only need one coat to see the results! the only drawback that I have found is that you can defiantly smell it when you go into the room.
having removed the sharp edges from the surrounds and buffed them up it was finally time to fit the drivers! having put the drivers in and wired them up I screwed the surrounds into place tightly so the vibration wouldn't shake them lose or rattle anything.
FIN
Step 8: Final Thoughts


Iv'e not got access to any professional acoustic measuring equipment, but having listened to quite a bit of music from these speakers I'm extremely happy with the outcome. the midrange and high notes are clear and the bass is punchy without being overpowering.
That being said I would like to put some poly fill into the cabinets to try and make the bass more prominent and even see if I can Bi wire the cabinet and put an EQ in to balance the highs and lows better.
I'm happy to answer any questions and as always thanks for taking a look.

Participated in the
Woodworking Contest

Participated in the
Full Spectrum Laser Contest


