

Introduction: Sub Micro (Spy) Blimp Building With Hacked Servos


Building tiny RC blimps has become very accessible with the ultra micro RC-gear available today at affordable prices. Plantraco’s awesome Nanoblimp, a RTF featherweight dog fighting champion, illustrates that. It is just new on the market and if I see it right it must be under 6g, allowing for the use of a 9” balloon. It follows the line set with Plantraco’s earlier Microblimp, with its gondola at 10-12g. The Ballooncraft micro blimp on the other hand has been on the market for quite a while, but using a 17” balloon (putting it near 30g without payload), that’s has become a heavyweight in the Microblimp League.
Anyway it is always more fun making one yourself. For me the trigger was the market appearance of the wonderful tiny DelTang DSM2 receivers, with a weight of 0.23g or 0.65g including connectors. And hacking sub micro servos makes the rest of the build quite simple.You only need to be willing to work with the tiny gear, keeping the total weight near or under 10 g (situating it between Plantraco’s Microblimp and Nanoblimp). Check it out in this video:
I have been building indoor RC blimps for about 12 years now, and dismantling servos has often been the main source for reversible motor controllers and small motors, mainly for the for the tail rotors. For this project the complete three axis propulsion is based on hacked servos.
The servo circuits do not give a perfect proportional control. Actually the concept makes use of the imperfect on/off working of these circuits. In a servo, gets power as soon as the potentiometer is not in the desired position corresponding to the transmitter’s stick position (for some more "theory of operation" on servos check here). But the analogue circuits in ordinary servos do not give full power when the deviation is small. The ones in digital servos do, so these are not suitable for this hack.
As people building tiny RC stuff know, at this scale wiring and connectors become important in the weight. But for this Ible I kept things basic,holding on to the connectors and avoiding soldering. In general soldering is not difficult, but at this scale it does need some experience and the right gear. Obviously this means there is some room for further weight loss, and in step 7 I list some tips for more experienced builders.
You can fly your blimp around in at home and if you have two you can go for a "Plantraco style dogfight" attaching a short pin on the front of each balloon.
Or you can go for a payload version and add a miniature camera. With a large enough balloon a wireless camera is possible, but I kept to a miniature recording camera giving a total weight for camera + propulsion of about 20 g (see last step). Here is a video of the camera version:
If you like this Ible, please don’t forget to give it your vote. Many thanks for your attention!
Step 1: Required RC Gear


An ultra micro receiver: I used DelTang Rx33. In any case, chose one below 2g and working on a single LiPo cell (commonly referred to as 1s). Actually many receivers do work on 1s, even if not documented as such. Make sure your servos’ and receiver’s connectors are compatible, or you’re in for some soldering after all. Both the DelTang DSM2 receivers and the blue arrow servos come in a number of connector versions. Specialised online shops like Micron Radio Control. Plantraco or Aether Sciences RC can help in this.
Obviously you will need a compatible transmitter. The simplest one with 3 or more channels will suffice.
A 70 to 140 mAh 1s lipo battery (and a suitable charger): The smallest batteries (around 2.5 g for a 70 mAh) are needed to keep the weight under 10g. A larger battery obviously gives you a longer flight time, but even as flight time is very dependent on flying style, it is easily half an hour with a 125 mAh (weighing 3.5g). A smaller battery will still easily last 15 min or more and it will make a latex balloon last longer (making room for more ballast to compensate for lost helium).
Leads to connect your battery to your receiver (again the specialist RC shop can help in this).
Three small propellers: I used the Plantraco 32 mm “butterfly” propellers. These are some amazing high performance tiny propellers that fit a 0.7mm shaft. The "AES-H34 - Hélice Micro" from Aether Sciences RC looks very suitable too.
A 1mm carbon rod, about 30 cm long
A piece of Depron, about 10 cm by 10 cm, 1mm thick (if not available 3mm thick Depron can be used too).
Some putty as ballast.
Finally, you will need some cellophane tape (sellotape, scotch tape), a pair of small pliers, a couple of small elastic band, superglue and a pair of scissors. A scale, accurate to 0.1g or better, comes in handy. Soldering is optional.
The balloon is described in the next step, the camera and related stuf is described in the last step.
If you already have a transmitter and a charger for the flight battery, the materials needed will cost up to 80 EUR. If you source your servos and propellers cheap you can bring this down significantly. If on top of that you go for a slightly larger version with a 2g receiver, you can you bring it down to under 30 EUR.
A suitable transmitter and charger shouldn’t set you back more than 50 EUR. That is slightly more than the complete Plantraco NanoBlimp, but then we are talking of a DSM2 system, with far more than 4 frequencies available.
Step 2: Determining the Weight and Choosing the Balloon


I first determined the weight of all parts and added an estimate for the fin (that was not cut size at that stage) and for glue and cellotape.
item weight in g
3 hacked servos 3 x 1.7
3 propellers 0.17
receiver 0.68
80 mAh battery 2.6
33 cm rod 0.4
battery lead 0.3
depron fin (estimate) 0.5
allowance for tape and glue (estimate) 0.25
Total 10
So the concept promised to be suitable for 11” latex balloon (a common party balloon) or any balloon with a lift capacity of at least 10g. Ballast is added to achieve the desired buoyancy and removed again to compensate for the loss of helium over time.
A fresh 11” latex balloon should lift 11g at least (according to manufacturers reference data for 300m above see level), but you will soon notice a loss in lift capacity. In balloon shops latex balloons to be inflated with helium are commonly internally treated with "Hi-Float". This makes them float longer.The one I bought lifted 14 g (about 30m above sea level). I ended up using a 125mAh battery bringing the weight on 11g and allowing for about 3g of ballast. As expected regular trimming by removing ballast was needed and as after about 10 hours al ballast was removed. But that is not bad for a 1.5 EUR balloon.
A fresh 14” latex balloon however carries more than 20g so there is some room to last a couple of days (again with "Hi-Float"). For the camera version I had a 16” balloon with a lift capacity of over 35 g available.
Foil balloons keep their helium much longer (up to weeks and can be refilled), but have a higher proper weight, making the minimum suitable sizes larger. My favorite foil balloon for a micro blimp is obviously the Zeppelin NT as sold by the Deutschen Zeppelin-Reederei GmbH https://ssl.kundenserver.de/s7875334.shoplite.de/sess/utn;jsessionid=154edbeeba05160/shopdata/index.shopscript and lifting about 21g. A nice alternative, more commonly available is the 40” Letter ”I“. Its lift capacity of 18g is quite tight for a camera version, but it is possible without the camera or with an extra lean build (like powering both camera and propulsion from the flight battery, see last step).
A not on the helium: for these small blimps pure (99% or something like that) is strongly recommended as there is little buoyancy to spare. But where gasses like “Ballonal”, a mixture of helium with nitrogen used to be popular, nowadays almost all balloon shops work with pure helium.
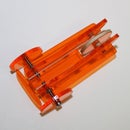
Step 3: Hacking the Servos


Protect the circuit board from accidental short circuiting by wrapping a single layer of tape around it.
Test by connecting to the receiver with the propellers left off. Power up and trim each pot till the motor doesn’t move with the transmitter’s corresponding stick at neutral position.
Choose which motor/function you want on what stick. I usually put the up/down on what is normally the “throttle” (because a stick without auto centering is convenient here), the main propulsion on the “elevator” and the left/right on the “ailerons” (on a mode 2 transmitter).
Step 4: Assembly


The receiver gets wrapped in cellotape too, before attaching it too the middle of the 1mm carbon rod with a little more cellotape. I used a rod as long as possible for best manoeuvrability. With the gear used that was about 32 cm.
A battery mount is made with cellotape. Part of strip of cello tape is covered with another layer of cellotape, sticky side to sticky side. This non sticking area should be at least as long as the battery’s circumference. At about ¼ from the front side of the rod, stick one end perpendicular to the rod and fold the sticky end closed. Now make loop in which the battery fits and close it with the other sticky end left. You should be able to slide the battery in and out.
The servo motors are attached with little elastic bands. The front one is directed forward (main propulsion), at the back one is attached transversely (tail rotor). Check the connectors reach the receiver. If you use a transmitter without servo reverse (like the one shown), check the tail rotor is blowing the right way when moving the stick. If not, mount it the other way around. Putting on the propellers helps checking the correct alignment.
The third motor is mounted near the centre of gravity of the assembly, pointing down. Put on the propeller backwards as you want it at its best performance when pushing the blimp up.
Lock the motors in place with superglue. If you choose to cut off the elastic bands afterwards keep the drop of glue really tiny, sticking the elastic bands to the motor or rod as little as possible. After removing the elastic bands add some extra superglue. If that proves hard, don’t bother, as three small rubber bands will account for only about 0.1 g. Obviously, keep any glue away from the shaft.
Step 5: Balloon Attachment and Trimming


Final trimming is done with putty. The amount should be just enough to have the blimp slowly float down when no power is applied. The place you put the putty should help the final trim to have it hang horizontally.
When flying in high halls you should take in account that higher up and in warmer areas a blimp can have tendency to increase its buoyancy. So it is better to trim it a little heavier. The battery will run down a somewhat faster as you will need more power “up”, but it is better to be safe than sorry.
One advantage of using a latex balloon is that it will lose helium noticeably within hours and come down. When using a foil balloon you should take more care in trimming, as coming down can take days. A spare balloon on a string and double sided tape on top can be a real saver by allowing for some “inverted fishing”.
Step 6: Flying and Fitting a Tail Fin


The tail fin is made out of Depron and attached with some tape. I made it hanging down so it helps protecting the propellers from hitting floors or walls. Also it keeps the blimp some distance from any landing surface. This proved to be important as the middle propeller looses efficiency when pushing close to a surface, making lift-off difficult. So no hovercraft effect there.
Obviously the weight trimming needed to be corrected for the fin.
With a tail fin flying the blimp is not difficult, but full control will take some practice.
Moving forward does need to be compensated with more upwards propulsion. The front propeller speeds up the air under the balloon creating an upside down wing effect.
I usually start by giving up till the blimp keeps about the same height and then give it just a little more and start moving forward, adjusting the speed to keeping more or less the same height.
Step 7: Tips on Losing Weight (optional)

A relatively easy one is losing the potentiometer and circuit board of the middle motor and soldering the motor to the receivers built in ESC (if it has one, as the DelTang have). Obviously you lose the ability to reverse it, so you definitely to trim a little heavy. On the other hand you gain a lot in proportional control, compared to the servo circuit. You can also use it for the forward propulsion, sacrificing the backwards function. I would recommend the latter in larger rooms as in that case coming back down is probably more important than reversing.
If you’re up to some tiny soldering you can replace the potentiometers with two tiny (1/10 Watt) 4,7 kOhm resistors.
You can consider to replace the connectors by soldering directly to the receiver, but to be able to use a 9” balloon as I believe the Plantraco Nanoblimp does, one needs to bring it all below 6g. That will need another approach and another Ible. (If you’re interested, subscribe to me).
Step 8: Adding the Camera


There is an abundance of information on the numerous variations on the market at Chuck Lohr’s non-commercial information site. Check it out before purchasing one. I have a so called #3 and a #8 and confirm the #3 is better, as recommended on the site.
Do not expect top quality, but something suitable for fun. The motion blur is quite severe, in particular at lower light conditions. But for me, the main disadvantage is their narrow view angle. I have ordered a wide angle Jelly lens to experiment on improving that, but it hasn’t arrived yet. So I will have to report on that later.
I stripped the camera from its disguise as a key fob, so it they weighs only about 10g. I covered it with some tape to avoid short circuiting the printed circuit board, but keeping free the Micro SD-Card slot and the mini USB port. The tape also keeps the actual camera in place, as it is attached to the printed circuit board with a flexible connection.
A folded Depron strip was taped to the camera to have it hang under the front motor.
If you want, you can power the camera on the flight battery, saving about 4g. In that case you will need an extra male and female battery plug to solder an extra connection in between the flight battery and the receiver (see the last 4 pictures). However I recommend not to charge the flight battery through the camera. The original battery seems to have some protecting/regulating circuit attached, while RC batteries count on the RC charger for that.

Runner Up in the
Hack It! Challenge


