

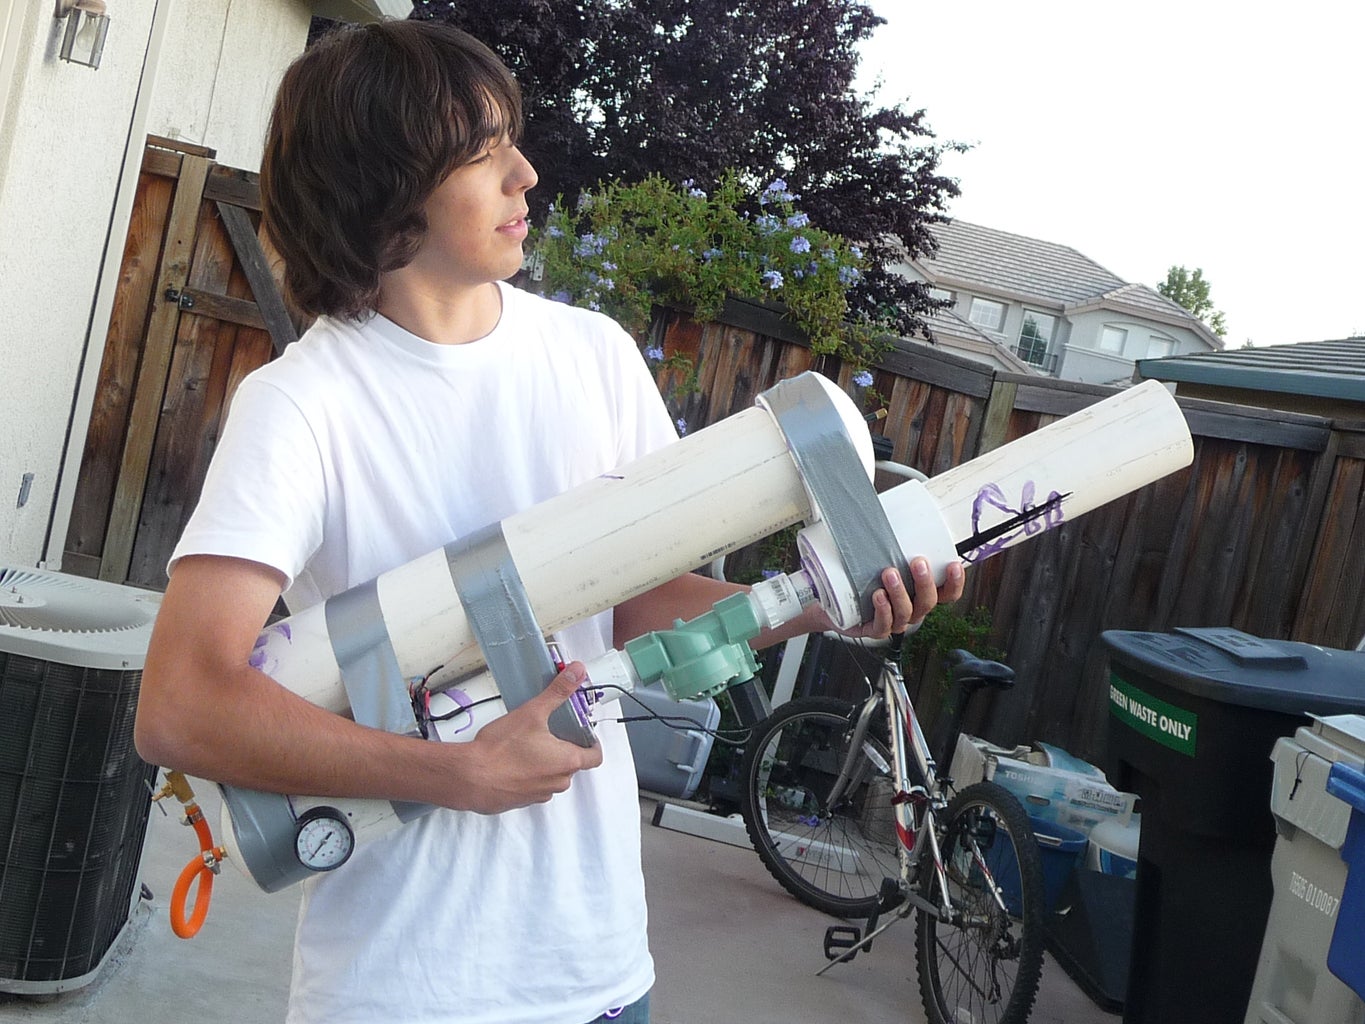
Introduction: T-shirt Cannon


Everybody has wanted to build a B.F.G. This time it was my turn, so i built a T-shirt cannon to blow the minds of crazed fans and students
Step 1: Research

-shoot multiple shirts on one charge
-have enough power to project the shirts a good distance
-be reasonably priced and portable
so after a bit of research i found this video
It had everything i needed, so instead of buying his modestly priced gun of $560 dollars, I set out to build my own for less than $100.
Step 2: Parts List


WORD OF WARNING! MAKE SURE YOU DRY FIT ALL OF YOUR PARTS BEFORE LEAVING THE HARDWARE STORE! SAVES TONS OF TIME. I AM IN NO WAY RESPONSIBLE IF YOU HURT YOURSELF!!
Tanks:
- 4" diameter PVC 2 foot length
- 3" diameter PVC 2 feet total cut into foot long sections
- 4" PVC caps x2
- 3" PVC cap
next set of parts is to reduce from 3" to 1". if you find a cheaper way ignore my parts list
- 3"coupler x2
- 3" to 1.25" reducer x2
- 1.25" to 1" recucer x2
- foot length of 1" PVC
- 1" slip to 1" threaded adapter x2
Plumbing:
- 1" sprinkler valve
- foot length of 1/4" hose (get one that is properly rated)
- 1/4" hose adapter (hose barb) to 1/8" threaded x2
- 1/8" nipple x2
- 1/8" elbow
- 1/8" valve
- small hose clamp x2
- Teflon tape
- bike pump valve (can be replaced with a air compressor adapter)
- Epoxy
- PSI gauge
Tools:
- Drill
- various drill bits
- PVC cement and primer
- Popsicle stick
- Duct tape (optional)
Step 3: Drilling and Epoxy


1. Take one of the 4" caps and drill a hole just big enough to insert the bike valve
2. take the other 4" cap and drill a hole that is just big enough to screw in a nipple
(screw the nipple into the elbow to make it easier to screw into the PVC, use Teflon tape)
3. take the 3" cap and drill a hole that is just big enough to screw in the hose adapter
3. once they are inserted add epoxy to the inside to seal any un-seen leaks
4. once dried do the same to the outside
Step 4: Firing Tank and Barrel


1. take the 1' section of the 3" diameter PVC and solvent weld the coupler to the pipe
2. solvent weld the 3" to 1.25" reducer to the coupler
3. solvent weld the 1.25" to 1" reducer to the other reducer
4. cut about a 5" section of the 1" pipe and solvent weld it to the reducer
5. solvent weld the 1" slip to 1" threaded adapter to the 1" diameter pipe
repeat twice
1. choose which one you want to be the barrel and which to be the firing tank
(as a personal preference I chose to cut the tank a couple inches so that the bulk length would be about a foot)
2. the barrel is done, take your firing tank and drill a hole for the PSI gauge, use the same technique for the nipple and adapter, screw in and epoxy
(measure out were it will be so that the gauge is on the appropriate side of the gun by screwing the firing tank into the valve)
3. once the epoxy has set, solvent weld the 3" cap to the firing tank
Step 5: Main Tank

1. Solvent weld the 4" caps to the 4" pipe
DONE
Step 6: Firing Mechanism


there are two ways to fire your gun you can use the electrical solenoid built into the valve or use the technique displayed by crispyjones
I will provide instructions for the electrical side
parts:
- 9V battery clip x3
- 9V battery x3
- shrink tubing
- wire
- switches, one that stays on and one that is momentary
Assembly:
- solder according to the diagram
- position the switches on the gun so that it is most comfortable for you
- use epoxy or glue to secure the buttons
Step 7: Plumbing
1. screw the barrel and firing tank into the sprinkler valve, use Teflon tape on the threading
2. complete the valve assembly by screwing the other nipple to the elbow, the valve to the nipple, and the hose adapter to the valve, use Teflon tape.
3. insert the hose onto the adapters, tighten using the hose clamps.
Step 8: Attaching the Two Halfs

you can use what ever you want, I used what i had on hand DUCT TAPE!!!
Step 9: DONE!!!
To check for air leaks fill the main tank with compressed air via bike pump or compressor. Seal any leaks with epoxy.
also the barrel can be screwed off to change the size and shoot other projectiles such a s potatoes, golf balls, tennis balls ect.
For shooting t-shirts I load the main tank with 100 PSI and then fill the firing tank with 40 PSI and this seems to work fine for me and can get about 6 shots in one fill.
NOW GO ENJOYING SHOOTING STUFF!!!!!


