

Introduction: THREE-IN-ONE Wooden Building Block Train Set


This is my wooden toy entry.
I like building wooden toys and had always wanted to build a toy train. In December last year I came up with an idea for a toddler’s toy set with the following objective.
OBJECTIVE
Create an appealing toy train set for a toddler (1+ yrs) that is first a fun roll around toy. Additionally, include stacking, sorting, matching and creative play to help build hand eye coordination and early developmental skills. The key elements would include;
a. a rolling train made up of several cars
b. the train must have building block parts that can be removed and replaced in any order
c. can be converted into a pull toy
In my first iteration the engine and caboose were made of a single piece of wood and so I took it to my friends' kids to observe their reactions and when I saw them playing with it, the idea of interchangeable parts occurred to me so I added another key element;
d. the engine and caboose must be removable and all parts must be interchangeable The basic set will have three cars, the engine, a block carrier and a caboose.
Step 1: Background and Design


USE ONLY ONE PIECE OF WOOD
I am involved with an informal group of woodworking enthusiasts who get together monthly to share projects, ideas and generally talk wood shop. At a recent meeting our host randomly gave out small, rough wood off cuts of curly maple along with a challenge for everyone to build something out it and bring it along to a future meeting. I got a piece that was 25” long, 1 ¼”thick, 3 ½”wide at one end tapering to 2 ¾” at the other end. Both of the long sides were rough and would require making a straight edge.
I decided to incorporate my wood shop friends' challenge with this instructable contest and tackle “two birds” at the same time. Therefore I would build my train entirely out of that small piece of wood without using any other material other than paint, glue and some thin rope for the pull cord. This meant that all components had to be fabricated including wheels, axles and dowels!
Step 2: Layout and Cutout of Main Parts


MATERIALS
One piece of maple wood 1 ¼” x 25” x 3 ½”wide at one end tapering to 2 ¾”
Glue
Paint & Stain
20” cord
TOOLS
Table saw
Router
Drill press
Belt sander
Misc. hand tools
So having decided on the basic design the next and important task was to determine the dimensions of the final product. The initial prototype I made was larger than this piece of wood would allow so I first had to layout all the parts needed on the piece of wood. Using a ruler, pencil and eraser I used a bit of trial and error to determine what dimensions would allow me to get all the parts from that single piece of wood. Since my toy included building blocks it is necessary to determine what the unit building block dimension would be and then size everything around that. This is important so that when a child is playing with the blocks they all line up and stack evenly. Two quarter blocks make a half bock, a half block and two quarter blocks make a full block and so on. The limiting factor of the length of wood dictated what dimensions I could use. Since the wood I had was 1 ¼” thick it made sense that the unit dimension would be a divisor that would yield a whole number without any remainder and so maximize on material yield. I determined that a unit measurement of 5/8” would enable me to get all the parts I needed. This decision resulted in the key dimensions below. Additionally as an objective was to have removable and interchangeable parts I had to decide on a way to secure them when they were placed on a chassis. Using dowels to accomplish this seemed obvious and I selected 3/8” as the dowel size.
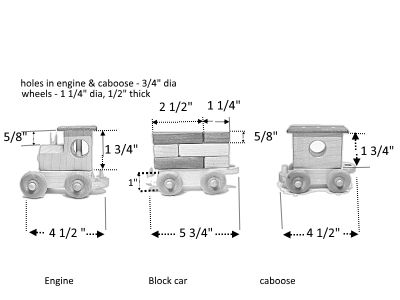
Key dimensions
Chassis for all train cars – 1” high, 1 ¼” wide, lengths as per diagram.
For the blocks, 5/8” would be the unit so all block dimensions would have to be a multiple of 5/8”. Thus 5/8”, 1 ¼”, 2 ½” or smaller at 5/16”.
Dowels – 3/8” diameter.
Wheels – 1 ¼” diameter, based on using a 1 ½” hole saw.
It was important to note that I had to cater losing 1/8” “strips” of wood
for all cuts as 1/8” is the kerf thickness of my table saw blade.
Making accurate cuts was paramount since if I made any mistakes I had to live with them as I couldn't just go and grab another piece of wood. I had to just continue working with what I had. So it was measure four times and cut once! I also kept all scrap including saw dust just in case.
The wood did not have a good edge to run against my table
saw fence and as I do not have a jointer I clamped the wood to a plywood jig and cut a clean, straight edge which I could then use as a reference all my other cuts. I cut out all the components using my table saw and a small crosscut sled.
The component piece for the wheels was ripped into two pieces ½” thick, which would be the wheel thickness. Each piece was sized to yield 6 wheels for a total of 12. This would provide the 4 wheels need for each of the three chassis (3x4=12).
Step 3: Making Dowels


The engine cab, caboose and blocks are all removable and are held on the chassis cars by 3/8” dowels. The engine cab has two dowels, the block car has 3 dowels and the caboose 2 dowels. A 3/8” pin would also be used as the connector pin for a train chassis to attach to the one next to it.
Youtube has many videos on different techniques on how to make wooden dowels and I decided on one that uses a straight bit in a router as I thought that might yield consistent results. I made the jig below which sits on my router table. The principle is to spin a square blank with a cordless drill into a hole past a raised cutting bit. My blanks were 7/16" square and the input hole was 5/8" diameter. The router bit was raised so that it was just a hair above the bottom of the 3/8” exit hole. As the square blank spins past the spinning router bit, the dowel is created and it exits though the round hole. I had to fine tune the router bit height so that the dowel did not bind in the hole.
The resulting dowels were a bit rough but were easily
cleaned up by chucking them into the drill and giving them a fine sand using some 220 grit sandpaper.
Step 4: Making the Axle Pins


The axle pins for the wheels were going to be made from the same 3/8” dowels . So I made a similar jig to what I used to make the dowels. A spinning 3/8” dowel was fed past a ¼” straight router bit which was raised to cut away a portion of the dowel. I tested this first on regular 3/8” dowels adjusting the router bit height until the resulting axle shaft was 7/32”. A fence was placed to stop the dowel and restrict the length of the axle shaft. This allowed me to make pins of equal length repetitively. After the axle pin was made, I turned off the router and backed out the dowel. The axle pin was then flush cut to length with a hand saw. I wanted the overall length of the axle pins to be 1” so to get this done easily I made another simple jig by drilling a 3/8” hole 1” deep into a scrap piece of 2x4. This ensured that the milled axle pins were all of equal length. The dowel pin end was inserted into the hole and then cut off. Since this was flush cut there was no way to pull it out of the scrap 2x4 so I drilled a 1/8” hole was through to the other end of the 2x4 which would allow me to use a drill bit to push out each pin after it was cut.
The head of each axle pin was lightly sanded and painted black (acrylic paint) to provide some contrast with the maple wheel.
Step 5: Making the Wheels


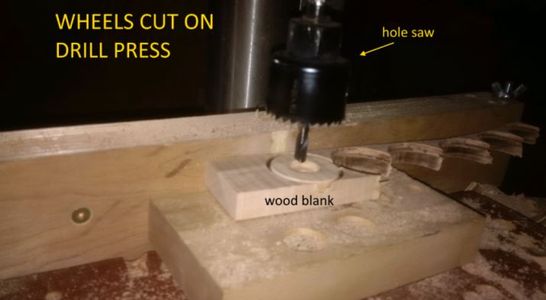


Wheels were cut out using a 1 ½” hole saw mounted in the drill press. The wheels were laid out on the two blanks and then a small pilot hole was drilled for each wheel. I wanted to have a recessed hub in each wheel so I used a 5/8” forstner bit, drilling it 1/8” deep, using the pilot hole as a guide. This created quite an interesting wheel. The wheels were then cut out using a hole saw in the drill press. Although not shown in the picture, the wood blank was clamped while drilling. When drilling out the wheels I set a drill stop and drilled about three quarter way through all wheels on one blank then flipped the blank over and drill out the wheels. This made it easier to remove the wheels from the hole saw.and reduce tear out.
A ¼-20 bolt was threaded through each wheel and chucked into the drill press so that they could be sanded smooth. I started with 150 grit to remove any rough spots then progressed to 220 grit and finally 400 grit.
I wanted rounded edges on the wheels so I used a 1/8" round over bit in my router table. I stuck a 1/4" dowel into the wheel and used this to safely rout each side. Using the long dowel kept my hands away from the spinning bit and my fingers intact!
Step 6: Make the Chassis Bodies


The chassis bodies were cut out as shown in the diagram. The cut out for the ends where the connecting pin goes were made at the crosscut sled. 7/32” holes drilled for the axle pins.
When drilling the holes for the wheel axle pins, I referenced off of a clamped fence and kept the same side against the fence when drilling each of the two holes per chassis. This endured that front and back wheels would sit flush and the wheels would roll smoothly.
I drilled 3/8” holes for the dowels. ½” diameter holes were drilled into the front ends of the block car and caboose. These are the connection points for joining the cars together and the larger ½” hole provides adequate room and play to fit over the 3/8” dowel pins. This would allow enough play for the cars to move freely when being pulled or pushed while linked together.
Straight edges were rounded over on the router table. The straight ends of each chassis (except the front end of the engine) were also rounded over on the belt sander.
I drilled holes at the front of the engine chassis to accommodate the cord. The size of holes were determined by the 1/8" cord I was going to use for the pull.
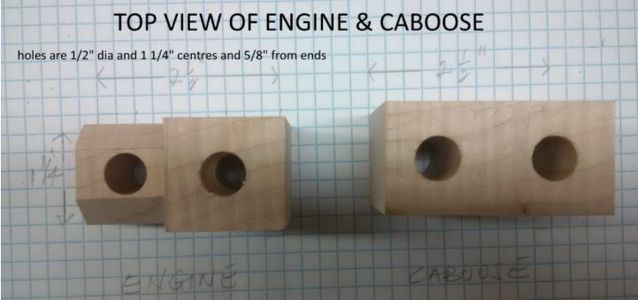
Step 7: Make the Cabs for the Engine and Caboose


¾” diameter holes were drilled into the engine and caboose cabs to represent windows. The engine was cut as per diagram.
The bevels on the front of the engine cab were carefully cut on the table saw using a cross cut sled jig set up as described in below. One side was cut off on the right side of the blade using this setup. The other side was cut by moving the jig to the left side of the blade and the cab flipped over to cut the other side. For safety reasons the cuts were made by securing the cab with double sided tape and a clamp to ensure that fingers are kept away from the blade.
Straight edges were rounded over on the router table. I like to add a hint of colour to the toys I make and so I painted the inside of the window holes with some water based acrylic paint. I would later use a 1/8” round over on the edges of those holes to get a nice uniform looking finish.
To make the headlamp I cut a small 7/8" square, rounded it over on the belt sander then shaped it on the drill press.I painted it yellow, drilled a 7/8" hole in the front of the engine and stuck it in.
Step 8: Make the Roof for the Cabs


I wanted the roofs for the cabs to be ¼” thick and also to overhang the engine and caboose by a ¼” on all sides. Again, I had to use only the wood from the original small piece. there was a cutoff that was the exact width of the cabs, namely 1 1/4") and so I would have to add a 1/2" to increase the width and get the 1/4" overhang I wanted on either side. To get a move symmetrical look, I ripped the wider piece into two and then edge glued the third piece into the middle ending up with a more uniform looking little board. From this I cut the two roofs. The top of the roofs edges were chamfered and then given a light stain to provide a contrast to the light maple. I hand rubbed some MINWAX red oak stain (which I had on hand). The stain would also highlight the curly maple.
Once dry, the roofs were glued on to the cabs.
Step 9: Assemble Wheels and Dowels in Chassis
I Checked that the wheels spun freely on its corresponding axle pin before assembly. Any loosely fitting axle pins were quickly rectified by wrapping a sliver of masking tape at the end before being tapped in to the chassis. Additionally when driving the pin in I ensured that there was enough play for the wheel to rotate freely. I put a thin metal ruler between the wheels and the side of the chassis,as a spacer, to make this task easy and get a consistent spacing for all wheels.
The 3/8” dowel pins for the chassis bodies were cut to length. The dowels extend 1 ¾” so they were cut to 1 ¾” plus 3/8” (the depth of hole drilled into the chassis). Three dowel pins for the end connectors of each chassis were cut to 1”.
Step 10: Make the Stacking Blocks

I wanted two sizes of blocks and had cut blanks with this in mind. The two sizes selected were;
5/8" x 1 1/4" x 1 1/4"
5/8" x 1 1/4" x 2 1/2"
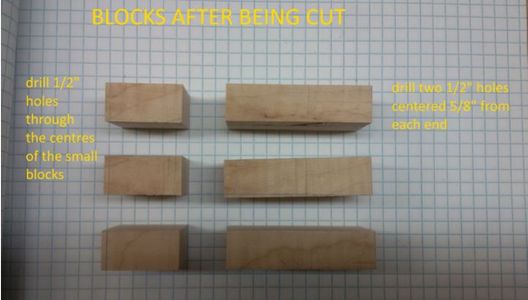
The picture shows the two blanks. The cuts were made in the crosscut sled on the table saw. 1/2" holes were drilled through the exact centre of the smaller blocks and for the larger blocks the holes were drilled with centres 5/8" from the end.
The blocks were then all sanded and edges carefully rounded using a 1/8” round over bit at the router table. Some blocks were stained (same colour as the cab roofs).
Step 11: Make Round Cylindrical Blocks


I wanted to make at least one round cylinder block but the there was no more wood big enough to cut this out using a hole saw as there were only small bits and pieces left over. The largest piece was only 5/8” thick, 1 ¼” wide and about 4” long. So I cut this in half and glued the two pieces together to end up with a blank that was 1 ¼” square by 2” long. My next challenge was how to turn this into a round cylinder as I do not have a lathe. I decided to use the principle of a lathe by making a jig to spin the blank manually against a router bit. a 7/32" hole was drilled down the centre of the blank and mounted on a 1/4"-20 threaded rod. I fashioned a simple crank to turn the blank by hand in a box which had a trim router suspended over the top. By hand turning the blank while moving the router above the blank I was able to gradually mill the rectangular blank into a round dowel. The pictures show the progression of getting this done. Once completed I drilled the 7/32" centre with a 1/2" bit and then cut two blocks.
It may seem like a lot of work to make two small round blocks but staying with the self imposed challenge of making everything out of a single piece of wood forced the thinking process and creativity to get it done with limited resources and help me learn new techniques along the way. The toy is intended to help little ones build their own creativity so I thought it was just as appropriate to add my own in its development.
Step 12: The Crane and What Else Can I Make From These Scraps?


I had previously cut a cube for a crane and took a small cut off to make the boom. I wanted the boom to pivot up and down so decided to have this accomplished by pivoting the boom on a small 1/4" dowel. I also wanted the dowel end to contrast against the crane body. I stained the cube before drilling the hole for the 1/4" dowel. To make the 1/4" dowel I selected a scrap piece of maple from the pile and milled it into a square rod approximately 1/4" x 1/4" square. I drilled a 1/4" hole into a small piece of metal I had lying around, chucked the square rod into the drill and ran it through the hole to create the 1/4" dowel. I cut a slot in the cube for the boom on the crosscut sled. The width of the crane boom was sized so that it fit snugly into the groove and so could be move up and down and left in any position.
I sorted the remaining scraps and determined that by gluing several pieces up I could make larger pieces from which I could cut the following;
a. a 1 ¼” cube
b. two blocks 5/16”, 1 ¼” x 1 ¼”
c. two blocks 5/16” x 1 ¼” x 2 ½”
Step 13: Anything Else From the Dwindling Scrap Pile?


The scrap pile still had a few straight cut offs including ends of dowels. Why not a train accessory. I cobbled together a few pieces, made some cuts and with a little paint was able to fabricate the Rail Crossing sign.
It would be really cool if I could combine all these little pieces into something useful so I through about making a '"container" into which I could glue up a bunch of little pieces. I had a few strips 1/16" thick and 1 1/4" wide so if I could make it into a box then I could fill that box with the smaller pieces. So I set the goal to make a bigger block with dimensions of 1 1/4" x 1 1/4" by 2 1/2". If I were able to do that then it would end up being my biggest block for the set.
I decided to make the block in two halves and then glue those two pieces together. I glued up pieces as best as possible to form two rectangular shapes and filled in the spaces with whichever pieces fit in. Using the remaining sawdust I made a slurry of sawdust and glue in the consistency of a filler and used that to fill in the voids. I sped up the drying process with the assistance of a space heater. I only did the latter when I was around to observe, in order to avoid anything from getting overly hot and possibly catching fire although the temperature does not get that hot. But I did, just over an abundance of caution. Once the two halves were dry I cut them to size on the crosscut sled then glued them together.
When those dried I glued on the 1/16" strip I had to cover up the messy inside and filled the ends with more filler. The homemade filler does get rock hard when dry and cuts great. When that dried, I cut the block to size, drilled 1/2" holes, sanded and applied some stain. I used the stain as this helped to hide some of the joins considering how it was made up of multiple pieces.
It was not as pretty as if made out of a single block of wood but good enough and what a way to up-cycle all those ends that get thrown away.
Step 14: What's Left, Let's Think Outside the Box.


So I looked at what was left of the wood I started off with and there quite a bit of sawdust and just a few very small pieces of wood chips. I thought about particle board which basically consists of remnants of wood that has been chipped and bound together with adhesives and binding agents using an industrial process.
I decided to experiment. If I sifted the sawdust to get a uniform sized particle and mix in glue to make a slurry maybe I ould press it in some kind of mold and make something. I have an 1 1/4" drill bit so I drilled a hole in a scrap piece of 2x4 to act as a mold. I screwed on a backer board to seal off one end and then applied paste wax inside the hole. I happened to have a piece of 1 1/4" dowel rod, which was also waxed, and this became my plug to squeeze in the slurry. The wax would prevent the slurry from sticking to the hole.
I mixed the sawdust with glue to make the slurry and filled the hole in the scrap wood. I then used the dowel to push it down and clamped everything together. There was a bit of squeeze out. I let that sit for a couple days, removed the backer board and then hammered the dowel out. The resulting sawdust plug was still a bit soft and required a bit more time to dry before I could mill it into a round block. I was able to turn it into a round block. Success!
This process demonstrates that the sawdust can be converted into useful wood, albeit with some effort, so I will be keeping the rest to experiment a bit more and maybe make a few more blocks.
Step 15: The Completed Project


All parts were given a coat of food grade mineral oil
followed by a coat of my homemade beeswax polish and then buffed with a cotton cloth.
And there you have it.
And so the HAY RAIL train was born.
A wooden toy that's;
1. A Train Set.
2. A Building Block Set.
3. A Pull Toy

Runner Up in the
Wooden Toys Challenge 2016

Participated in the
First Time Authors Contest 2016


