

Introduction: Take Control - Turning LED On/off With a Button.


Hey guys! Want to learn how to read input into arduino and use it to control the output? Well here you've got the perfect tutorial on how to do so! In this instructable, I will guide you through the simple steps needed to make an led glow when a button is clicked an turn it off when it is clicked again.
Step 1: Step 1: Downloading the Arduino IDE

Download and Install the Arduino IDE (Interactive Development Environment) using the link below:
https://www.arduino.cc/en/Main/Software
Choose and save the version that best suits your operating system and configuration.
Step 2: Step 2: Hardware Materials
- 1 Arduino board
- 1 breadboard
- 1 LED
- 1 Button
- Jumper wires
- Resistors
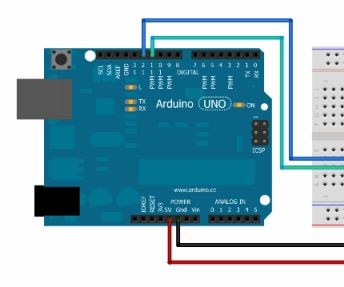
Step 3: Step 3: Building the Hardware

1) Connect one pin of the LED to port 5-e and the other at 6-e on the breadboard.
2) Connect one end of the jump wire at port 13 on the arduino board and the other end at port 5-a on the breadboard.
3) Connect one end of the second jump wire at port GND (ground) on the arduino board and the other end at port 6-a on the breadboard.
4) Add a button which will act as an input
5) Above picture shows how the connections should look like.
Step 4: Step 4: Downloading and Running the Program
Download the attached arduino program to your laptop. Connect the arduino to your laptop, and run the program. You should have a LED that turns on and off with a button click.
Attachments

Step 5: Step 5: Understanding the Program
LED has two methods:
- digitalWrite(ledPinNumber, HIGH) which sends a HIGH signal to LED making it glow.
- digitalWrite(ledPinNumber, LOW) which sends a LOW signal to LED turning it off.
In setup method, declare pin 4 as Input and intializes buttonOn as false. pin 7 is declared as output.
In loop method, the current value of button input is read. if it is pressed, it toggles the button from off to on. Next time the button is pressed it toggles from on to off. Delays are added to reduce noise and avoid changing the output too quickly. When buttonstate is On, HIGH is sent to LEDPin causing the LED to glow. When buttonState is Off, LOW is sent to LEDPin causing the LED to turn off.


