

Introduction: The Best Led Project Ever!


I find this project hard to categorize.
It's a combination of my ideas with ideas I got from Instructables and the internet. https://www.youtube.com/watch?v=1LaVV8uWhjg&feature=youtube_gdata_player
https://www.youtube.com/watch?v=IWZlUL9BP2k&feature=youtube_gdata_player
Step 1: Tools.

A dremel or similar rotary tool with a good selection of accessories is money well spent. It isn't great at anything but is good enough for almost anything.
An electric drill of any kind with a good
selection of drill bits is also a great buy.
A "third hand" isn't necessary but will prove to be invaluable when soldering small components.
Buy a good soldering iron. A decent pencil tip "Weller" is under $30. and will do a good job.
Get a good quality set of wire strippers.
Get a pair of needle nose pliers and a couple pairs of mini wire cutters/nippers.
Get a solder sucker.
Get a good variety of screwdrivers
You also need a hot glue gun.
An inexpensive multi- meter is a good investment.
Get a few "olfa" style knives and a hobby knife set.
Step 2: Major Supplies

1) experimenters board.
2) fine solder
3) enameled wire. (I recycled mine from an old t.v.)
4) jumper wire. ( I bought a breadboarding wire kit ) you can make custom lengths from solid core bell wire.
5) a project box. large enough to accommodate a 9v battery/clip and 2-3 switches.
random stranded wire.
Step 3: Specific B.O.M.

Parts and components.
1) 9v battery clip
2) 2x spst mini toggle switches
3) 1x Large dome clear 40watt incandescent bulb.
4) 1x 5mm dome U.V. led
5) 10x smd ultrabright leds
6) 1x 555 timer chip
7) 1x 4017 decade counter chip
8) 3 x1K 1/4 watt resistors
9) 2x 10⁴ ceramic disc capacitors
10) 1x 10 microfarad electrolytic capacitor.o
11) 1x100k linear taper potentiometer
12) 1x 9 volt alkaline battery.
13) 1x 4.7K 1/4 watt resistor
14) Tonnes of patience and the ability to read a schematic .
Step 4: Cut the Bottom Off of the Lightbulb

Use an abrasive cut off disc to remove the metal bottom of the lightbulb.
Then very gently use the cut off wheel to cut through the part where the bulb sticks out.
Step 5: Gutting the Bulb


Once you get the part that sticks out cut open, very carefully break the rest of the glass with a screwdriver and needle nose pliers. Once it is flat enough, I used a small diamond cut off disc and very gently pressed it onto the glass opening. Note you are not supposed to use a cut off discs flat side so be very careful. Once you are most of the way through you can pull the filament and glass out of the bulb.
I smoothed the hole witj a round diamond rotary file.
Step 6: Get the Wires Ready


Fold lengths of the enamel wire in half and twist together. Cut the ends and remove some of the insulation. I used the diamond rotary file. The looped end makes a cradle for the tiny surface mount leds. You can use any led you want though.
Step 7: Make a Tree


Twist the enamel wire that you have soldered the leds to into the rough shape of a tree. insert them into the bulb and use tweezers to pull the branches into place. Just like Christmas time? Use a hot glue gun to fix the tree into the bottom of the bulb.I also added one U.V. led.
I used a battery to identify which wires were positive and negative. If you use 3 volts and very quickly tap the wires, I found that the leds survive a reverse bias. Solder the wires into the board and label their polarity.
Step 8: The Circuit.
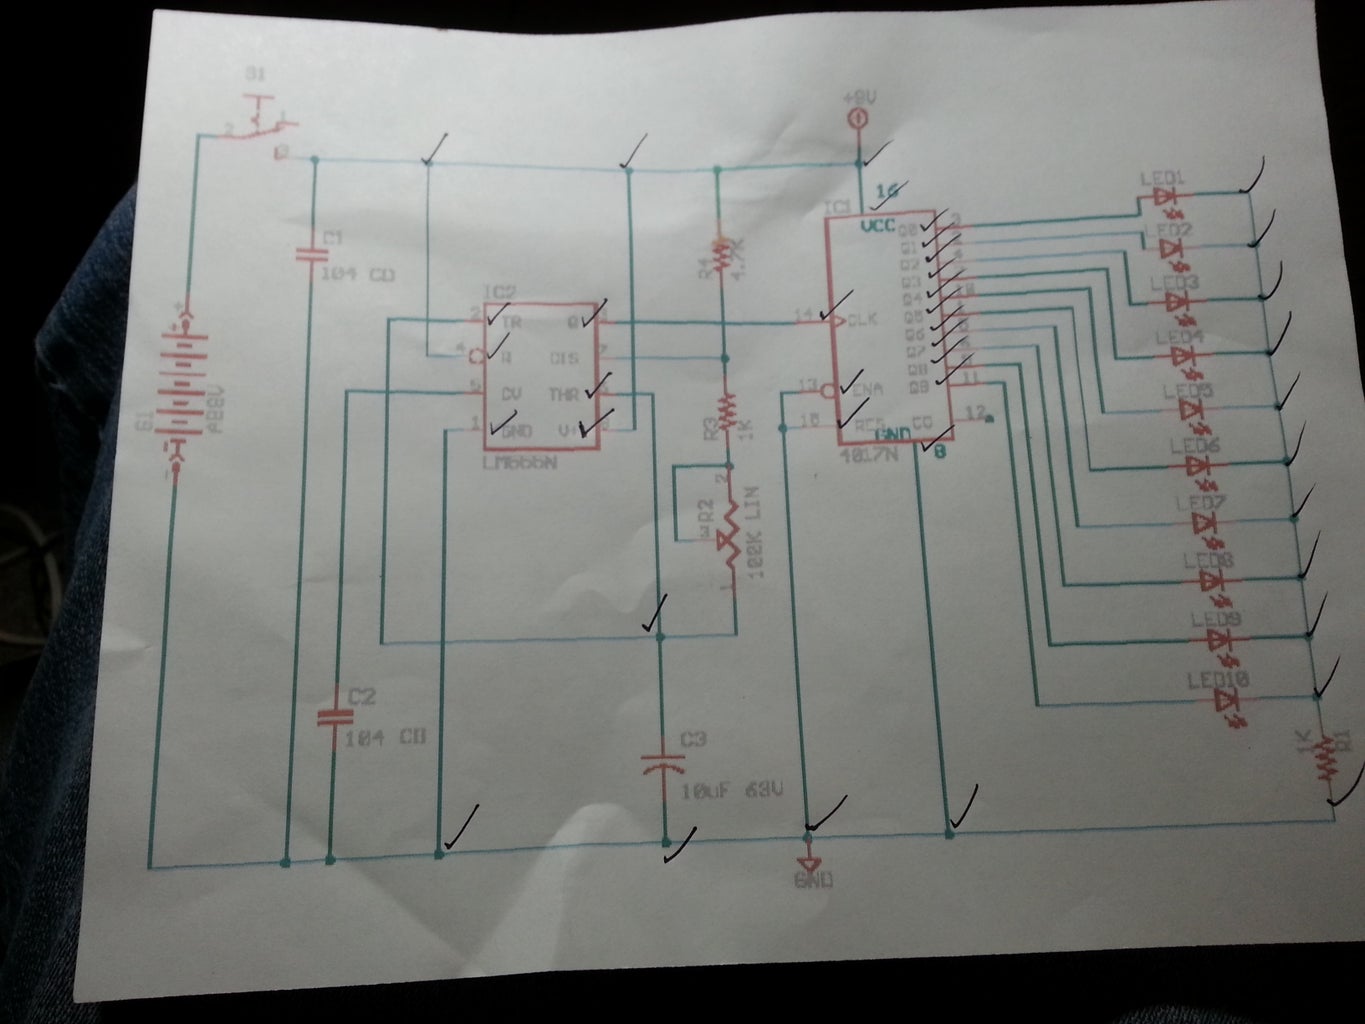


I browser searched "Random led flasher" and found this one. I'm sorry I don't remember where I found it.
It will randomly flash up to 10 leds and the clock and reset pins are controlled by a 555 chip. Because of the way I wanted this circuit to look (messy and organic) I can't show you a step by step construction of the board as I just made it up as I went along.
Step 9: Power Supply


I used a small project box and wired two switches. One turns on the UV led and one turns on the flashing circuit.
The circuit is poweed by a 9 volt battery. The potentiometer controls the charge and discharge rate of the capacitors connected to the 555 timer circut. This allows you to control the speed at which the leds flash. The Leds light individually in steps.When you have the speed turned up high it has a strobe light effect. You have to see it in the dark to appreciate it. There is two Video links in the beginning of this instructable of this operating. enjoy!


