

Introduction: The Legoduino Circuit Learning Project


This project was created/designed/the brainchild of a 9-year-old girl. She has her own profile, NerdyCrochet, now that she is thirteen (2017) and legally able to publish her own instructables.
My daughter is the inventor of this Lego Circuit/Arduino Learning Project, I just helped with the pictures and the write-up of this instructable. She builds circuits here at home and has also been learning about Arduino and programming. She came to me one day with copies of real electronic components built out of Legos so she could practice making the circuits on her own. I thought it was so cool that it deserved to be shared with the instructable world.
Note: These Lego components don't actually transmit electricity or work like a live circuit. These are toys to create mock-ups of real circuit boards. My daughter uses the Lego components to double check her circuit diagrams so she doesn't accidentally blow up an LED on the real circuit board.
Following are a few of her creations. We hope you enjoy looking through the pictures and please let her know what you think. I'm sure there are other ways of building these electronic components out of Legos that are closer to the real-life examples, but hey, this is what my child came up with and I'm pretty darn proud of her. The fun of creating these models is digging through a pile of bricks and using your imagination--she challenges you to come up with some creative models of your own!
(To see a video of the Legoduino in action, skip to step 12.)
Step 1: Leads

Here are real leads and her Lego version leads--pretty self explanatory. Both versions of Lego leads she found closely resemble the actual leads used in real circuit boards.
Step 2: Switch

This is a real switch on the left, and her version on the right made out of Legos.
Step 3: Resistors

The real resistors are on the left, her Lego resistors on the right.
Step 4: LEDs

The real LEDs on the left and her Lego version on the right.
Step 5: Potentiometer


A real potentiometer on the left, her Lego version on the right. Also an expanded/exploded view where (1) is the bottom level of the component.
Step 6: Light Sensor


The real light sensor on the left, her version made out of Legos on the right. Also an expanded/exploded view where (1) is the bottom level of the component.
Step 7: 1.5V Battery


Her version of a 1.5 volt (AA) battery. She has the cathode and anode brightly colored for easy connection of her Lego leads. Also an expanded/exploded view where (1) is the bottom level of the component.
Step 8: 9V Battery


Her Lego version of a 9 volt battery on the right. Also an expanded/exploded view where (1) is the bottom level of the component. She has the anode and cathode parts of the battery brightly colored for easy reference for the leads.
Step 9: Bread Board


A real bread board on the left, her Lego version on the right. She was very specific that her Lego board had five rows of connections, just like the real bread board. (Here, the real bread board pictured is a double version of her single Lego board.) In the expanded/exploded view of the component, (1) is the bottom level.
Step 10: Arduino and USB Cable

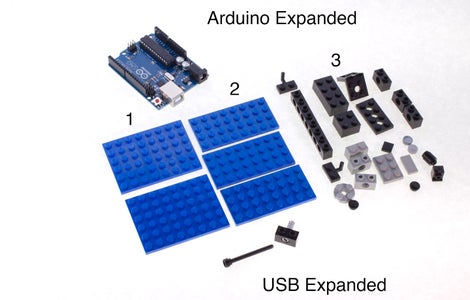
How her Lego Arduino board stacks up against a real Arduino. Also pictured, a Lego USB cable to connect into her Lego Arduino. In the expanded/exploded view of the Arduino component, (1) is the bottom level.
Step 11: Multimeter


A real multimeter versus her Lego multimeter. In the expanded/exploded view, (1) is the bottom level of the component.
Step 12: Legoduino in Action!

First Prize in the
Toy Building Blocks Contest

Participated in the
Toy Contest


