

Introduction: The Memory Tree


The ultimate in nerdy Christmas trees: a small tree made from old, obsolete memory modules. Everyone who ever built or upgraded a computer has some of these laying around, and as they get old and too low-capacity to be of any use, they lose all purpose. But it's hard to throw something out that still works, isn't it?
Since they are mostly green, and have nice shiny copper strips or pins, they're perfect for a Christmas tree. And don't we all want a Christmas that's made of good memories? There you go! *badum-tishhh*
I made this at my local hackerspace: Hack42 in Arnhem, the Netherlands. Kids, remember to eat your veggies and support your local hackerspace!
Step 1: Gather Your Tools and Materials


You'll need:
- Lots of old memory modules, any kind; how many you need depends on the height of the tree. But I'd say you need at least 30. Different lengths is okay
- Floral foam. I used two blocks
- Some wood
- A metal rod or pipe. Doesn't have to be pretty, as it's not visible
- Hot glue
- Nails
- Some pretty shinies to decorate the tree. Old harddisk platters, HD reading heads, rings, various components, or anything that's shiny and seems suitable
- Copper or iron wire
Tools:
- a drill
- a hammer
- a knife
- a hot glue gun
- some pliers for cutting and bending wire
Step 2: Make a Stand


First of all, make a simple cross-shaped stand or foot, like the kind that is often nailed to the trunk of a real Christmas tree. You'll need two pieces of wood of about equal size, and two small blocks. They don't have to look very neat, Christmas three stands never do.
Drilling halfway through the small blocks before you nail them to the ends of the longer pieces makes them less likely to crack. Just a hint. I wish I'd thought of this earlier.
Drill a hole into the middle of the cross that's wide enough so the metal rod will just fit in. Push (or hammer) it in. With any luck, it's stuck.
Then saw the rod down to the height of the two blocks of floral foam, plus a centimeter or so.
Now your tree has a foot and a spine.
Step 3: Time to Go Green


Plug your glue gun in. When it's hot put some glue on the cross, near the middle, and stick the first block of foam on the rod. Try to get it as straight in the middle as possible and push it all the way down.
Put some glue on top of the block, and add the next block.
Now use the knife to whittle the foam down to a roughly rounded tree trunk shape. It's nice if it's narrower at the top, but make sure you leave enough foam to stick your memory strips in.
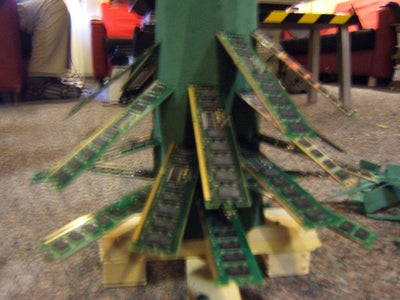
Start at the bottom, sticking the strips in the foam, almost horizontally: this means your tree will be widest at the bottom. Use the longest strips first. Work your way to the top, layer by layer, angling each new layer a little bit steeper. Look at your work: are you happy? If you aren't, now is the time to adjust.
Then take them all back out again, put hot glue in one of the slits in the foam, and glue the strip in. If any foam breaks off, glue that back in, too. Hot glue is your friend; use it liberally. Just don't burn your fingers!
Glue all the strips in, one by one, until you get to the top.
Step 4: Decorate!


Time to dress your tree up! You'll want something to cover the top of the foam; I used two old harddisk platters in different sizes, the smaller one on top, with a ring in between. I covered the hole in the top platter with a pretty shiny ring (another hard disk part).
Then I glued two of those rings each on a side of a CPU socket, and used that as a topper. I just glued it into the end of the metal rod that's inside the foam.
There are small holes in each of the memory strip, and those are perfect to hang your decorations from. I used rings and reading heads from old hard disks. But shiny elcos, resistors, or any other pretty component you happen to have may be very nice. Use wire to bend S-hooks and hang your decorations from those.
Step 5: And We're Done

Here's the result: a tree made of old memory modules. Let the Christmas cheer begin!

Participated in the
Reuse Contest

Participated in the
Holiday Gifts Contest


