

Introduction: Tools + Materials


Welcome to Table Saw Class!
Whether you've just bought a new table saw, or are looking to get one and want to know the basics of operation, this introductory class will cover the skills to get you started. Before firing up any equipment we'll start off exploring starter table saws at different price points and some shop basics, then dive into the fundamental skills of the table saw. At the end of this class you'll understand the essential skills to safely perform the most common operations on the table saw.
Meet Your Instructor
Hello. I'm Mike, and I make things.

With hundreds of open-source projects, my aim is to educate, inspire, and entertain. I love learning new things, breaking all the rules, and getting my hands dirty.
My functional prototypes have been included on TV shows and print magazines all over the world, and reprinted in a few art and design books, too. I've compiled 2 books for Instructables, and authored a few kids books for young makers to do with their parents. I'm originally from Vancouver, Canada, but now cause trouble in San Francisco, California. I work on the Instructables Design Studio, part of the Autodesk Education Group.
Step 1: Tools + Supplies
Depending on who you ask, the best table saw to buy can be a contentious topic. To me, there are three big things to consider when buying a table saw: Build quality, utility, and your budget. With this in mind I'll examine a few starter table saws and cover the benefits and limitations of each.
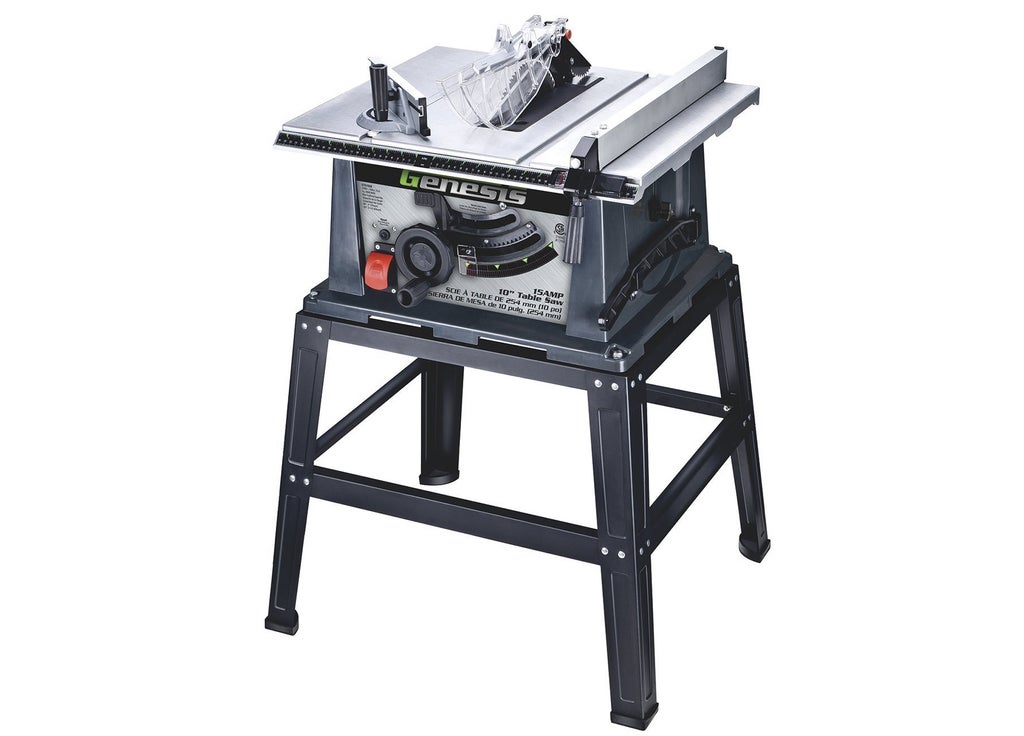
Genesis GTS10SB (~$190)
15 amp motor @ 4,800 RPM
| Benefits | Limitations |
|---|---|
|
|
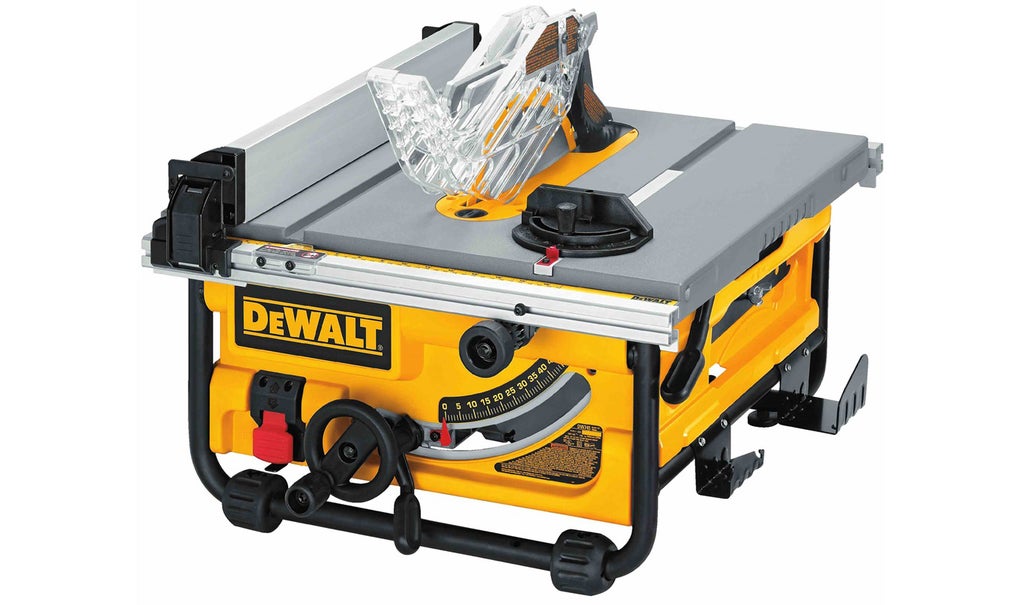
DEWALT DW745 (~$300)
15 amp motor @ 4,800 RPM
| Benefits | Limitations |
|---|---|
|
|
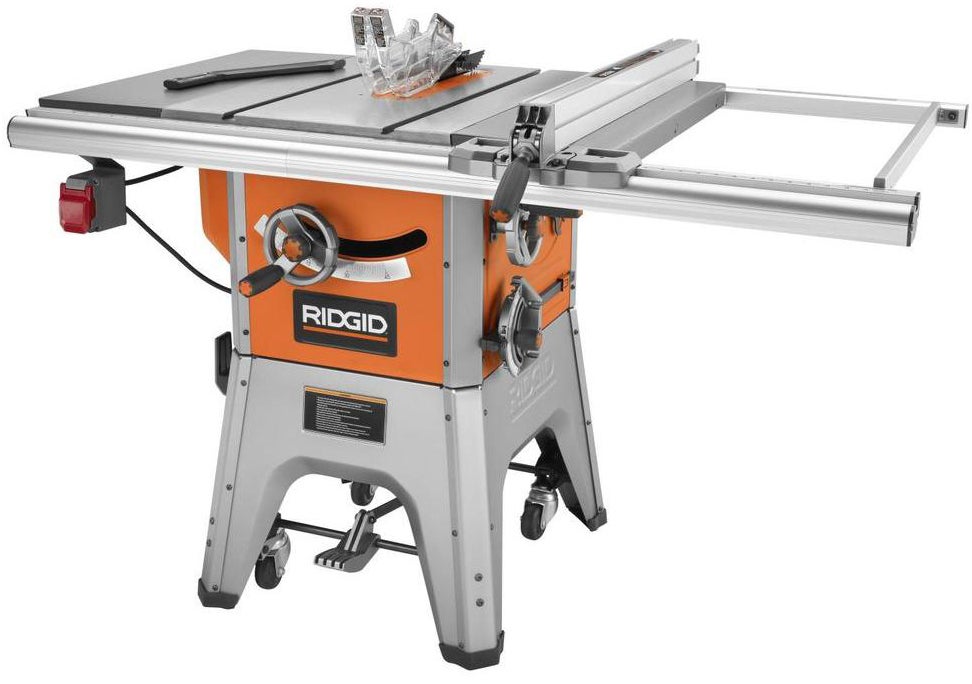
RIDGID R4512 (~$550)
13 amp motor @ 3450 RPM
| Benefits | Limitations |
|---|---|
|
|
I've deliberately omitted larger cabinet saws and specialty saws like the SawStop, a saw that will automatically drop the blade if contact is made with your finger. These saws are very costly and could be cost prohibitive for a beginner. If you find yourself truly enjoying working with a table saw after some time working with one then consider a higher end model, but the basic models work just as well.
A word on cordless table saws: new technology has introduced battery powered table saws. While convenient, these saws will lack the power of a corded saw and rely on swapping out batteries in order to stay productive. You needs will vary, but I prefer the corded variety.
Once you have a table saw, you'll need a few other supplies:
- Combination saw blade (30-60 teeth)
- Dado blade stack
- Dado insert for your saw
- Featherboard
- Push sticks (or a very fancy push block)
- Paste wax
- Mitre gauge
Measurement Tools
We'll look at each of these items in more detail below. But first, a word on safety.
Step 2: Safety

When working with power tools like the table saw you'll need to take some precautions to ensure safety. Make sure not to wear loose clothes that could become ensnared in the blade. It's also important to roll up your sleeves and tie back long hair.


Safety glasses are required, and a dust mask is advised. You should not wear gloves when working with a table saw, as the gloves can get sucked into the blade and take your hand with it.
Personal protective equipment is always a good idea, but with a table saw the biggest hazard is kickback. Kickback occurs when the wood you are cutting binds between the cutting blade and an immovable object like the fence, and then violently throws the wood back at you. Kickback is instantaneous and there's almost no way to get out of the way. Below are some measures that can help minimize kickback on the table saw and keep you safe.
Push Sticks
To keep your fingers away from the blade you'll need push sticks. Push sticks are sacrificial pieces of wood to plastic that help push the wood through the blade.

Push sticks usually have a notch or "bird's mouth" cut that hooks onto the end of the piece you are cutting and guides it into the blade. Push sticks should be viewed as a consumable item; though the idea is to keep them as long as possible, it's not the end of the world if you chew one up or accidentally cut through it (better than your fingers!).
Riving Knife
All modern table saws come with a riving knife, a stationary dull blade that rides along behind the cutting blade that acts to prevent wood from binding against the saw blade after cutting.

Internal stress within wood can cause wood to become misaligned after cutting, so what was once a straight piece of wood can warp into a helical bend after cutting. This is normal. The riving knife acts as a wedge, keeping any warping after cutting away from the cutting blade. Riving knives are removable, for the times when you want to make a dado or other cut that doesn't go completely through the material, however should be in place at all other times.
Kickback Pawls
Pawls are serrated spring loaded edges designed to allow wood to travel past it in one direction, but not the other. Not all table saws have kickback pawls, but they are a great feature that can be added to most table saw riving knives.

Pawls are mounted just behind the riving knife and drop down on either side of the cutting blade.

Pawls are spring loaded and move upwards when wood pushes them out of the way, if kickback occurs the serrated teeth catch the wood and prevent it from flying backwards towards you.
Featherboard
Another great safety accessory that's doesn't come standard with table saws are featherboards. Some are magnetic, some ride in the mitre slot next to the blade, but they both aim to push the wood against the fence and keep it aligned while cutting.

Though you can hold the board with your hands and guide it through the cutting blade, the featherboard applies constant pressure against the workpiece. Misalignment while feeding wood into the cutting blade can cause kickback, and while a featherboard will help reduce the occurrence of a kickback it will not restrain the board if one does occur.

The fingers of the featherboard apply pressure against the wood. In this animation you can see the board starting out of alignment with the fence, then straighten up once the wood makes contact with the featherboard.
Step 3: Standing Position

Where do you stand when operating the table saw? The answer seems obvious: directly behind the wood being pushed through the blade, giving you maximum control and leverage to push the material, right? Wrong! This puts your body directly in line to be struck by your material if there's any kickback.

Kickback happens when the material being pushed through the cutting blade gets bound between the fence and the blade. Since the blade is spinning towards the operator, the wood will bind and be projected directly at you.

The above exaggerated pose shows you should be off to one side when pushing your material through the saw blade, minimizing your chance of being struck if there's any kickback.
Shop awareness is also important. Make sure there's no one else in the potential path of kickback, either.
Step 4: Saw Blades

Table saws are a powerful and versatile tool, partly due to their power but also the type of blade installed. Saw blades are typically defined by the number of teeth they have: low number of teeth means a faster and more aggressive cut, and a high number of teeth means a slower cut with a nicer edge.
Low Tooth Count Blade


Saw blades with a low tooth count are great for rough cuts, making quick work for large volumes of work. The aggressive teeth are great for construction cuts that aren't meant to be of finish quality.
High Tooth Count Blade


Fine tooth saw blades make slower cuts, but the finish quality of the cut is much nicer. Fine tooth blades are great for cuts that will be the finish edge of your project. Higher tooth count blades are able to cut harder materials, like hardwood. With the right blade, your table saw can even cut thin metals.
Dado Blade


Dado blades are stacked like a sandwich to achieve the desired blade thickness. Dado blades are used for cutting grooves in wood, either with or against the grain. We'll cover this more in the Dadoes + Rabbets Lesson.
Tooth Crown

If you look closely at the crown of blade teeth you'll notice there's a slight angle to the tooth. The thinner and sharper the blade angle, the cleaner the cut.
Blade Storage

Blades should be stored to protect the blade tips. If your blade has a plastic cover it's best to cover your blades to prevent damage. I like to keep my blades separated to prevent any contamination from oils and debris that might be present from transferring onto other blades stacked against it.
Step 5: Terms

There's a few terms you'll likely hear in this class, and around the shop. Here's a few common terms you should know:
Kerf:
Any cutting will result in some loss of wood that is turned into sawdust, this is called the kerf. The kerf is the divergence between the left and right sides of the saw teeth, and since the teeth of any saw is larger than the blade thickness you'll want to measure kerf from the teeth and not the face of the blade.
Rip cut
A cut parallel to the grain of the wood (more in Ripping Wood Lesson)
Cross Cut
A cut perpendicular to the wood grain. (more in Mitre Cut Lesson)
Kickback
When wood binds against the blade and is violently thrown back towards the operator.
Zero Clearance

An insert that exactly matches the width of the blade. A zero clearance insert prevents small pieces from falling in the gap between the blade and the edge of the insert, and reduces tearout when cutting.
Tearout

Tearout
A ragged finish along the kerf, and only appearing where the blade exits the cut. For table saws this will be the side of your wood that is facing down during cutting.
Dado

Dado cut - across the grain of wood
A dado (pronounced "day-doe") is a carved slot. Dadoes can also be called grooves, but officially speaking dadoes are across the grain and grooves are cut with the grain - however both terms are used interchangeably without much fuss.
Rabbet

Rabbet cut
A square notched cut along the edge of a board, with or against the grain.
Arbor
The threaded spindle attached to the motor which the saw blade is secured on, will have a notched side which a wrench can grasp.
Step 6: Quiz Time!
{
    "id": "quiz-1",
    "question": "A dado and a groove are the same thing.",
    "answers": [
        {
            "title": "True",
            "correct": false
        },
        {
            "title": "False",
            "correct": true
        }
    ],
    "correctNotice": "Correct! Though sometimes used interchangeably, a dado is cut across the grain and a groove is cut with the grain. ",
    "incorrectNotice": "Are you sure?"
}
{
    "id": "quiz-2",
    "question": "Tearout occurs where the blade:",
    "answers": [
        {
            "title": "exits the cut.",
            "correct": true
        },
{
            "title": "enters the cut.",
            "correct": false
        },
        {
            "title": "doesn't make contact with the wood.",
            "correct": false
        }
    ],
    "correctNotice": "That's right! Knowing this, prepare your cuts with the 'show' side facing where the blade enters the wood (the top), so any tearout will be on the 'hide' side of the wood (the bottom).",
    "incorrectNotice": "Are you sure?"
}
{
    "id": "quiz-3",
    "question": "Low tooth saw blades are perfect for cutting fast, rough cuts.",
    "answers": [
        {
            "title": "True",
            "correct": true
        },
        {
            "title": "False",
            "correct": false
        }
    ],
    "correctNotice": "That's right! Low tooth saw blades make aggressive cuts into wood and are very quick.",
    "incorrectNotice": "Try again."
}
Step 7:
Whether you have a vintage table saw, a budget conscious saw, or a top of the line table saw, they all work roughly the same. In the next lesson we'll go over the parts of a saw and how to make adjustments to get the cuts you want.


