

Introduction: Turn *any* Video Into a 3D Model

Your iPhone, or any smartphone, or device capable of recording video, is actually a very powerful tool to create 3d representations of your world. It's really easy, and only requires a few free software packages. It is possible to do on a Mac, but the free software we are going to use today runs best on PC, so the tutorial will be for PC! (I'm using windows 8)
In my opinion, this solution is also better than solutions like 123d Catch (free software from Autodesk) where you have to take up to 60 images at precise points. It's just too difficult to encourage a lot of people to play around a lot with it. Anyone can take a video! (123d catch does have other nice features, so I encourage you to check it out too)
As you can see there are just a few simple steps I'm going to walk you through in more detail:
1. Record the video
2. Turn the video into images
3. Turn the images into a point cloud
4. View the point cloud, and do more cool stuff!
This can only be used for academic and non-commercial uses because of restrictions with the underlying software we will use.
Step 1: Taking Your Video
There are a lot of good recommendations for taking a video of an object. Here are some to get you started:
1. Shiny, see-through, or reflective images are really hard. So trying to reconstruct a glass bowel, or a car, or even something with windows can be difficult. But that doesn't mean you shouldn't try!
2. Consistent lighting. Some people think it's good to add a flash but that can actually hurt your results because of how the photogrammetry algorithms work. Just trust me on this one. Try not to have any sun or light shining directly into the camera.
3. Good contrast, but not too dark of details! If your details are really dark, the software will have a hard time finding them. Good contrast however helps the software find "features". Features are unique details that have distances to other features/details. This is how the software figures out where the images are from, it compares the distance and angle between the features between images. So being able to find a lot of features is good.
4. Things like fish-eye lenses, tilt-shift lenses or other specialty lenses should be avoided if you are using a DSLR. Unless you would like to rewrite the software - it's best to stay away.
5. Try to keep your camera steady, but don't worry too much about it. The software will automatically figure out where each image in the video was taken from, how cool is that?! If you want to scan an object 360 degrees, do a couple concentric circles at various heights.
6. Distance doesn't matter too much, but the closer to the object, the better detail you will get.
7. Duration - for the purposes of this demo - I recommend the video being between 30s and 1 minute long.
The most important suggestion I have is to try different things! There is no cost and no way to break anything, so just see what works well for you.
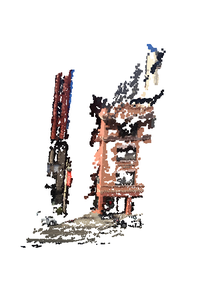
I was walking down Post street in San Francisco one day and thought, huh, I'll try it just walking down the street! And I was pretty pleased with the results. If you don't want to use your own video, feel free to use this one to learn.

Step 2: Turning the Video Into Images
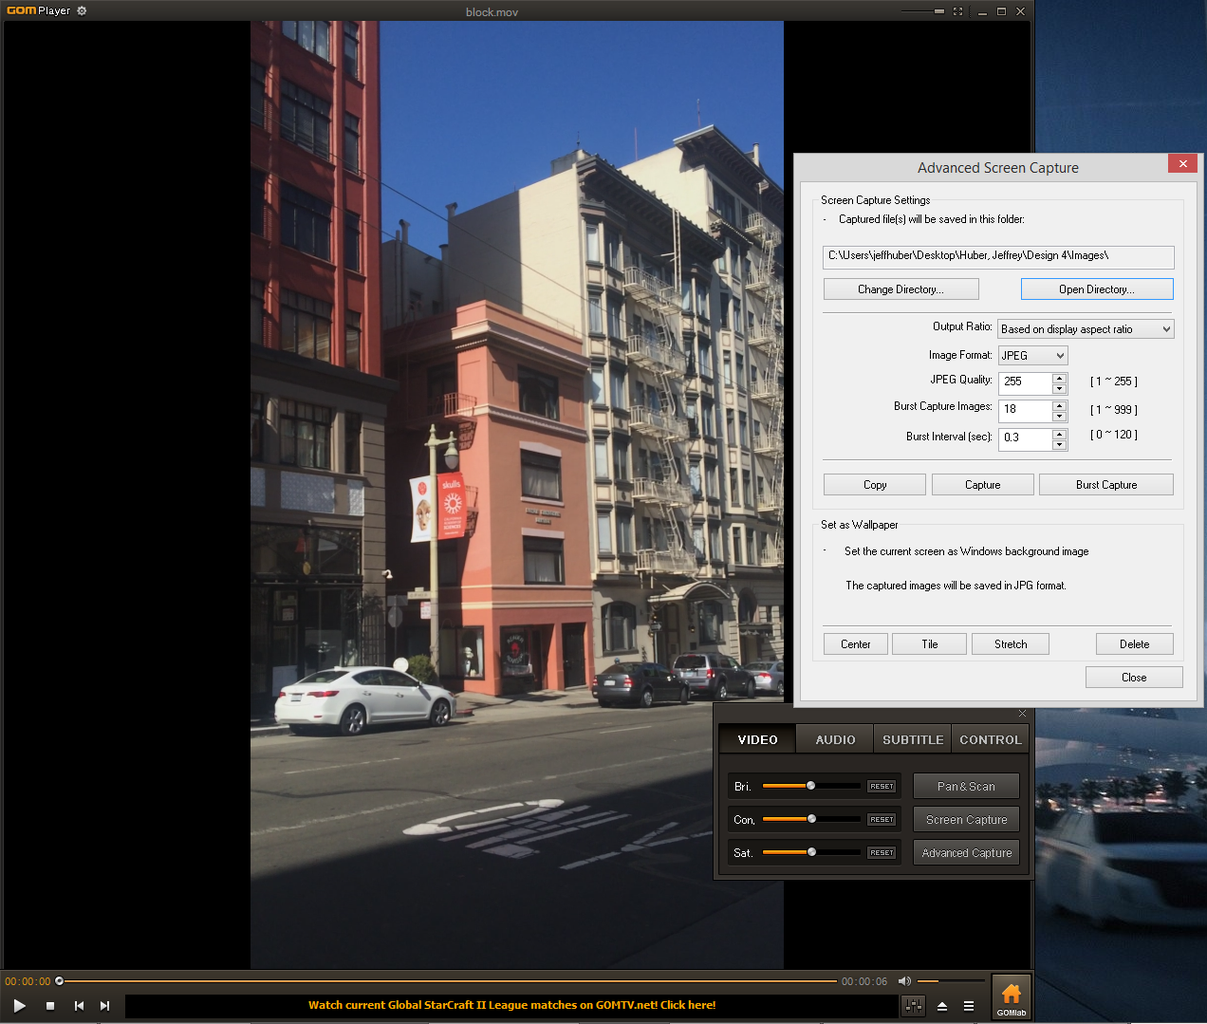
For this step, you are going to need a free piece of software called GOM Player. (http://www.gomlab.com/). (WARNING: Some people have reported GOM player as having Malware! Please exercise extreme caution or consider another option) Download it and install it.
1. Open the video you took in GOM media player.
2. If you took the video in portrait mode like I did, you will probably want to rotate it. You can press CTRL+SHIFT+S to do this.
3. Click "Advanced Capture" and then select a folder that you would like to save all the images to, maybe something like "Desktop/pointcloudimages". Set "Burst Interval" to 0.5 and "Burst Capture Images" to the length of the video in seconds times 2. So if the video is 60s long - type 120 here. (in the future you can experiment with using even more images per second)
4. Click play on the video at the beginning and then immediately click burst capture as well. Let the video play out - you will see images appear in the images folder.
5. Great job!
Step 3: Turning the Images Into a Point Cloud
For this step, we are going to use the wonderful VisualSFM by Changchang Wu. As I mentioned before, you will need to contact Changchang if you would like to use this tool for anything other than academic or non-commercial purposes. So download it and install it!
(if you don't know whether to use the 64 bit or 32 bit version, here is a guide to find out what type your computer is.)
To complete the install of VisualSFM, we want to use PMVS and CMVS, which are advanced tools to make great point clouds. To do this:
1. Download the CMVS-PMVS zip here: https://github.com/pmoulon/CMVS-PMVS/archive/master.zip
2. Extract the Zip so you can see the files. Then copy "cmvs.exe", "genOption.exe" and "pmvs2.exe" into the folder where you installed VisualSFM. On my computer that is called "VisualSFM_windows_cuda_64bit" but that might be called something different on your computer.
Great now we are ready. Boot up VisualSFM.
1. Open VisualSFM and click the folder with the + icon. Select all the images in the images directory. Delete any fuzzy or bad images. Bad images are blurry, out of focus, or are overexposed (too bright)/underexposed (too dark).
2. Click the 4 arrows icon to SIFT the images and let that run. SIFT looks through the images and finds the features.
3. Click the 3 arrows pointing right to run a sparse reconstruction and let that run to. This matches features between images and starts adding your images to the view. This part is really fun to watch!
4. Remove any bad cameras (cameras where they shouldn't be - usually far too high or far too low) by pressing F1, selecting cameras and then clicking the hand icon.
5. Run the dense reconstruction by click "CMVS". Choose a folder to save the results to and then wait for that to complete.
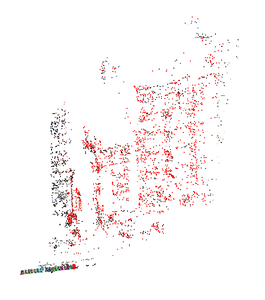
6. When that is done, press "TAB" to see the dense reconstruction, cool!
You may be wondering how to save the result, and the good news is that it is already saved. We will go over that in the next step.
Step 4: Viewing Your Point Cloud and Future Steps You Could Take

I recommend the tool Meshlab to view your point cloud, but a lot of different pieces of software can open point clouds. You can get Meshlab for free here, http://meshlab.sourceforge.net/. It's available for Windows, Mac, and Linux.
Open the folder where you saved the PMVS. Then open the "00" folder and then open the models folder, and then you will see a list of files that start with "option-" and end with ".ply". There may be just one, and that is actually normal. Open all or just the one in Meshlab.
From here you can do lots of stuff!
Other things you can do:
1. Clean up your point cloud and remove the noise (aka bad data). Here is a youtube video on how to do that: Cleaning: Triangles and Vertices Removal
2. Do a reconstruction of your model with a Poisson reconstruction. Here is a great instructables I found on that: Using Meshlab to clean and assemble Laser data. (steps 6-8) If you want to 3d print your scan data, this is what you want to play around with.
3. Import your point cloud into a CAD software package and use it to sketch, trace or reverse engineer an object.
Happy scanning!


