

Introduction: Turn Your Arduino Into a 4 Voice Wavetable Synth With Only a Few Components...


More by the author:


About: IMPORTANT: Please do not message me personally with technical questions. Use the comments in the respective Instructables. I really love sharing and helping people makes much more sense in a shared space where…
Multiple synthesizer projects have been done for the Arduino, but few have been able to utilize the full power of the Arduino processor. DZL from GeekPhysical wrote a 4 voice wavetable synthesizer that is one of the more advanced software based synths for the Arduino. It has wavetables included (sine, saw, square and triangle) and envelopes to create beats.
This instructable will show you how to make a simple sequencer that plays a little melody. You can hear how it sounds here:
Or you could detect touch and convert it into sound patterns:
This instructable will show you how to make a simple sequencer that plays a little melody. You can hear how it sounds here:
It is up to you to modify the code to do many other things. Possible examples could be a midi controlled synth (sample code included), it could be a strange noise machine like this one:
Or you could detect touch and convert it into sound patterns:
Step 1: Parts

You should use the following parts:
Don't worry if you don't have the exact values. It will probably work, but might be with lower sound quality. The Arduino is not powerful enough to drive a pair of headphones so you will need some kind of preamp for that - e.g. a headphone preamp like this one.
Don't worry if you don't have the exact values. It will probably work, but might be with lower sound quality. The Arduino is not powerful enough to drive a pair of headphones so you will need some kind of preamp for that - e.g. a headphone preamp like this one.
Step 2: Add the Components to Your Breadboard


Start out with adding the components to the breadboard as the picture depicts. If you want diagram based instructions look at the third slide in this step.
Step 3: Connect to the Arduino Board


Connect one wire from pin 6 to the breadboard and one wire from ground to the breadboard.
Step 4: Connect to the Speakers
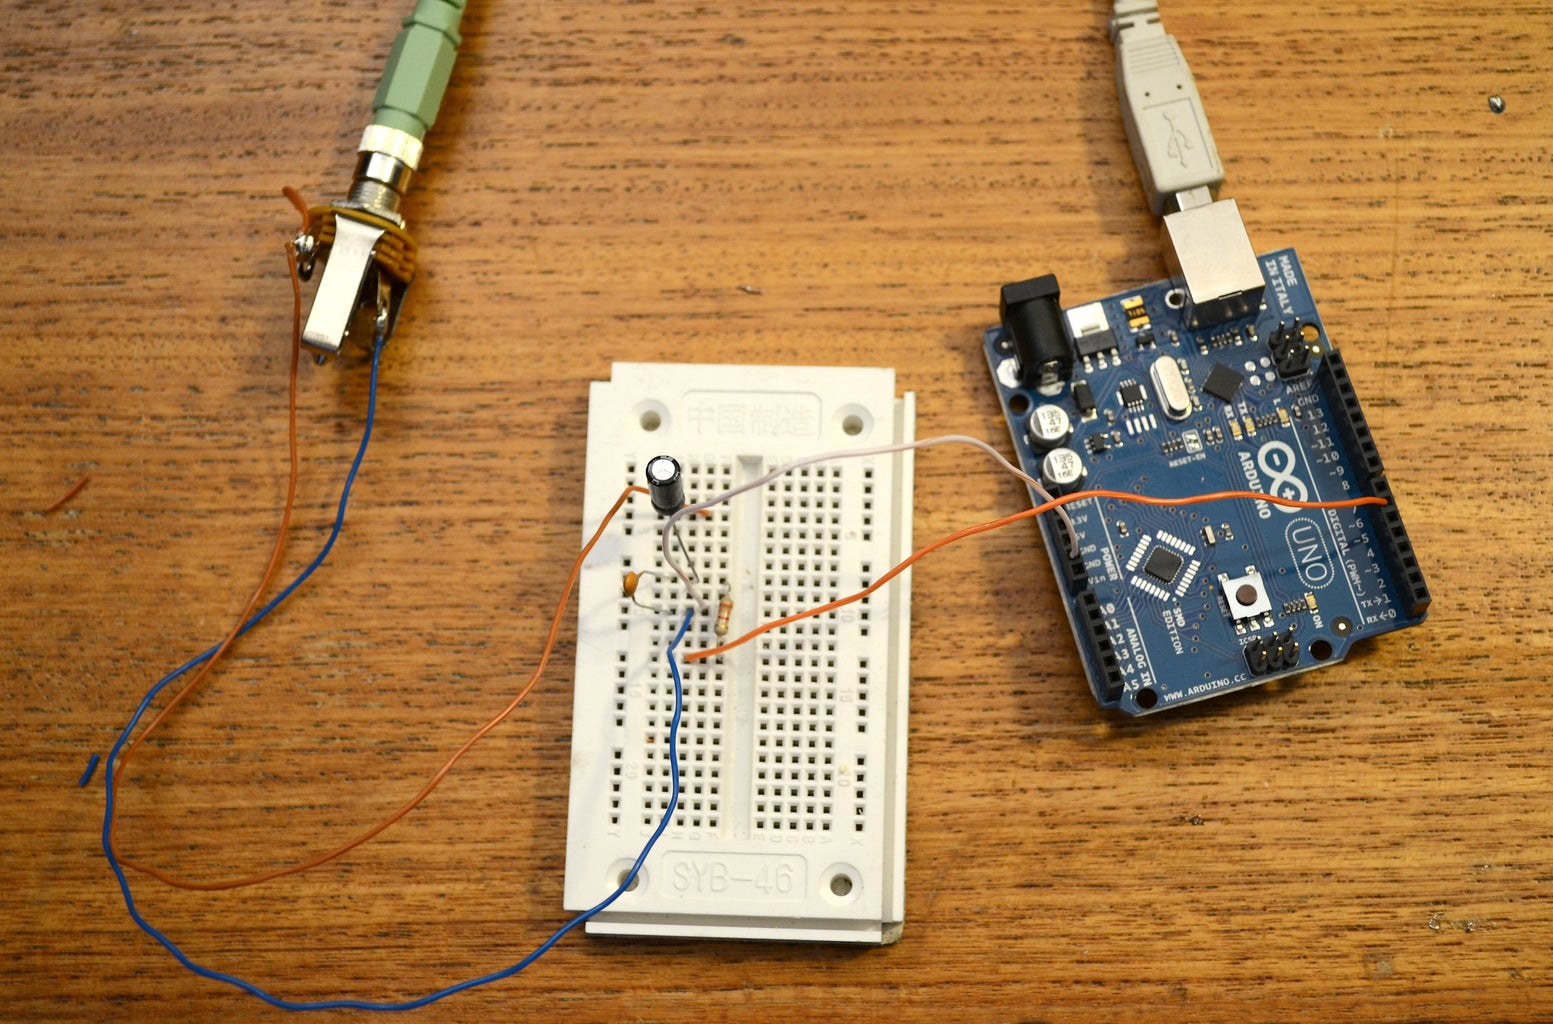


Connect the jack connector to the breadboard as shown and plugin the jack from the speakers.
Step 5: Upload Code

***Remember to read the update below (keeping the old info for consistency)***
Below are the simplified steps to uploading the code to your Arduino board. If you are brand-new to Arduino, you can find a great step-by-step guide here to help you get your board connected and up and running, it's very simple and then you can continue with the below steps.
Congratulations - you are ready to go!
Update!
A new version of the synth can be found below:
https://github.com/dzlonline/the_synth
This version works with the newest version of the Arduino Ide and the whole synth has been simplified. It should be more simple to hack and modify for ones own needs.
The output should be connected to pin 11 (Configurable to 3 as well). In the old code one should use pin 6.
Below are the simplified steps to uploading the code to your Arduino board. If you are brand-new to Arduino, you can find a great step-by-step guide here to help you get your board connected and up and running, it's very simple and then you can continue with the below steps.
- Download Arduino: www.arduino.cc
- Connect the Arduino board to the computer via usb.
- Download the code from github here: https://github.com/Illutron/ArduinoSynth (Old code - look below)
- Upload the code to the Arduino board.
Congratulations - you are ready to go!
Update!
A new version of the synth can be found below:
https://github.com/dzlonline/the_synth
This version works with the newest version of the Arduino Ide and the whole synth has been simplified. It should be more simple to hack and modify for ones own needs.
The output should be connected to pin 11 (Configurable to 3 as well). In the old code one should use pin 6.


