

Introduction: USB FOAM CUTTER - USB STYROFOAM CUTTER


• Name: USB STYROFOAM CUTTER
• Theme: STYROFOAM CUTTER MADE WITH PVC PIPES
Step 1: LIST OF MATERIALS:
LIST OF MATERIALS:
- 1 / 2¨ threadable PVC pipe (01m)
- Switch (01 units)
- “B” guitar string (01 units)
- 2P male pin (01 pcs.)
- Parallel wire (2m)
- Screws (2 pcs.)
- Nuts (2 pcs.)
- Screw-in cap 1 / 2¨ (02 units)
- 1 / 2¨ PVC 90-degree threaded elbow (02 units)
- USB power source or portable charger
- USB cable
TOOLS:
- Drilling machine
- 1/2 PVC thread maker
- Diagonal Cutting Pliers
- Scissors*
- Stylus *
- Insulating tape
- Pen *
- Screwdriver
- Arc saw
- PVC Blade (use on arc saw)
* Optional
_________________
LISTA DE MATERIAIS:
- Tubo de PVC roscável 1/2¨(01m)
- Interruptor ( 01 unid.)
- Corda de violão "Si" ( 01 unid.)
- Pino macho 2P ( 01 unid.)
- Fio paralelo (2m)
- Parafuso ( 02 unid.)
- Porca ( 02 unid.)
- Cap roscável 1/2¨ ( 02 unid.)
- Joelho roscável 1/2¨( 02 unid.)
- Tarraxa para PVC 1/2¨
- Furadeira
- Fonte c/ entrada USB para celular
- Cabo USB
- Carregador portátil
- Alicate de corte diagonal
- Tesoura*
- Estilete*
- Fita isolante
- Caneta*
- Chave Philips
- Serra em arco
- Lâmina para PVC (usar na serra em arco)
*Material Opcional
Step 2: Cut the Pieces


STEP BY STEP
1st - Cut the pieces
I preferred to use the 1 / 2¨ threaded tube (for hot water), but you can choose to use another type of PVC pipe with the same diameter, that is OK.
Cut 3 pieces with the following measures:
01 - Piece with 4 inches
02 - Pieces with 8 inches
__________________________
PASSO A PASSO
1º - Cortar as peças Eu preferi usar o cano roscável 1/2¨ (para água quente), mas você pode escolher usar outro tipo de cano de PVC com o mesmo diâmetro que não tem problema. Cortar 3 peças com as seguintes medidas: 01 01 Peça com 10cm
02 Peças com 20cm
Step 3: Making Threads in the Pipes


2nd - Making threads on the pipes
When you buy a PVC pipe, it may occour that one or both of the tips are with the thread made, but when cutting the piece into smaller tubes you will need to do the thread. For this you should use a thread maker, they are various sizes to be used in PVC pipes of different diameters. With the 1 / 2¨ thread maker, you can thread the pipe of the same diameter.
The threads can be made by holding the tube in one hand and the thread maker on the other or, or using a vise to hold the pipe (that is what I did), so you have more stability of the pipe and can make the threads with more precision.
______________________
2º - Fazer roscas nos canos
Quando você compra um tubo de PVC pode ser que uma ou as duas das pontas estejam com a rosca feita, mas ao cortar a peça em tubos menores você vai precisar de fazer a rosca. Por este motivo existe as tarraxas, são vários tamanhos para serem usados em tubos de PVC de diâmetros diferentes. Com a tarraxa de 1/2¨ você pode fazer a rosca do tubo do mesmo diâmetro. As roscas podem ser feitas segurando o cano em uma mão e na outra usando a tarraxa ou usar uma morsa para segurar o cano (foi o que eu fiz), assim você tem mais estabilidade do cano e consegue fazer as roscas com maior precisão.
Step 4: Holes in the Cap


3rd - Holes in the cap
Make two holes in each cap, one in the center and the other a little off center (see video).
The center hole is where the screw will pass and the hole below is used to pass the electricity wire.
_______________
3º - Furos no cap
Fazer dois furos em cada cap, um no centro e outro um pouco mais abaixo. O furo do centro é onde vai passar o parafuso e o furo mais abaixo serve para passar o fio de eletricidade.
Step 5: Knee Holes


4th - Knee holes
In one knee make two holes, each hole will serve to pass the parallel wire
_____________
4º - Furos no joelho
Em um joelho fazer dois furos, cada furo vai servir para passagem do fio paralelo.
Step 6: Connect the Pieces


5th - Connect the piecesThe connection of the threaded parts, besides being easier, leaves the piece firmer.Connect the two elbows first in the 4 inches tube and then connect the 8
inches pieces, following this shape is more certain to have alignment between the 8 inches pieces.
____________
5º - Conectar as peças
A conexão das peças com rosca além de ser mais fácil deixa a peça mais firme. Conectar primeiro os dois joelhos no tubo de 10cm e depois conectar as peças de 20cm, seguindo essa forma é mais certo de ter alinhamento entre as peças de 20cm.
Step 7: Remove the Wires


6º - Strip the wires
After the assembled part, it will be necessary to strip the ends of the wires, to pass them inside the cap and to wind the copper in the screw.
______________
6º - Desencapar os fios
Depois da peça montada vai ser necessário desencapar as pontas dos fios, passar eles por dentro do cap e enrolar esta ponta no parafuso.
Step 8: Switch


7º - SwitchPlacing a switch is not complicated, you have to split the paralel wire at the desired switch position. After that, you need to cut one of the wires, strip the tips and connect each tip to each switch terminal.
____________
7º - Interruptor
Colocar um interruptor não é complicado, você vai precisar escolher a altura no fio e cortar um dos sentidos para instalação. Com o corte vai gerar duas pontas, cada ponta precisa ser instalada nas entradas do interruptor.
Step 9: Connecting the USB Cable With Parallel Wire

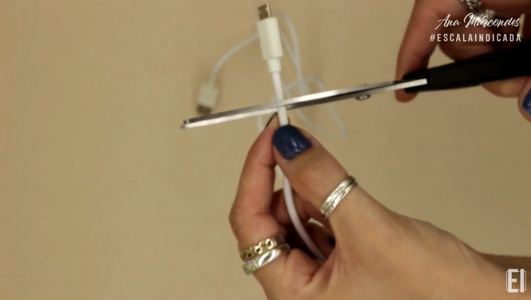


8º - Connecting the USB Cable with Parallel Wire
Cut the USB cable near the mini USB connector, gently strip the cable near the cutted tip, to expose the internal wires, avoiding to damage them. You will notice that there are 4 wires:Black and Red are for power supplyGreen and white are for data communication.Cut off the green and white wire (we do not need them) and strip off the black and red cables, connecting them to the parallel wire.
___________________
8º - Conexão do cabo USB com fio paralelo
Cortar a ponta oposta do cabo USB, com a ponta cortada e desencapada você vai perceber que existem 4 fios: Preto e vermelho – Eletricidade Verde e branco – Dados Cortar as pontas verde e branca (não precisamos delas) e desencapar o cabo preto e vermelho, conectar cada ponta do fio paralelo a uma cor do cabo USB.
Step 10: Using the USB Connection


9th - Using the USB connection
Your cutter can be used connected to mobile charger source or to a portable USB charger.
Ready, with your new cutter will make it easier to make crafts, school work and college.
Thanks for watching! ♥
Ahh ...Do not forget to rate the video and share it with your friends!
OTHER PLATFORMS:
• Instagram:
@AMARCONNDES
@ESCALAINDICADA
Escala indicada
• Gmail:
escalaindicada@gmail.com
_____________________________________
9º - Uso da conexão USB
O seu cortador pode ser usado conectado em uma fonte de carregador para celular ou no carregador portátil. Pronto, com seu novo cortador vai ficar mais fácil fazer artesanatos, trabalhos de escola e faculdade.
Obrigada por assistir! ♥
Ahh... Não se esqueça de avaliar o vídeo e compartilhar com seus amigos!
OUTRAS PLATAFORMAS:
• Intagram:
@AMARCONNDES
@ESCALAINDICADA
Escala indicada
• Gmail:
escalaindicada@gmail.com


