

Introduction: Ultimate Intelligent Fully Automatic Drone Robot (w/ RPi, Arduino)


My followers, here at Instructables.com probably know that I am a very big fan of flying robots, drones, helicopters. In my previous instructable I promised that this time we are going to build a quadcopter... but not just a simple quadcopter. We are going to make an intelligent drone that uses the newest Raspberry Pi Zero W and a PiCamera module to follow a red ball or my face. One year ago I made another drone project with a MultiWii flight controller we are going to use that one too, because its cheap and has a lot of possibilities, because it was made with Arduino. I give you a short demonstration, more details in the next steps:
So what can this drone do? Why is so special?
Because it is fully automatic and smart. (Much smarter than any other multicopter on the market...) With this drone you will never hit a tree or wall again and has automatic functions like following a face or a red ball. (I am at this stage... I think these are pretty good results.) I made a Python program on my Raspberry Pi Zero W that recognizes different shapes with its camera module, and depending on what sees sends commands for the flight controller like "go forward", "go backward", "yaw left" and etc... With this technology you can make your on drone that is smarter thanany other copter on the market. To make this project I was working five months starting from zero.
What will you learn from this Instructable?
I am going to teach you how to build your very own intelligent quadcopter drone that is able to detect and follow faces or a red ball. We are going through programming and basic drone building tricks. All you have to do is to follow my description. I made two drones actually a hex- and a quadcopter, but now we will build a quad, because its stability.
What is its future?
I would like to use these drones to perform automatic life saving action in mountains without human help. It also can be used to detect animals or even to catch criminals in a big mass of people. The drones navigate automatically with GPS and with their camera.
Look at the second and third pictures/GIFs :)
On the second picture the drone holds its position as I hold my face in one position. When I move the drone moves in my direction. On the second one, the same situation with a red ball.
Before we get into the project I would like to share a background story and some information about these drones. Well if you are interested in the backround you can read it, but if you aren't then go to step "Starting the Real Project".
Step 1: Video!

This is the shortened video of my project, because I am going to Brussels with the project where I have to show a demonstration. With a good friend of mine we are making a longer video with all the details and test. If you are interested look for updates in a week or two.
The second picture is my poster for this project. This one will be also used in Brussels at Europe Day 2017.
Step 2: The Full Project and This Instruclable

Please note that in this Instructable we are going to build one intelligent drone, not swarm intelligence. The swarm intelligence project is my entry for the MILSET Expo-Sciences International and this Instructable is only the fun part of that project. So to make it clean, the original project is a Scientific and Innovative project, but it is open source so I am sharing it with you... Well I am sharing only one part of it, that is useful for daily use and hobby flyers.
On the picture above you can see version 1.0 of the quadcopter. That only avoided obstacles, but I am teaching you something more interesting: image recognition with version 2.0.
Step 3: Source of Inspiration / Backround Story


I had a bicycle accident eight months ago and I suffered an opened humeral fracture. I wasn’t able to get up on my feet, I had to suffer on the ground while a couple accidentally walked there, and they called the emergency services. It was terrible, and because of the long way of the ambulance I lost a lot of blood and the doctors had to cut a small piece of muscle out of my biceps. It was terrible... Now this shouldn’t happened if there were a faster method on making first aid. Example an intelligent flying robot could easily handle this situation. I don’t want to be horroristic, just want to show you the importance of an intelligent system like this.
Our town is surrounded with high mountains, so mountain accidents happen very often here. Because of the environment many different animals live here: bears, eagles, wolves and the most important in this case are the common buzzards. These birds live in the forests and what is interesting from my point of view is, that they have a very unique flight technique and their eyes are much better than the human eye. They are fast, precise and effective when they hunt their dinner. I saw buzzards here a few times and I was amazed how efficient this animal is. They don’t really live in large groups only a few live together, and their biological abilities inspired me. It made me think if I could make flying robots that communicate with each other while flying and if they could solve problems together.
I wanted to make intelligent flying robots that can save lives, look for people in the mountains and in destroyed buildings. Too many bad news from the news paper about accidents like this... it's time to stop...
Step 4: The Background of the Full Project (Technical Details)

I made two intelligent robots, drones with Arduinos and with a Raspberry Pi Zero that is equipped with a camera. There is a hexcopter and a quadcopter. They have different abilities just like us. One of us is better in mathematics, others can do sports and etc. Both of them has cameras with live image transmissions in Full HD and they also have GPS. Most of the drones out there in the market have these features, just like the DJI drones – these also have distance detecting cameras and automatic modes, such as follow me mode or return to landing modes. And this is what the market achieved. I wanted to go further… I wanted to make really intelligent drones that aren’t controlled by a pilot and that know more than filming in 4k. This is the other reason why I started to build intelligent flying robots. Both of them is equipped with a lot of sensors and with these they are able to solve problems just like a bird or a human does. These drones can communicate up to 1.8 kilometers, they communicate with the main server, they share their knowledge with each other and this way they can learn about the world and about the terrain that surrounds them. In a very basic way they are able to learn… Each time they make their flying techniques smoother and their database is growing.
The drones are equipped with the following sensors and software. This is what I actually used to make the project come to reality.
a. Raspberry Pi Zero --- onboard computer on the drone
b. Raspberry Camera --- to detect plants, faces, objects (anything I program to)
c. APM Flight controller --- Arduino based flight controller, holds the drone in balance, analyzes GPS Signals, controls the motors (this technology existed)
d. The Drone Mechanism --- hexacopter frame, motors, camera holder, 10400 mAh batteries, GPS, propellers (weighs more than 2kg)
e. Light Sensors --- detects sunlight
f. Barometer --- reads air pressure, calculates relative altitude
g. Distance Sensors --- ultrasonic sensors that detects distance from objects indoors/outdoors
h. 1.8km Long Range Serial Communucation Module --- to communicate with his partner, the quadcopter and with the server
i. 4K 24fps/2k 30fps Camera --- to make amazing pictures about each flight
5.8 GHz Video Transmitter --- to show what the drone sees (up to 2000 meters)
Step 5: Starting the Real Project...


So that is all I wanted to tell you about my scientific project and innovation. I felt that I had to make clear what are we doing here.
Now leeet's begin!!
We will start with gathering parts and tools then we go through together on software and hardware parts too. To make this project it is good to have some experience in programming Python, C++ and some basic knowledge about drones and Flight Controllers. My codes are in written in Arduino and Python, but I am not going in deep on how to use the languages and libraries. I am giving you the codes with notes to explain how it works.
On hardware part you have to know how to solder and basic electonics. We are using MultiWii Flight Controller, that is basicalli an Arduino Mini Pro with extra sensors.
This is not a beginner's project but let me tell you what do you need to know before starting if never ever had a drone on your hand.
Main Features of the Ultimate Intelligent Drone:
- Face Recognition
- Red Ball Recognition
- Following these two Shapes
- Fully Automatic Flying System / with Raspberry
- IoT DataLogger and analyzer / with Raspberry Pi Zero Wifi board
- Avoiding People (if they are too close)
- Avoiding Trees (by measuring and software calculating its size)
- Basic Drone Features: GPS Waypoint Navigation, Live Stream Video FPV, Altitude Hold, Position Hold, Return to Home)
- Telemetry via Bluetooth
- Extra "Follow me" mode with GPS and EZ-GU
As you see it is a complex project, but I hope by now you have fun to build such a great multirotor. Enjoy!
Step 6: Beginner's Guide and Where to Start

Well, I can't write so much here, so I am going to give you the sources where I got my knowledge. Everyone is a beginner at some point, but if you go through these tutorials you will understand everything that is needed to build a drone. Actually there are three things that you need to know: how to program Raspberry Pi in Python, how to build a drone, and how to use the MultiWii FC board. So here are your lessons in videos or articles:
I use the exact same techniques for this project, this is where I started:
How to build a drone?
Short video about what you need:
How to use Raspberry Pi Zero W and OpenCV for face recognition?
http://www.makeuseof.com/tag/getting-started-raspb...
http://www.pyimagesearch.com/2015/02/23/install-op...
https://www.instructables.com/id/The-Drone-Pi/
How to use Multiwii Crius SE 2.5?
And here is a video series from Painless360 to learn everything about MultiWii.
You can watch these during work or before, the important thing is to know and understand what you are doing, because copy pasting codes is a non sense. The most important thing is to improve yourself with these projects. Learn by making fun projects. ;)
Step 7: Gathering Parts!


I am trying to give you links where you can buy parts. I bought most of them from the german Amazon an from the UK, but if you find cheaper solutions that's better. I choosed a MultiWii controller, because it is easy to code, it is written in Arduino, and has many functions, that Naza, APM or Pixhawk don't have. I use Raspberry Pi Zero, but I don't know where are still available, it was only a few pieces available and sold very quickly. This is not the cheapest project I made but worth every cents.
You will need Hardware and Software parts. Here they are:
Hardware:
- Quadcopter Frame Kit (comes with motors, ESC-s, props)
- MultiWii SE 2.5 Kit (GPS, OLED Screen, Sonar, Bluetooth)
- 3S1P 11.1v 3000mAh Battery (Hobbyking Battery - good quality)
- Go Pro, SJCAM (any other action camera with 4k resolution - just my opinion, I like 4k
- Raspberry Pi Camera
- Raspberry Pi Zero W - still available in the UK
- Reciever and RC Transmitter
- 5km Video Trasnmitter and Reciever
And that is all you need for this project. They come in kits, so there should't be compatibility issues with electronic modules. Be quick with the Raspberry Pi, only a few are left. If you want you can buy cheaper or more expensive cameras.
Software:
- Arduino IDE from www.arduino.cc
- MultiWii Software from https://code.google.com/archive/p/multiwii/
- Raspbian OS from www.raspberry.org
- EZ-GUI Phone App from http://ez-gui.com/
Download these files and applications then let's get started! But first I am still giving you my codes, shematics and suggestions for gathering tools.
Step 8: Tools...

To make such a complex project you will need all kind of tools:
- Screwdriver
- Multimeter
- Ductaple
- Zip-Ties - a lot of them
- Scrissors
- Wire Cutter
- Wire Stripper
- Cutter Tools
- Ruler
- Screws
- Soldering Iron
- Solder
Computer with necessary softwares. Mine is an ASUS Zenbook.
Step 9: My Codes and Shematic


Download this .ZIP file and feel free to use. There is inside the code for the red ball detection, face following algorithm and the pre-calibrated MultiWii software. Alsocontains the MiltiWii configurator but I recommend to use the EZ-GUI Phone App.
We will need these files in the following steps.
The shematics show you the pinouts of the MultiWii and the Rasberry. Now some good news. The circuit is easy... very easy you only have to connect the UART RX of the MultiWii and the Pin 15 of the Raspberry Pi together with a jumper cable. And power up your RPi. Everything else is just plug and play modules, that you probably know by now from the tutorial videos. ;)
Attachments

Step 10: Getting Started - Installing MultiWii on the Quad


I already assembled my frame. You'll get a small manual with the kit. It is easy to assemble. With four metal screwa I fixed the MultiWii on the top of the frame.The I zip-tied together the ESC - Electric Speed Controller Cables that are controlling the motors and giving power to the board. I plugged in each servo cable. Make sure your wiring is good otherwise your drone won't fly.
Step 11: Featuring GPS and Navigation Board
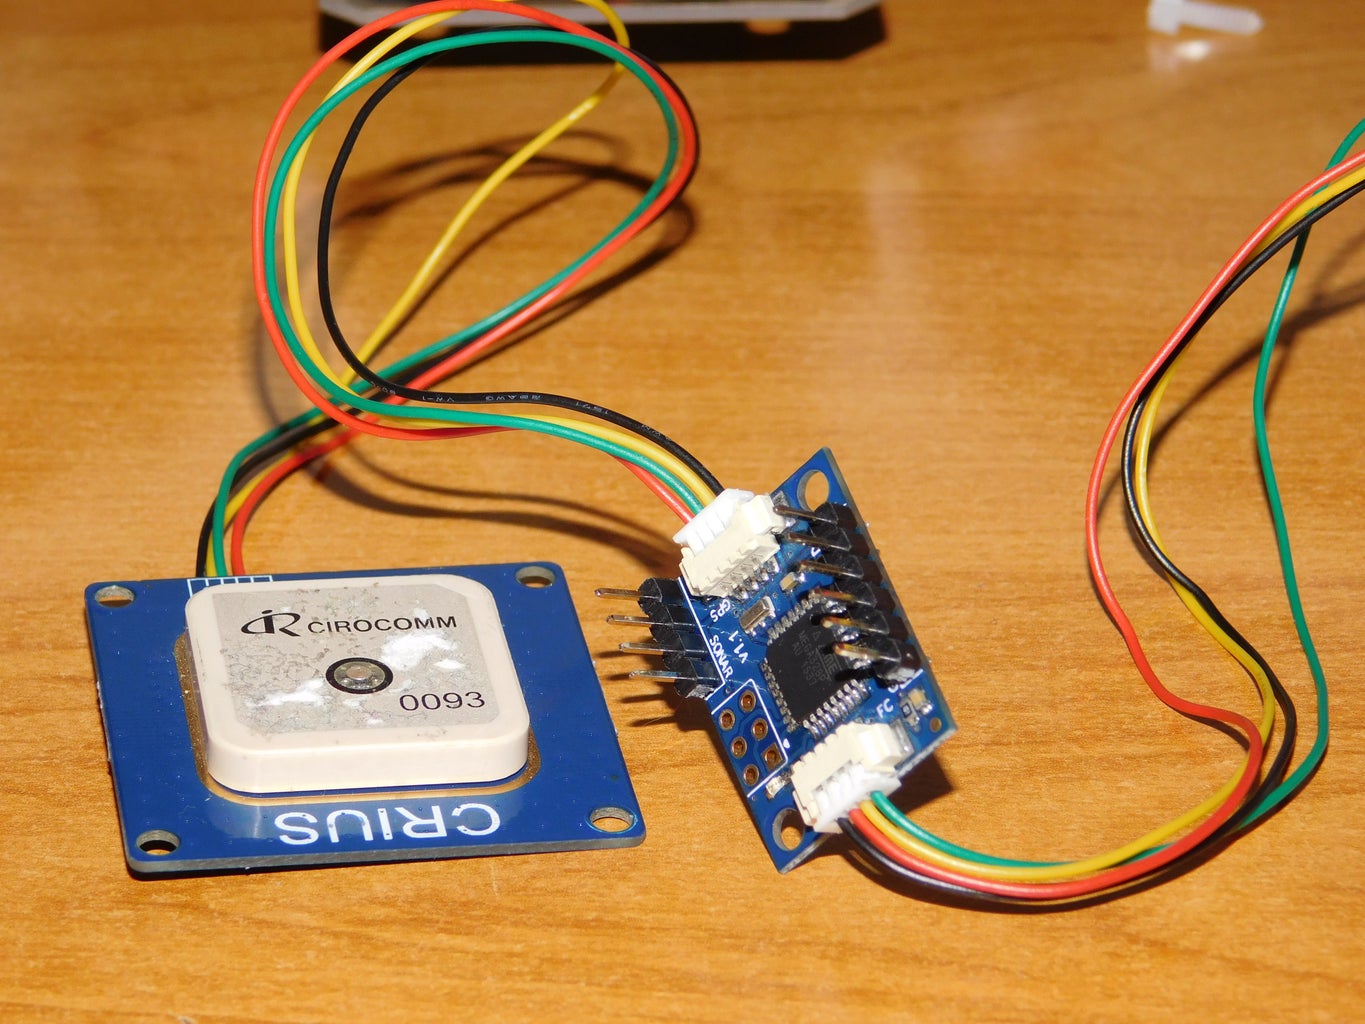


The modules are precalibrated so you just have to plug in the GPS to that tiny little I2C Navigation board then plug it into the I2C port of the MultiWii. Voila! Your GPS module is ready.
Step 12: Adding Bluetooth


The MultiWii kit comes with a precalibrated Bluetooth module. Plug it in the UART port and place it on your quadcopter.
Important Note: when you are using the Raspberry Pi's function disconnect the RX Pin of the Bluetooth module on the MultiWii
Step 13: The R/C Reciever


I mounted my Radio Controller's receiver on the back of the drone the with some jumper wires connected the Throttle, Roll, Pitch, Yaw and Aux1 pins to the Multiwii. I can't show you a diagram here, please look at your receiver's schematic - it should be written on it.
Step 14: Fixing the Components


We have a nice wiring and great looking flight controller on the quad now, so fix it with some screws and do a quick test with it.
Step 15: First Boot-Up and Quick Test

I powered up my board, got a GPS lock pretty fast and the Bluetooth was also working correctly. Continue building...
Step 16: Extra OLED Screen (Very Useful)


The kit also contains a Crius OLED screen, that is very useful for quick data displaying. Makes calibrating so much easier. You can see everything on it: Modes, Battery, Gyro. And for this hacked intelligent version I added my name, but you can change it.
To install plug it in the second I2C port and... you're done. You can view and change data with your transmitter stick combination. (Later about that)
Step 17: Battery Voltage-meter


You will need a 51k and a 33k resistor. Solder the 51k to the positive battery pin, then solder the 33k to the negative and solder them together. There you have a proper battery voltage signal. Solder the signal wire to the A3 pin of the MultiWii and then you can test it with your OLED screen.
Step 18: Low Battery Voltage Alarm (Buzzer)


You can add a simple buzzer to pin 8 of the MultiWii. This is going to beep loudly at 10.7 and also a 9.9 volts. You can change these values actually.
Step 19: Mointing the Top Plate


You will need 16 PCS of 2.5mm screws (comes with the kit). With the help of these fix the top plate to the arms of the quadcopter.
Step 20: FPV Transmitter for Live Stream Video


I put a 5.8Ghz 2km video transmitter on my drone. Put on the top plate with a zip-tie, so won't fall down even at high speed.
Step 21: Cable Management


I like to have a clean setup because there are so many small parts and a lot of cables on a drone. We need some space inside the frame for the Raspberry Pi and for the battery so with some zip-ties I am holding wires. This way they require less space and we won't have a "kabelsalat" (german word for so much cables in one space). :)
Step 22: 4k FPV Camera
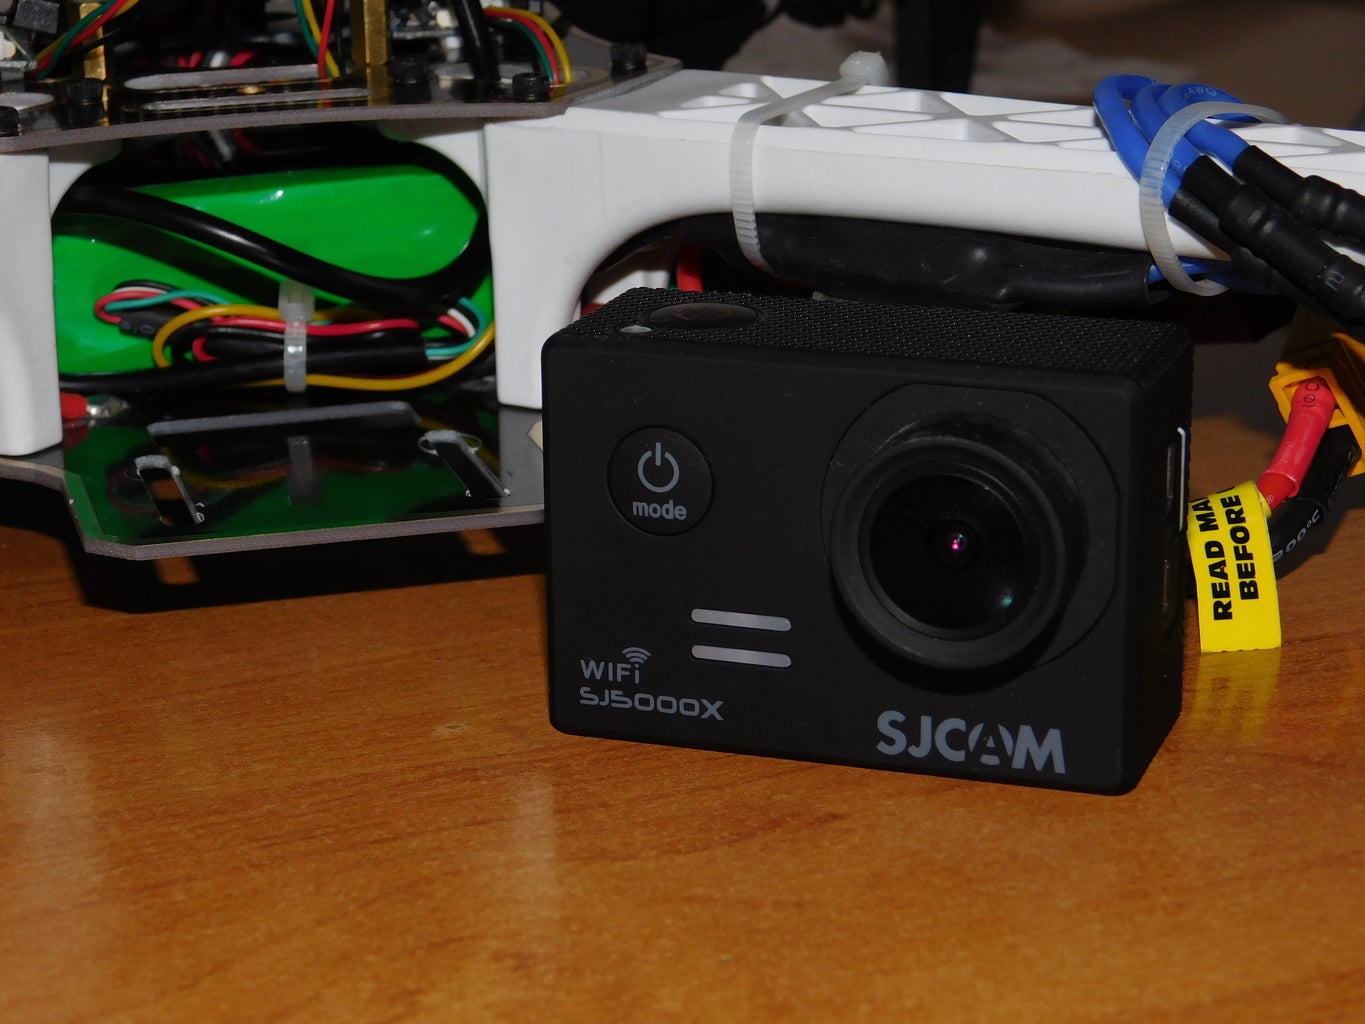


I love crystal clear recordings while flying so I choose this SJCAM 5000x Elite action camera for my drone. It has a really good image sensor. Check out those screenshots from my laptop.
Step 23: Raspberry Pi Zero W

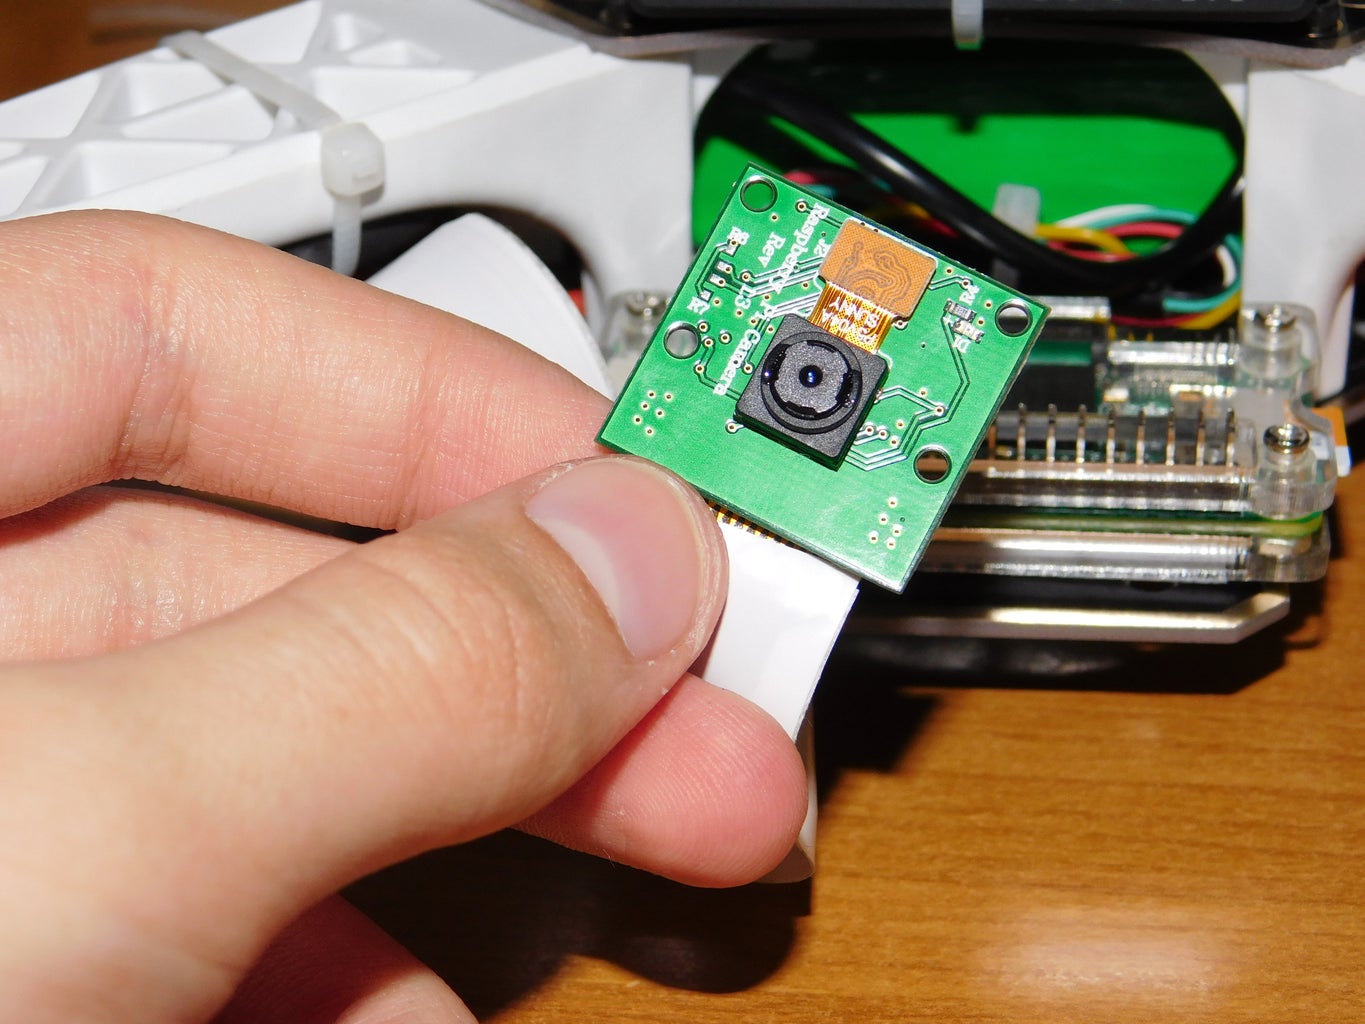

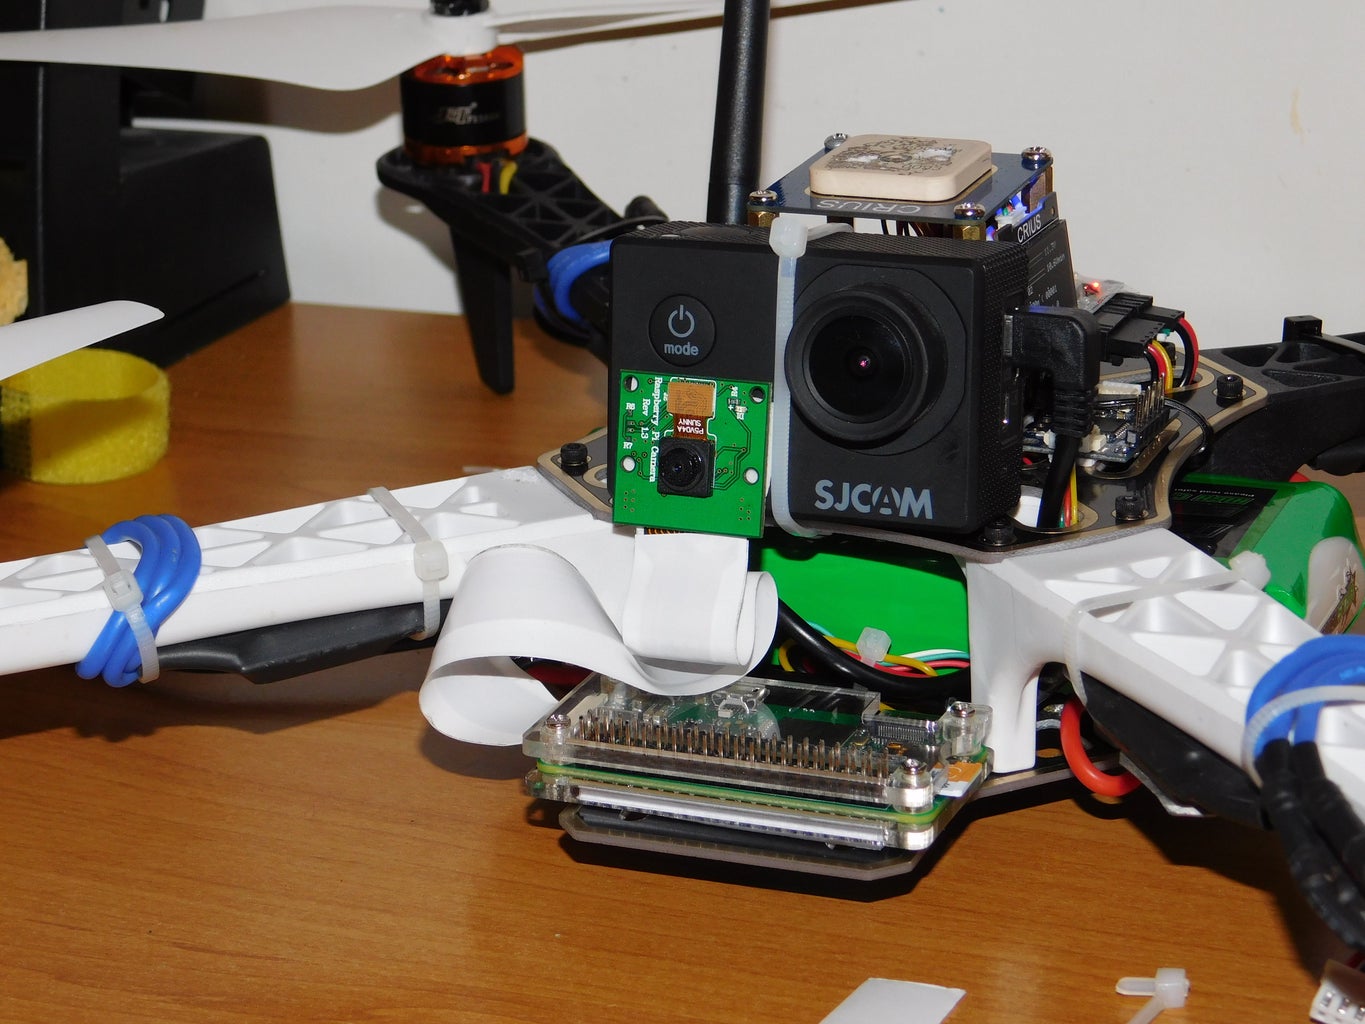


First connect the Pi Camera to the RPi then mount the microcomputer on the front of the drone. I thought connecting the RPi to the MultiWii is going to be hard but it was very easy. You only need three cables
- GND to GND
- 5v to 5v
- RPi TX to MV RX
And you are done with this one. Well coding was harder, but only for me, you have there in the .ZIP file. :)
Step 24: MultiWii Firmware


From the .ZIP file use the MultiWii 2.3 - navi7b code and upload to your MultiWIi board with Arduino IDE version 1.8.1. I choose Arduino Pro Mini / 5v /16Mhz in the menu. Your drone should calibrate itself the stop blinking.
Note: This is a specially calibrated MultiWii firmware for navigating waypoints, running OLED screen, connecting for RPi and some extra functions. If you had any errors or problems, copy-paste in the comment section, I am here to help you.
Step 25: Quick Indoor Hovering Test

I made a quick hovering test after uploading the code. Worked well, only calibrated a little bit on the PID settings.
Step 26: Raspberry Pi IoT / SSH Connections (Programming)


To use the Raspberry Pi you have to SSH connect to it through WiFi. If you also have internet connection you can get weather and temperature details and also wind conditions to tell if it is safe to fly or not. This part is not working as good as I want, stability problems may occur.
I used Remote Desktop Connection to view my RPi's desktop on my PC then I started progamming. I copied my code on the RPi tested, debugged and the repeated this for at least hundred times. Finally I got a good code, that navigates the drone depending on where it sees the object. It is moving very slowly, I don't want accidents. The code basically sends serial command for the MultiWii depending on where it sees the followed object.
What should you do?
- from the .ZIP file copy the python files on your Raspberry Py
- SSH to Raspberry with Putty or Remote Desktop Connection
- type "python followface.py" and if your drone is armed your code starts working
Step 27: Testing!


Please do not follow me at this part. Never fly indoors. I was the only one in the room so that is why I had the courage to fly inside, but is dangerous. I was brave because my quadcopter was calibrated well and it was flying stable.
Video is coming on Wednesday, with real flight examples now I have only two converted GIF files that was recorded by a screen recorder on my laptop and by the on-board PiCamera. On the first pic you can see me on the left side as I move a tiny red ball and the drone tries to follow it. Gets closer and further as I move the ball.
On the second one I am standing in the front of the drone that follows my face. I am very hppy with my results, but still a lot of work. I need more accurate motion.
Step 28: Version 2.1 Hexacopter Implementation


I have a hexacopter too and I had much more space on that. I tried it out with a modified code and worked properly. I just wanted to mention that is possible to make it on other copters too. I was a good thing that I was able to fix the camera with some screws. Lot better than double sided tape.
Step 29: Kind Request for Your Help


Making such a complex project is hard and very time consuming. I was working five months with this project and I really hope you like it. If you liked or learned something I would appriciate if you vote on my project in the contest I entered. Thank you very much!
Step 30: Your Flying Robot - and Some Safety Concerns


Have fun with it and enjoy flying! But please if you use the REDBALL or FACE FOLLOWING function make sure your camera isn't detecting other red colors or faces in the area, because that may cause instability.
Step 31: Thank You for Watching! Happy Flying!


I hope you liked my project, drones are very amazing machines, let's develop together. If you have any ideas or suggestions let me know about it in the comment section. Or if you have any observations about the project just tell me. ;)
Video is coming on Wednesday this pictures are screenshots from it. Stay creative!

First Prize in the
Microcontroller Contest 2017

Grand Prize in the
Internet of Things Contest 2017

Second Prize in the
Robotics Contest 2017


