

Introduction: Software for Solar Design. Help Improve the Explanation.


It IS working! 2august 2009 and the latest scene file is wfunnelandotherstiltedforward and is available for download and improvement below
http://blip.tv/file/2429375/ is the latest how to about using the art of illusion software.
check it out! (It is 11 minutes but worth it and I could not edit the screencast to the 10 minute maximum for other video sites)
The Kyoto trough was placed in the plans and designs section at http://solarcooking.wikia.com by their webmaster a couple of days ago. (May 5th 2009)
http://www.youtube.com/watch?v=Jp4TWLQbYJ4 is video to explain the trough.
and I have a video showing differences between different dish shapes at
http://www.youtube.com/watch?v=IIRhNRk_0js
26th March, I added a movie (covering 6 hours) for a dish made with the Roland Winston "dimpled curve" to this page.
Winston had a host of patents and he is pretty famous. (His proper design is a trough). Anyway, the dish made to his trough specs seems to be the best of the lot when it is aimed badly.
Check the movie clips to see for yourself! If you want to know more about Winstons famous w curve, check the yahoo fossilfreedom group. A guy has done an excell file of his design there. (Lapsed patent).
15th March, I added a zipped folder on step one to get you quickly started with this software.
Draw elevation, plan and end view of your solar reflector, drop it into a scene, run the program and you can directly compare it to traditional reflectors! Before you build it.
Step 2 has photos in sequence with image notes, to walk you through the software.
Image notes are used lots in this instructable! Click on the mov files at the bottom of this page to see my first (not quite right) attempts at modeling the sun moving across a reflector over 6 hours in movie form. This shows how 5 differently curved dishes perform!
There are many other curves to try out! And troughs can be tested too!
People in Chad are not allowed to gather firewood anymore due to desertification.
(see the solar cooking wiki for more details)
So now many people cannot cook their food.
Lets design better solar cookers to help out a bit!
You do not even need to get your hands dirty if you design with software!
Traditional parabolic solar cookers are great as long as you keep repointing them at the sun.
But who wants to stand in 35 degree C heat doing this for a couple of hours?
Let us use the software to design reflectors
that maximixe the collected sunlight for an hour or 2.
My thanks to Peter Eastman, Pete and others on the art of illusion forums for helping me with
this. Nothing would have happened without their help.
The basic idea behind this instructable is that if the sun could see, It would see the reflection of the cooking pot bouncing back from the reflector.
The size of the reflection that the sun sees should corelate with the cooking efficiency of the reflector. Lets put a camera where the sun is!


Step 1: Searching for Software. Finding It! and Zipped Folder to Get You Started!

I have been on the lookout for cheap easy free software to do this for about 6 months.
Most have very difficult user interphases or super high prices or only work on one computer platform.
I think I have found a good one in Art of Illusion. It is free, it is a java program so it works on all the computer platforms and it is simple to use. Its main window is elevation, plan, endview and perspective view. If you want to get fancy, it has additional windows for materials and making movies and animations.
A great bonus with art of illusion is that the people in their forums are really helpful.
An additional great bonus is the scene files. I asked for help and someone did the bulk of the scene file work for me. I then modified it a bit, put it on the web and they suggested additional modification.
This means that a solar cooker development tool can become good really quickly!
The picture below is a physical model of a solar cooker. The picture was taken at an angle.
The reflection gives an idea of how good the reflector would be if the sun shone in at that angle.
The zipped folder will allow you to compare 5 solar cookers. Use A.jpg B.jpg etc as the starter files.
You can use zero as start time and 9.5 as end time and 1 frame per second to get a table covering 6 hours of time (90 degrees of sun movement). Use different start times and different frame numbers to "focus in" on any part of the 90 degree time period to study that part in greater detail.
Attachments
Step 2: The Art of Illusion Interphase.


Art of illusion has a simple user interphase. The first window that opens shows a scene in elevation, plan, endview and perspective view.
To the right (out of picture) is the object view which contains any object you make and info about their size type and coordinates. Objects can be cameras, shapes lines and curves. Basically anything physical that you make. Objects can be copied and pasted even in the same art of illusion scene file!
On the bottom (out of picture) is a track line where you can animate one or more of your cameras or objects in your scene to do animation in mov format or save a series of images from your movie track.
Please do not be afraid of this! I got help and if you download the scene file, an animation is ready to go! All you need to concern yourself with for the moment is making simple curves for your own reflector design and putting them in the picture.
The images are in sequence for how you can make a parabolic dish for your movie and get to grips quickly with art of illusion. There are image notes on each image for further explanation.
Brian
Step 3: What I Have Done So Far. (Educational I Hope). Apple Optics!


Imagine you are the sun, looking down on your solar reflector, what will you see?
Answer. You will see (more or less) the reflection of the cooking pot reflected back to you from the reflector to you. This is useful because you can set up cameras in your scene to take pictures of the dish from different angles. How does the reflection change over time? What will a reflection from a hemisphere look like? What will the reflection from a parabolic dish look like? And after an hour when the sun has moved 15 degrees, what will the reflection look like?
In art of illusion,
I have done preliminary pictures of 5 different dishes with the sun moving 5 degrees (20 minutes) at a time and the results will surprise you!
When the people on the art of illusion forums saw my poor camera setup and pictures, I got help setting up a camera that "flies across the sky" and takes a series of pictures or a quicktime movie of each dish!
More work has to be done of course but take a look at the next page for the first results and downloads. Below is the physical proof of the concept with an apple and a 60 degree compound parabolic model.
Step 4: First Results
Tutorial and results page
Using software to compare solar cooker performance
Solar cookers come in a huge variety of shapes and sizes and lots of them are great when pointed directly at the sun but performance becomes poor very quickly as the sun moves. . Art of illusion. With it, I compared a parabolic dish, various compound parabolic dishes and a hemisphere as the sun moves in 5 degree increments. (20 minute incriments). It is only preliminary results of course but the hemisphere wins as the best stationary dish!
Who would have thought! Parabolic dish came --- LAST!
In fairness my first test was pretty crude.. I used a red ball to represent the cooking vessel and I reason that the size of its reflection in the dish will approximate the cooking power.
Nothing was optimised. I put the ball at 000 at the xyz cooordinates and moved the dishes until the reflection image filled the dish with the camera overhead. Then I made all the other dishes invisible and rendered the scene . Finally I put the 35 images in one jpg file to compare them!
I now do it using a folder with a html file inside it. Art of illusion can spit out a sequence of jpg images that will fill out a table of images in the html. MUCH EASIER!
I have uploaded better version of my art of illusion scene file for anyone else who wants to try this. I got a lot of help in the art of illusion forums with this and I thank them for it. The help thread is
http://sourceforge.net/forum/forum.php?thread_id=2915545&forum_id=47782
If you use my scene file, you need to reduce the magnification from the default 100 to 1 or 2 to see the dishes The scene file should be .aoi when you download it. I have been told that it can download as .temp (Just change to .aoi and it should be fine)
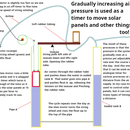
Explanation of picture. With the sun overhead, all the dishes show a full red image, meaning that the sunlight will be all reflected to the red ball at the focus! So they are all equally good when pointed at the sun! By 10 degrees off (40 minutes later) a black cresent appears in the parabolic dish reflection meaning that this dish is much poorer in those conditions. It reflects conciderably less light to the red ball than do the other dishes! By 30 degrees off target, pretty much all the dishes are useless, the only red that we can see is the red ball itself. The dishes just reflect the sunlight back into space. (The people at art of illusion are not too impressed with my poor choice of magnification) etc. I should have had the red discs much bigger. Sorry
16th feb, I got help with a new scene file. If you use it, you can render a stop motion movie of jpg files of each dish very quickly, you can also move the movie timeline and your camera moves quickly.( I have video on youtube to help you get started with this.
http://www.youtube.com/watch?v=y-s2N_8tzQo is part one of software
http://www.youtube.com/watch?v=obMlr2pXXgY is part 2 It is poor quality but if you get through it, it is worth it.)
The scene file for making movies is pretty neat. It is called dishs all same size nullworks.aoi I used one frame per second and 48 frames in total
28 feb, I uploaded the most recent scene file. It has green for the background and the camera moves for 6 hours (90 degrees) over the dishes.
March 12th, uploaded a new better aoi. file
20th feb I added the 5 .mov files here for download so you can inspect how the dishes reflect light over time.
Depending on the dish, the reflection pattern is very Different! I urge people to download and inspect these quicktime movie files. They show a dish from ovehead to 45 degrees off the side.
Brian
Step 5: More Work to Be Done! Suggestions, Adding Your Scene Files, Etc.

The next stage is to learn how to cut the dishes and slice them in art of illusion. It is pretty clear from the quicktime movies that the compound parabolic dishes especially have areas left and right of the suns path that quickly go from good reflector to reflect nothing as the sun moves. So lets make a reflector with no left and right bits! Lets just make a dish that sends the light to the dish.
Also, I made a mistake in my movies in starting with the dish pointed at the sun. The ideal start would be with the sun approaching the dish, and then going over it.
So my movies were just half the story!
I need a way to tabulate the results with jpg files easier. I joined them into a huge picture file and then shrunk them. Someone suggested a html table?
I could do the html table and then print screen to save it as a picture?
Clearly we need a way to quickly compare the dishes (and new dishes that you make) on one page and I have not succeeded in doing that yet.
Please comment on ways forward below this page, also, if you make a nice scene file with a new trough
or dish design, you could add it in your comment so that others may use it! I think it works if you click "add image" and just add the scene file or mov file instead. For here, to keep file size down make your mov file 10 frames per sec instead of 30. Thanks Brian
Step 6: Preliminary Conclusions


Having looked at the quicktime movies, it seems to me that the ideal stationary dish will NOT be parabolic. (It may not be hemisphere or compound parabolic either).
It also seems that it will NOT be circular. Perhaps it might be shaped like a 0 instead parallel to the path of the sun. Or even like 2 long strongly curved petals?
Anyway, please take a look at the movies, and get started on your designs.
I have run a winston curve (see the mov files on the intro step).
Even with the winston shape, a dish does not have a really long complete acceptance angle)
I start to think that a better design for "dishes" will be made from 4 strips of reflective material, joined together, and held in shape with springy wires. (Like Those laundry baskets that you fold flat)
Brian
Step 7: Making the Camera "fly" Over the Scene
This is a step by step of how to make a camera fly over the scene by "peteihis" from the art of illusion forums. It is VERY important that you follow his instructions in sequence. I do not think you can edit a cameras propertys properly once the camera has been made a "child" of a null object. so it is really important to set your camera up exactly as you want it, (in the right place and pointing in the right direction with the right field of view) BEFORE you attach it to a null. OK?
Here are his instructions.
"OK. Step by step.... It looks longer than it actually is. Below, the movement is scaled so that 1 second equals 10 degrees, so the angle can be adjusted by moving the time slider to the appropriate time.
First the basic assembly:
1) Place the camera above the cooker pointing down. -- Just type in the coordinates, like (0,100,0) and (-90,180,0)
2) Place a Null object (Object-menu/ Create Primitive...) in the cooker (0,0,0 or what seems the best center point)
3) On the object list: Make the camera a child to the Null. (Just drag it under the Null so that it gets inteted and disappears) and click the small arrowhead beside the Null to see it again.
So far, so good. Now let's attach the camera to the null object:
4) Have the camera selected and pull up the animation score on the bottom of the screen
5) Select both of the animation tracks (Position and Rotation). That is: click the names of them to have them selected, hold shift key down to select both.
6) press Ctrl+K. This creates keyframes that attach the camera to the parent object.
7) Double click the name of the Rotation track -- A dialog opens. On the dialog, unselect the "Isotropic rotations" (In this case it does not effect the action, but simplifies the calculation of orientation) -- And while at it, the Coordinate System should be "Parent". :)
Now if you move the camera manually, it will jump back to the keyframed position any time you render a picture or move the green time-slider on the animation track.
Now let's make the sun/camera move:
8) Have the *Null object* selected
9) Keyframe it on 0.0 seconds. Move the green time slider to 4.5 seconds
keyframe there... (Keyframe at least the Rotation track, position is not going to be changed, so no need for another keyframe there.)
10) Double click the small diamondshaped marker on the Rotation track (make sure that you don't have more than one keyframe selected, or nothing will happen) -- it will open a dialog for the rotations keyframe. Make the Z-rotation 45 degrees and hit OK.
11) Double click the name of the Rotation track. On the dialog, change the Smoothing Method from "Interpolating" to "Linear". This ensures that the time corresponds directly to the angle, if you for example decide to add more keyframes....
Now as you move the time slider, the camera will move along a 45 degree arch above the scene. You can use the time slider to select the angle you like. The picture will be rendered at the time, that the slider is pointed at.
If you need to move the centerpoint of the rotation, edit the Position keyframe(s) of the Null.
And about handling the animation score:
- Clicking or dragging on the time scale moves the slider
- Dragging by right mouse button on the lower area moves the timeline
- Right-dragging with shif-down zooms the timeline. "
And without this I would have been totally lost!
Brian
Step 8: Screenshots of Seamonkeys! Making Sense of the Data.

(I ended up using seamonkey, spawn of netscape composer to do my html table. It is an old build but it seems to work.)
I think the movie files give people ideas and hints about how to progress with their designs but they are a moving target. What you need is something steady on paper so you can compare results.
I made my first huge picture file by combining a bunch of jpeg pics from rendered shots of the different solar cookers. But WAY TOO TIME CONSUMING! Has to be much easier.
Someone suggested a html table solution. (I did not know you can put a pic into a table but you can)
So all you need is to make a html file in you folder with all your pictures, make a table and insert the pics into the html file as a grid!
And if you are clever, and name your pics from the AOI movies that you render something like a.jpg,b.jpg,c.jpg,d.jpg,e.jpg,f.jpg etc, the movie will spit out a0001.jpg, a0002.jpg etc for your first row, b0001, etc for your second column etc. Then all you have to do is make the table once and just paste the html file into new project folders and just change the names of the types of dishes when you edit the html. Then for a permanent low bandwith file, just take a screenshot of the html table in your computer or make a pdf file of it.
Here is my screenshot of my first attempt below (the pic looked great in my browser before I uploaded, perhaps it is saved on instructables at lower resolution?) Anyway, it is good for now
The screenshot is of 6 hours of time as the sun moves over the dishes
Brian
Participated in the
Epilog Challenge


