

Introduction: Utility Paracord Keychain/Braclet


I had found that when transporting my kayaks and towing objects with my kayak I always had a lack of usable line or links to secure my kayak to objects. I thought there are plenty of paracord keychains and braclets, what if I made a dual design that could be used as a utility and in a survival situation. It also needs to have a decent amount of cord, in a small size keychain/bracelet and be easy to retie after it was in use, so I created this...
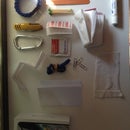
Step 1: Materials

1. Lighter/matches 2. Scissors (I find stainless steel ones like those pictures work great when citing paracord) 3. Paracord about 10 feet 4. 2 Quick links (1/8" were the smallest I could find, came in a pack of 3 for $3 from a home improvement store, hold 220 lbs) you could use other sized links as well. 5. Ruler 6. Keys (if you want primarily for keychain)
Step 2: Securing


First secure the paracord through the quick link by taking the 2 ends, folding them together, then putting the ends through the link, pull the looped side through, pull tight.
Step 3: Begin Tying


Measure down 5 inches down from the bottom of the quick link. Each foot of paracord will be one inch of bracelet until the bracelet is 5 inches long then you double the bracelet. <--for adjustable sized bracelet/keychain. Make a loop at the 5 inch mark then fold the other length of cord over the long piece of cord so that the cord from both loop goes into the other loop. Tighten
Step 4: Here We Go Again

Repeat the previous step by tying the same knot and tightening as you get closer to the quick link. Make sure to alternate sides you start the loop on underneath. ( it takes some trial and error at first but eventually you get into the rhythm. Every so often pull on the knots up toward the quick link so that it's loose, moves very freely, and you can see gaps as shown in the picture. This may take a few minutes.
Step 5: Tying Over It

Once you reached the quick link with plenty of spacing and cord to spare as seen in a picture on the previous step you will now want to do that same knot over the existing knots. You continue the knot back down away front he quick link, again it will get easier as you get the rhythm for it. It should look like the photo except you will have some frayed ends hanging off at the end. No special knot at the end you simply do the knot you have been doing until you no longer have enough paracord or you hit the end of the chain.
Step 6: Cutting and Melting

At this point you will want to lop off the paracord that hangs off pretty close to the chain of paracord. Then you will want to burn off the ends to prevent the cord from fraying. Sorry you didn't get to see fire I had already previously melted the ends and was out of fuel. Remember to always melt over the sink or outside and avoid burning your hands or flammables or melting the cord onto your hand because it hurts ALOT. Also try to avoid breathing in the fumes of the melting cord.
Step 7: Attaching the Second Quick Link


At the bottom of the chain you will find you need to wiggle the knot and find a small opening at the very bottom to open up your link and put it in to ensure it is secured.
Step 8: Now Wear and Use As You Wish


Open up one of the links and put in your keys for a keychain or hook the other link around your wrist and tighten for a somewhat loose( yet secure) and comfortable bracelet. You can now have peace of mind you will always have extremely strong links and cord for tieing down objects or towing moderately heavy loads. Or in a survival situation I would hope never comes. Remember never exceed weight limits of cord or links and always use caution should you decide to use it to support human weight. Now be safe and I hope you enjoy!

Participated in the
Great Outdoors Contest


