

Introduction: Vector Editing


More by the author:


About: Autodesk helps people imagine, design and create a better world. Everyone -- from design professionals, engineers and architects to digital artists, students and hobbyists -- uses Autodesk software to unlock t…
This lesson will oultine the vector editing tools in ArtCAM Premium.
Note: All files can be found at the bottom of each lesson. Feel free to save the files to your own directory.
Step 1: Example 3-1

Step 2: Example 3-2
Attachments
Step 3: Example 3-3
Attachments
Step 4: Birthday Card Tutorial

- New Model
- Width = 150mm(6”), Height = 200mm(8”).
- Origin to centre of model and resolution = 1056x1408 points
Now we can create the boundary and balloons.
- Create Rectangle
- Width = 130mm(5”), Height = 185mm(7.25”)
- Create Ellipse
- Start Point X -5(-0.2”)Y -5(-0.2”),Width = 30mm(1.2”), Height = 40mm(1.55”)
- Ctrl copy to create 2 other balloons
With our border and balloons created, now we can create the text for our card.
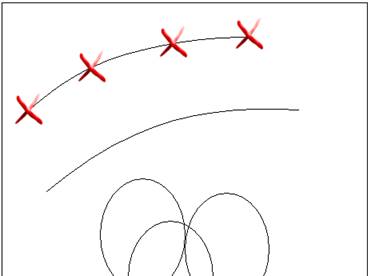
- Create Polyline – curve for text
- Draw smooth polylines
- Repeat for 2nd line
- Create Vector Text
- Font = Snap ITC, Size = 10mm(0.375”) and Character Spacing 50%.
- Select top Polyline - On a Curve - Select Curve
- Type the word Happy
- Repeat for word Birthday!On the second Polyline
- Delete curved polylines
Now let's create the cake.
- Create Ellipse
- Start Point X 30(1.2”)Y -60(-2.36”),Width = 45mm(1.75”), Height = 6mm(0.25”)
- Node Editing - Cut vector ellipse to split it top and bottom
- Block and Rotate
Copy – lower ellipse half
- Distances are offsets
- X Offset = 0mm, Y Offset = -7mm(-0.275”)
- Columns = 1, Rows = 4
- Polyline – snap from cake to balloon x3
- Trim Vectors - trim overlapping vectors on ballons
- Rectangle - draw in empty are to left of cake
- Width = 10mm(0.375”), Height 30mm(1.2”)
- Circle - draw above rectangle
- radius = 4mm (0.15”)
- Snap bottom of circle to mid top of rectangle
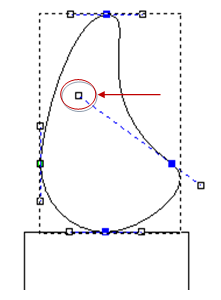
- Node Editing – make flame
- Drag top node up
- Drag upper control point of right node, into flame
- Transform -
rectangle and ‘flame’
- Scale to 25%
- Move candle into cake top
- Ctrl copy 5 candles
- Trim Vectors - - trim overlapping vectors of candles and cake
With our five candles created, let's add a number five to the card as well.
- Create Vector Text
- Font = Ravie
- Size = 25mm(1”)
- Type the number 5 in lower left empty area
- Create Circle
- Snap to center of 5
- Radius approximately 25mm(1”)
- Create Star – small star
- No of points 5, Radius of 1st points 5mm(0.2”) and 2nd points 2mm(0.075”)
- Paste along Curve – Select star and large circle
- Specify Number, Number of Copies = 5
- Delete original Star vector and large circle and original border rectangle
- Import Vectors
- border feature.eps
Step 5: Welcome Plaque Tutorial
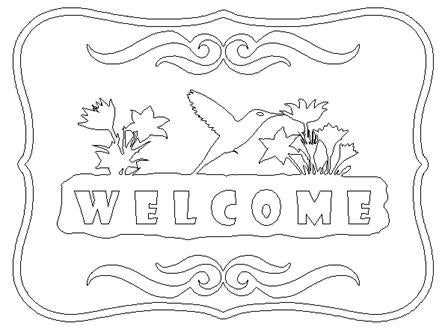
- Open base.jpg
- Width of 1220mm (48”), Origin to lower left corner
- Bitmap to Vector
- Reduce Colours - 3
- dark blue as the primary colour.
- Create Vectors
- Click on lightbulb to hide Bitmap Layers.
- New Vector Layer
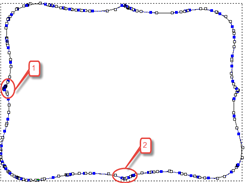
- change name in lower panel to border then Apply
- Select border vector and right click, Move Vectors To…border
- Delete outer rectangle vector and small cluster of vectors.
- Node Editing - Cut Vector
- delete large vector to leave only bottom left vector.

- Mirror Vectors
- Check Copy and Join
- Mirror Right
- Mirror Top
- F9
- Bitmaps Layers - Import Image - scroll single.jpeg
- NewVector Layer
- Rename - scroll
- Bitmap to Vector
- Reduce Colours - 2
- dark blue as primary colour.
- Create Vectors
- HideBitmap Layers
- Transform Vectors - scroll
- scale 150% and Apply.
- Spline Vectors
- Tolerance 1 (0.05”)
- Mirror vectors
- Copy - Right
- Use arrow key to nudge until they slightly overlap

- Weld Vectors
- F9
- Alt and drag it down towards bottom
- Mirror Vectors - Over Model
- Bitmap Layers - Import - welcome bird.jpeg.
- New Vector Layers and Rename it to design
- Bitmap to Vector
- Reduce Colours - 2
- black as the primary colour.
- Create Vectors
- Hide the Bitmap Layers
- Transform Vectors
- scale to 120% and Apply
- Unlock Maintain aspect ratio
- New Width to 900mm (35.5”)

- New Vector Layers - Rename it to text
- Create Vector Text.
- Font Showcard Gothic, Size 90mm(3.5”) and Character Spacing of 160%.
- Type WELCOME
- Drag to position
- Activate the borderVector Layer
- Offset Vectors - border
- distance 20mm (0.75”) Outwards with Sharp corners.
- Change Vector Layer colours


