

Introduction: Volca Synth Foldable Case


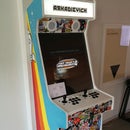
Foldable wooden case for Korg Volca synthesizers with integrated MIDI keyboard and speakers. Based on Volca Synth Suitcase, which I built nearly half a year ago.
What's inside:
- Korg Volca x 4. I've used Bass, Keys, Sample and FM
- Korg mini kaoss pad 2S
- Arturia KeyStep
- MINDBURNER 3 way MIDI splitter
- Bastl Instruments Dude mixer
- Patchblocks module (as clock sync divider)
- Harley Benton PowerPlant Junior x 2
- Multiport USB adapter x 2
- 2.1 USB speaker set
The whole design and build process took around 3 months with maybe 10 hours a week. I've done it all at home, but having access to a proper workshop and tools would definitely make the process much easier and faster. There was a lot of planning, trying, failing, retrying and going back and forth with different options, but in this instructable I'd like to only cover the shortest path to get to the end result. Hope you'll enjoy it!
Step 1: Cardboard Model


I usually start projects like this by drawing a rough 3d model in Tinkercad, but this time I've decided to build a cardboard model instead. This helped me to better understand the dimensions of the case, but also let me find out that some of my initial design ideas required rethinking. In particular, I had to move the internal panels further away from each other, otherwise the case won't be able to close with all gear and cables inside it. I've also found out that the latches would have to hold a lot of weight when I carry the case, so I've decided to slightly change the shape of the keyboard panel to balance the load. You'll see what I mean in the next step.
Step 2: Design


Same as I did with my Pocket Synth Briefcase, I've decided to go with laser cut panels made by Cotter, a local laser cutting lab located in Copenhagen. I've used SketchUp Pro, which supports exporting to DWG, DXF and some other vector formats. Unfortunately, SketchUp Free lacks this feature, so unless you want to pay $590 to keep using SketchUp Pro after the trial period, you only have one month to complete the design.
I've chosen to use birch plywood, 9mm for the box and 3mm for the interior panels. Plywood is really easy to work with, but it's pretty heavy. The total weight of the panels ended up being around 6kg. I think it would be possible to reduce the thickness of the exterior panels down to 6mm and that would tangibly reduce the weight while still keeping the box strong, but then I would have to be more creative about mounting hinges and overall assembly.
Remember I've mentioned load balancing and the keys panel shape in the previous step? On the first picture, if you imagine the yellow section moving up together with the keys panel, you can see the panel acting as a hook latch. Also, this funny arc shape in the bottom of it is not just a visual decoration. If it was a straight cut the panel won't be able to move - it's a circular motion!
Step 3: Box Assembly


The assembly process was pretty straightforward. I've used wood glue and brad nails. Plywood is soft enough to be cut with a utility knife. The screws for the hinges appeared to be a hair longer than needed, but I just sanded their ends off with a sanding bit. Everything fit together perfectly, which to be honest was a surprise for me.
Step 4: Panels


Panel mounts were made of 12mm strip wood. I've cut them to desired size and shape, glued them to the box and used some clamps to hold them in place while the glue dried.
Instead of using wood screws for attaching the panels to the mounts, I've chosen to go with M3 rivet nuts and bolts. It appeared to be a great idea, because I had to take the panels in and out many times during the build process, so regular screws would most likely have eaten the threads in the wood to a point when they would stop holding the panels in place.
The panels appeared to be too soft and bended a little, so I reinforced them with some strip wood from the back.
Step 5: Oil, Feet, Latches and Handle


Raw plywood is really good at adsorbing moisture and bend. One of the easiest solutions to prevent this is oil finish.
Fun fact: what's called "Danish Oil" in the US, does not exist in Denmark.
I went to the nearest paint shop and bought some furniture oil. Before applying it, I did some simple tests to make sure it provides good water protection while still allowing velcro tapes to stick to the surface.
After I applied the oil and let it dry I installed rubber feet, latches and handle. The exterior part was done.
Step 6: Velcro Tapes


Velcro tape is the easiest and fastest option to go with when you want to mount something, but still be able to remove it if needed. The keyboard was too heavy for the tape to hold it, so I've made a couple of simple mounts from steel hobby wire and put some small self stick furniture pads between the mounts and the keyboard to prevent its surface from scratching.
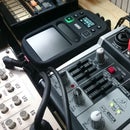
Step 7: Wiring


Warning! This section contains questionable ideas and may cause electric shock. Do this at your own risk.
To power up Volcas and Dude mixer with 9v I've decided to use Harley Benton PowerPlant Junior. It has isolated outputs, which makes you forget about ground loop noise problem. Every output has a limit of 110mAh, but even though each Volca consumption should not exceed 100mAh, after a period of time one of them was randomly switching off. This only happened when all four Volcas were plugged in, so I decided that the problem had something to do with the total power consumption. The solution was to simply add another power adapter in addition to the existing one. The bodies of the adapters were pretty heavy and bulky, so I decided to take the circuit boards out and use them separately. If you do this, please make sure to find all high voltage wires and contacts and isolate them carefully.
MIDI splitter, keyboard, kaoss pad, patchblock module and amplifier needed 5v. And even though I was able to find a power adapter with five outputs, I had to use two separate USB adapters because of the ground loop noise.
The bottom section looks less interesting. Here I've used a 3.5mm headphone splitter for clock sync and made a simple audio cable extender by soldering two 3.5mm sockets together.
Steel hobby wire was quite useful for mounting everything, including the cables.
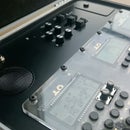
Step 8: Front Panel


I've ordered some really cheap 2.1 USB speakers with integrated amplifier from ebay, disassembled them and mounted components directly into the panels.
As you can see on one of the pictures, the sockets on the control panel are double sided (again, soldering two of them together as in the previous step), which makes it easier to remove the panel whenever needed.
There are 4 sockets on the control panel:
- audio in, 5th channel of the mixer
- line out, output of the mixer split out before the amplifier
- sync out (not connected yet)
- MIDI in, that goes to the input of the KeyStep (not connected yet)
For the power I used C8 socket also known as Figure 8 or Shotgun.
Step 9: Cable Holders and Insulation Strips


A couple of finishing touches, velcro cable holders and insulation strips on the internal edges of the box and it's done!
Step 10: Result


Finally I have a setup, that can be kept in a storage while I'm not using it, but it takes only a couple of minutes to pull it out and start jamming. Speakers sound pretty ok for their price. With 5 sequencers, clock sync divider and the effects processor there is plenty of room for experiments. As about the cons, even though the box feels really sturdy and solid, it turned out heavier than I would like it to be.
I've tried to keep this instructable short, so I'll be happy to answer any particular questions about the build down below in the comments. Hope you find this helpful and wish you good luck with your projects!


