

Introduction: WIFI Battery Monitor System - ESP8266


One of the main problem in battery powered projects is to choose/use the proper battery size/model/type. As market is flooded now with a lot of low quality batteries claiming thousands of mAh ( Ultrafire fakes stories is just an example) the only way to proper check them is to run a set of tests.
A simple basic tester that will be able to monitor over the entire battery lifetime at least few parameters like, voltage, current, power consumption and stored energy between charges can give you valuable informations about the parameters and health of the battery. And of course also you can see how are looking the numbers against the datasheet claims :).
Step 1: What We Will Need:
- CBDBv2 Evo Board ( or any other ESP8266 Board you may like but who has voltage/current measurement capabilities)
- INA21x - Current shunt monitor
- USB adapter (take a look here for more details about the USB Adapter)
- Li-Ion Battery Module
- 2 x 10 Ω /10 W resistors
- Connection wires - various colors
Step 2: Schematic & Wiring

As the CBDBv2 Evo DevBoard has already Voltage and Current measurements capabilities onboard, the only thing that we will need to do is to connect the battery module that we want to measure to the board:
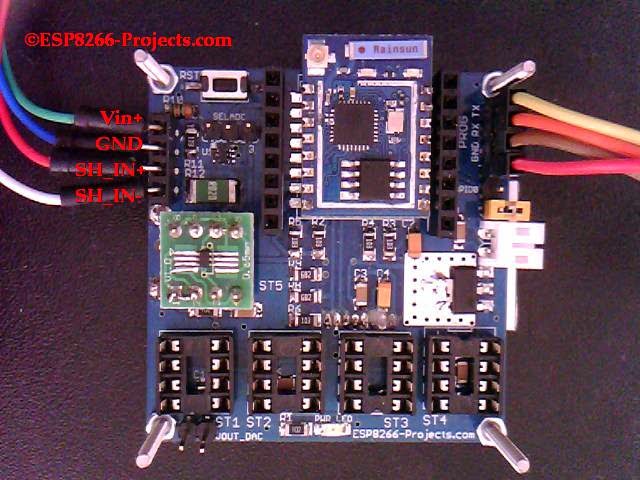
WIRING:
- GREEN - V+
- BLUE - GND
- RED - SH_IN+
- WHITE - SH_IN-
For that ones of you that want to use a different Board or just want to add these functions to a ESP8266 Module, you just need:
- for Voltage - add and size on your needs the voltage divider as explained in details in the previous article about ESP8266 Internal ADC.
- for Current - add your favourite Current Monitor but don't forget about the VmaxIN for ESP8266 ADC of about 1V!
Step 3: How to Measure Battery Parameters
When measuring the real battery capacity what we are interested in is the amount of energy stored in a battery since it is this energy we need to power our devices. Stored energy is measured in Watt-hours - the same unit used to measure our domestic electricity consumption (where 1,000Wh = 1kWh = 1 unit of electricity).
In order to measure the stored energy in a battery a power resistor is used as the load, and a fully charged battery is fully discharged through it. By measuring the voltage across this resistor at regular intervals during the discharge process it is simple to calcuate the total energy dissipated and therefore the total energy which had been stored in the battery.
Using Ohm's Law (I=U/R) we can then calculate the current flowing through the load since we know the voltage across it. Instantaneous power is given by multiplying the measured voltage by the calculated current (P=U*I).
By taking readings for a certain amount of time until the battery is completly discharged, and adding up the energy dissipated in each time interval, we can calculate the total energy taken from the battery and dissipated in the resistor and therefore the total energy that was stored in the fully charged battery.
Step 4: Software Implementation
For programming CBDBv2 Evo Board and uploading the drivers and the software we will continue to use the LuaUploader as before.
1. Define used GPIO pins and variables:
ADC_SRC = 5                    -- GPIO14 - select Voltage Divider / Current Input
sda=2                          -- GPIO4  - SDA
scl=1                          -- GPIO5  - SCL
gpio.mode(ADC_SRC,gpio.OUTPUT, gpio.PULLUP)
gpio.write(ADC_SRC,1)      -- Voltage Measurement - Voltage Divider Source selected
gpio.write(ADC_SRC,0)      -- Current Measurement - Current Shunt Monitor output selected
voltdiv= 0.00412           -- Voltage reading calibration
dival = 0.00096            -- ADC volt/div value - CALIBRATE !!
resdiv = 4.31447           -- Voltage Divider Ratio - CALIBRATE!!
divalI = 0.9425            -- Current volt/div ratio - CALIBRATE!!
cpct = 0                   -- Calculated Delivered Energy
adcI = 0                   -- ADC readings -  Curent
adcV = 0                   -- ADC readings - Voltage
pwr = 0                    -- Calculate Power
t=0                        -- time
2. READ ADC - Voltage
function readADC_Voltage()
      adcV = 0
      advr = 0
      advr=adc.read(0)
      print("\nADCV Step   : " ..string.format("%g",advr).." steps")
      adcV=advr*dival*resdiv
      print("Voltage     : " ..string.format("%g",adcV).." V")
      return adcV
end
3. READ ADC - Current
function readADC_Current()
      adcI = 0
      adcr = 0
      adcr=adc.read(0)
      adcI=adcr*divalI
      print("ADCI Step   : " ..string.format("%g",adcr).." steps")
      print("Current     : " ..string.format("%g",adcI).." mA")
      return adcI
end
4. READ ADC Process function and instantaneous Power consumtion calculation
function readUI()
   gpio.write(ADC_SRC,1)         --select source
   adcV = readADC_Voltage()
   tmr.delay(10000)
   gpio.write(ADC_SRC,0)         --select source
   adcI = readADC_Current()
   pwr = adcI*adcV
   print("Power       : " ..string.format("%g",pwr).." mW")
end
5. Number format function for proper LCD printing
nr_format = function (fnr,unit)
   if (fnr > 1000) then fnri=fnr/1000
                        uniti=string.sub(unit, 2)
                        nrf=string.format(" %.3f%s ",fnri, uniti)
   else
   if (fnr < 100) then
                    if (fnr < 10) then
                                   nrf = string.format("  %.1f%s ",fnr, unit)
                      else nrf = string.format(" %.1f%s ",fnr,unit)
                    end
    else nrf = string.format("%.1f%s ",fnr,unit)
   end
  end
   return nrf
end
6. LCD Print - > Voltage / Current / Energy / Power
For more details about the I2C LCD Driver , please take a look at the ST7032i LCD Driver Article
function readUI()
   gpio.write(ADC_SRC,1)         --select source
   adcV = readADC_Voltage()
   tmr.delay(10000)
   gpio.write(ADC_SRC,0)         --select source
   adcI = readADC_Current()
   pwr = adcI*adcV
   print("Power       : " ..string.format("%g",pwr).." mW")
end
7. MAIN program
require('st7032i')
st7032i:init_i2c(sda,scl)
st7032i:init_LCD()
st7032i:lcd_clear()
st7032i:lcd_print(1,1,string.format("Battery Monitor"))
st7032i:lcd_print(3,2,string.format("Starting ..."))
tmr.alarm(0, 10000, 1, function() readUI() LCDout() tmr.delay(1000) end)
Step 5: First RUN

For testing, just save the code on ESP as 'blms.lua', restart ESP and run:
dofile("blms.lua") -- Start the Battery Live Monitoring System

If you want the BLMS software to start automatically when your CBDB module starts or reboots, then you neet to create and add some lines in your 'init.lua' file:
dofile("blms.lua") -- Start the Battery Live Monitoring System
Save the code on ESP as 'init.lua', restart ESP.
It should reboot and restart automatically the program .
Step 6: BMS Web Server Interface

srv=net.createServer(net.TCP)
  srv:listen(80,
     function(conn)
        conn:on("receive",function(conn,payload)
        --print(payload)
        conn:send("HTTP/1.1 200 OK\n\n")
        conn:send("<META HTTP-EQUIV=\"REFRESH\" CONTENT=\"5\">")
        conn:send("<html><title>Battery Live Monitor System - ESP8266</title><body>")
        conn:send("<h1>Battery Live Monitor System - ESP8266</h1><BR>")
        conn:send("Voltage :<B><font color=red size=4>"
                          ..string.format("%g",adcV).." V</font></b><br>")
        conn:send("Current :<B><font color=blue size=4>"
                         ..string.format("%g",adcI).." mA</font></b><br>")
        conn:send("Power   :<B><font color=red size=4>"
                        ..string.format("%g",pwr).." mW</font></b><br>")
        conn:send("Energy  :<B><font color=green size=4>"
                       ..string.format("%g",cpct).." Wh</font></b><br>")
        conn:send("<BR><BR><BR>Node.HEAP     : <b>" .. node.heap() .. "</b><BR>")
        conn:send("IP ADDR    :<b>".. wifi.sta.getip() .. "</b><BR>")
        conn:send("TMR.NOW    :<b>" .. tmr.now() .. "</b><BR<BR><BR>")
        conn:send("</html></body>")
        conn:on("sent",function(conn) conn:close() end)
        conn = nil
      end)
end)
Step 7: Thingspeak.com Data Upload

function sendDataTh()
    print("Sending data to thingspeak.com")
    conn=net.createConnection(net.TCP, 0)
        conn:on("receive", function(conn, payload) print(payload) end)
        conn:connect(80,'184.106.153.149')
        conn:send("GET /update?key=YOURKEYHERE&field1="..adcV.."&field2="..adcI.."&
                           field3="..pwr.."&field4="..cpct.."HTTP/1.1\r\n")
        conn:send("Host: api.thingspeak.com\r\n")
        conn:send("Accept: */*\r\n")
        conn:send("User-Agent: Mozilla/4.0 (compatible; esp8266 Lua; Windows NT 5.1)\r\n")
        conn:send("\r\n")
        conn:on("sent",function(conn) print("Closing connection")
        conn:close()
    end)
    conn:on("disconnection", function(conn) print("Got disconnection...")
    end)
end
Step 8: Web Server - First RUN

If you have a new ESP module or is the first time when using it on a new WIFI network, don't forget to do the WIFI setup:
-- One time ESP Setup --
        wifi.setmode(wifi.STATION)
         wifi.sta.config ( "YOUR_WIFI_SSID" , "PASSWORD" )
         print(wifi.sta.getip())
-- Read ADC data every 10s -- Print values on local Web interface and send them to thingspeak.com tmr.alarm(0, 10000, 1, function() readUI() sendDataTh() end)
For testing, just save the code on ESP as 'blmsweb.lua', restart ESP and run:
            dofile("blmsweb.lua")      -- Start the Battery Live Monitoring System
            print(wifi.sta.getip())       --print your BMS WebServer IP address
Open your favorite Web browser and type your new BLMS Web Server IP address. If all ok, it should look like below :
Step 9: CONCLUSIONS
Following the previous 8 steps you can end up with some minor tweaking with a nice and easy to program Battery Monitor System that can have a extended usage in all yours ESP8266 Battery powered projects and even more.
For more details about please take a look also on the original Battery Monitor System Article here
For any new CBDBv2 Evo orders/requests please feel free to use as usual:
tech at esp8266-projects.com.
If you want for your own experiments to order CBDBv2 EVO bare PCBs only, you can also do it directly at Dirty PCBs, our preferred PCB House:
http://dirtypcbs.com/view.php?share=5876&accesske...
Thank you for your continuos support of my projects & looking forward for your comments about :)

Participated in the
Home Automation


