

Introduction: WT588D Standalone / Arduino Sound Player


This tutorial is for the WTD588D-U to be used in standalone mode
In this instructable i will show you the necessary tools and steps to load a few sound files and have them play on key press.
Perfect for testing the module before adding it to your Arduino projects.
There are a few different versions of the WTD588D, the -U has an onboard USB programer and is very cheap less than £3 from china, Other versions require an external programmer but have the benefit of being a smaller package size.
Step 1: Download Required Software
Before we begin you will need software to prepare your audio files to ensure your audio file doesn't clip and to Export at 22khz bit rate, I recommend Audacity (link Bellow
The WT588D rar file contains manuals and the upload software required to push your audio files to the chip.
AudacityPrepare audio files and export as a 22khz Wav File.
WT588D Software Google Drive LinkUpload WAV audio files to the onboard flash.
Step 2: Prepare Audio Files


- Load or Record your audio files direct into Audacity.
- Ensure the audio files peaks do not clip by using the normalization tool located under effects.
- Change the project rate to 22000
- Export your audio file as a WAV
Step 3: Change Language to English
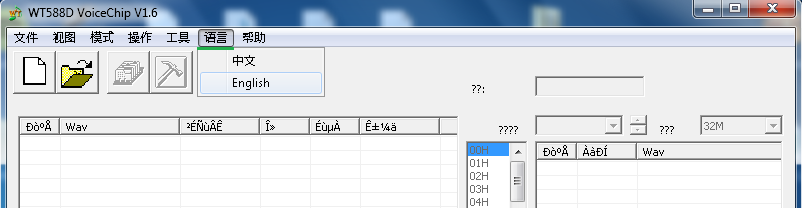
To change the language to English press the 2nd button from the Right.
Step 4: Load Audio Into Upload Software

Now we have our audio prepared we can load into the WT software.
Right click the left hand window and load your audio clips you are going to use within the project.
- (If you intend to use an Audi clip multiple times within the project you only have to load it in ONCE as we can reuse the clip multiple times)
Step 5: Organise Your Audio
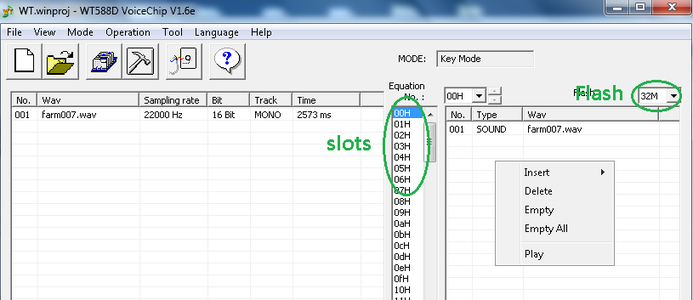
Now that we have the audio loaded we now have to organise it into slots.
Each slot can be selected to play individually via the Arduino or the first 4 slots can be selected by hardware buttons in standalone (KeyMode)
You can add multiple audio clips into a slot that will play after each other, you can reuse a clip over and over again without it taking any additional space.
Changing the flash size to match the size of chip you purchased will give you an indication of how much space you have avaliable.
Remeber the flash size is quoted in bits and not bytes, there are 8 bits in a Byte so your 32mb flash size will hold 4MB
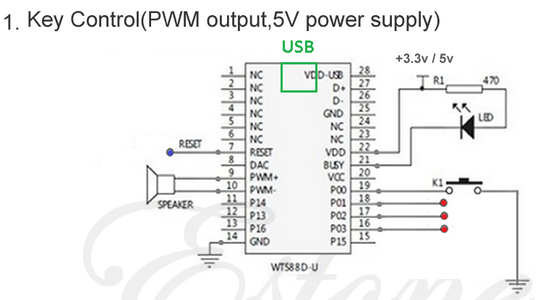
Step 6: Setup Your Modules Control Options

For this tutorial we will be using keyMode, this is the simplest Setup and will allow us to trigger audio by pressing hardware buttons.
Step 7: Compile the Settings and Audio Clips

Once we have loaded our audio clips, Set-up our slots and set our settings we now need to compile all of these into a single file ready to upload into our WT855D.
Step 8: Upload to the Module

- Plugin your WT588D-U into your computer, wait for the necessary drivers to install.
- Select your flash size
- Press connect
- Press oneKeyDownload - Wait for the file transfer to complete
- Press Cut to disconnect.
Step 9: Test
The module should now be uploaded with your config file and the audio clips.
Whilst testing the 5V can be supplied via USB
- Connect busy led to pins 22 + and 21 -
- Connect Speaker between pin 9 and 10
- Connect a push button between pins 19 and Gnd (14)
- You may repeat for pins 18 17 16 to trigger slots 2, 3, 4 to GND(14)
If not powered via usb you may connect a 5V supply to pin (22) and GND(14)


