

Introduction: Wax Seals From a Laser Cutter


"Wax seals!" they all said.
"But didn't wax seals go out of fashion with the rise of the postal service, around before the Victorian period?" I said.
"Doesn't your story involve tiny robot swarms, evil laser cutters and Aether travel?" they said.
"Oh," I said.
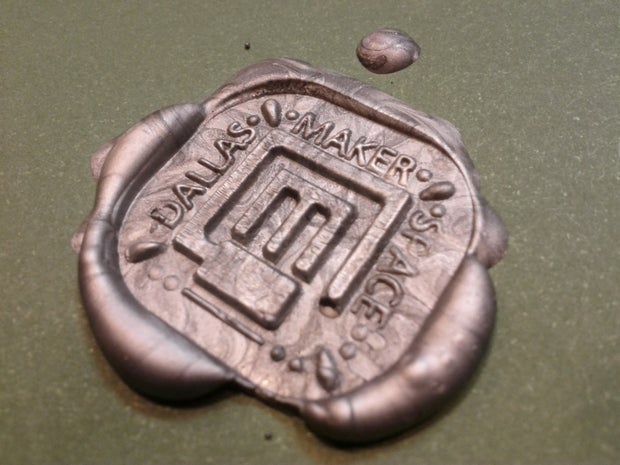
There are a few places online where you can order custom made brass matrices (the part that makes the impression in the wax is called a matrix), but ever the DIYer, I wanted to see if I could make a serviceable acrylic matrix on the laser cutter at the Dallas Makerspace. It turns out that making a custom wax seal is rather simple. If you have access to a laser cutter or can drop a few dollars at Ponoko, you can make a completely customized acrylic matrix for under $20.
You'll Need:
- Thick acrylic to laser cut - 4.5 mm or thicker
- A peg, bobbin, or any other item with a flat end to use as a handle
- 2 part epoxy glue
Step 1: Design Your Seal

Seals have been used for hundreds of years to show that documents were genuine. In ancient times, they carried the emblem of the owner, usually with a ring of text or a banner around the outside identifying the owner (or sometimes carrying their motto.) The practice of sealing documents with a personal or family symbol dates back to Ancient Rome, and its believed that the tradition of family heraldry came from the practice of handing down a seal from generation to generation.
Today, commercial seal makers offer general purpose seals with initials and popular symbols; but since you're laser cutting this seal, you can put whatever you like on it! Here are a few tips to keep in mind when designing your seal.
- The easiest way to get your art to cut correctly on the laser is to make it in Inkscape or another vector drawing program. You'll be able to draw your cut line on the same canvas as your art. This makes it easy to center.
- Your art should be in black and white. The black areas will be raised in the impression.
- Make the cutting outline of your stamp smooth; circles and ovals work best. Some historic seals are in the shape of a pointed oval, too.
- Leave some room at the edges of the design. Seals work better if the edge of the matrix is smooth.
- When you have your design finished, you must flip your art horizontally. The process of leaving an impression in the wax will flip it back.
Tips, Tricks and Resources
- How to wrap text around a circle (or any other shape) in Inkscape.
- Heraldry clip art from the Open Clip Art Library.
- If you want to make a seal that looks old, try using one of these open blackletter fonts from the Open Font Library.
- You can also use these sample files. They're adapted from the files I used to create my seal for Laser Lace Letters and make a seal that's slightly less than 3/4" tall. Feel free to use them to create your own!

Sample File 1
(Right click to save)

Sample File 2
(Right click to save)
Step 2: A Tricky Gray Area (Optional)

The laser cutter will be rastering your art, and then cutting out your matrix piece. If we laser a shallow edge around the art, the wax will press into it more easily, and will be less likely to get stuck. It involves some complicated work in Inkscape - and it's worth it - but if this is your first seal, I won't blame you for not wanting to spend time on this.
1. Convert your art to paths
2. Make a duplicate of your art.
Select all of the art inside your design (not the cut line on the outside) and duplicate it with Ctrl-D. Set this copy to a different fill color, so you can tell the two copies apart.
3. Convert any strokes to paths.
4. Add a thick gray stroke.
Group (Ctrl-G) or combine (Ctrl-K) the copied art and give it a thick, light gray stroke. .015 inches is a good width, and 30% gray is a good color.
5. Send to back
Send the copied art to the bottom of the drawing. Your black artwork will now have a gray halo around it that the laser will raster as a shallow lip.
If you're sending this file to Ponoko, you will have to convert the gray outline to a path as well. Read more about guidelines for lasering files at Ponoko here.
Step 3: Laser It!

This step will be different depending on your level of laser access. It may involve placing an order with Ponoko or Shapeways, asking a friend or a local shop to cut your file, or cutting it yourself. You want to cut your matrix out of thick plastic, 4.5mm or thicker. You'll be making a raster pass (or multiple raster passes) and then a vector pass.
Settings on different machines vary, but here are the settings we use to cut our matrices at the Dallas Makerspace. Our machine is a Full Spectrum Laser 40 watt hobby laser running RetinaEngrave 1.94.
Main Power Setting: 80%
Raster: 3D engrave, four frames. Auto-generate five frames, then remove the last (full black.)
Vector: 50% power, 100% speed, 3 passes.
Step 4: Attach the Matrix to a Handle

A handle will make the seal easier to place and to get out of the wax. Check out the woodworking area of your local craft store for things that make good handles.
Pegs and wooden board game pieces make really great looking handles, but you can also use a cork, a bobbin, or any other item that has a flat bottom no larger than the width of your matrix.
For this instructable, I'm using these wooden "peg people" game pieces. These come from Michaels, but you can also get them online for fairly cheap.
Pick a glue that will bond well to both the acrylic and the handle; it will need to withstand quite a bit of pulling as you take the matrix out of the wax, and will need to be able to handle getting warm as well. Cyanoacrylate glue (such as Krazy glue) won't work well, since the wood will absorb it. I used Gorilla Epoxy, which has a 30-minute cure time and dries clear. I also like JB Kwik for bonding acrylic to wood, but it is gray-black instead of clear, and harder to work with in small batches.
Put a dab of epoxy glue on the flat end of your handle.
Place your matrix on top (with the engraved side up) and center it by pressing down and sliding from side to side. 
Carefully flip the piece over and set it engraved side-down to cure. Wait for the glue to cure completely before making your first impression.
Step 5: Making a Good Impression

Sealing Wax comes in many varieties and colors. For this Instructable, I'm using a traditional wicked stick, which is similar to a candle, because that's what I could find locally. This is probably the least desirable method for getting your wax onto the paper; it takes a long time to drip the wax, leaving an uneven pour.
Online, you can find a larger variety of types of wax. There are sticks that fit into a low-melt hot glue gun, beads that you melt in a spoon or a melting pot, and wickless sticks that you heat with a heat gun. Wax also comes in a wide range of colors, and occasionally, scents.
In any case, the method for making a wax impression is pretty much the same as you'd use to make one with a metal matrix.
Melt your wax onto the paper. Cover an area slightly larger than the footprint of your matrix.
Wait 5-10 seconds for the wax to cool, then press your matrix firmly down into the wax.
When the top of the wax begins to cloud over, remove the matrix by gently rocking it back and forth until it comes free.
The other undesirable thing about wicked sealing wax is that if you don't pay attention, you can easily burn the wax, which will leave these black flecks in your seal.
Step 6: Care and Feeding

Once in a while, wax will get stuck in your matrix. Acrylic sticks more easily than brass, and the lasering process leaves a slightly rough surface that's more prone to sticking.
Pro Tip: (from @novysan) Heating the engraved side of your matrix very lightly with a heat gun will melt the surface of the plastic and eliminate some of the roughness that can lead to sticking. Don't use too much heat, or you could melt your design.
Large amounts of wax can be peeled off, but sometimes little bits get caught in the details, especially text. If this happens, you can clean it out by making another impression. Try pressing the matrix in earlier, or leaving it in the wax longer than normal.
If the wax is still stuck, or if you're done making seals, you can clean the matrix by running it under hot tap water and scrubbing with an old toothbrush. Never use needles, steel wool, or other metal abrasive tools to clean your matrix; they will roughen the acrylic and may damage the image.
The melting point of sealing wax is around 150 degrees Fahrenheit, and the softening point of most acrylics is around 200 degrees. Contact with hot wax shouldn't damage the plastic, but prolonged exposure while doing multiple impressions could warp it. Let the matrix cool down between seals. If you're planning to do a large run of seals, consider getting a metal matrix made, or make multiple lasered ones.
Step 7: Just Go Crazy


Now that you know how to do it, you can seal just about anything. Put a lasered seal on a ring blank like this one. (This filigree blank came from a local craft store, but you can find ones like it online.) Make seals for your hacker club or for a specific event, dress up packaging or invitations, or use it to seal up some period correspondence.
I'd love to see your creations! Leave them in the comments, and be sure to check out the Laser Lace Letters, which will launch in October.

First Prize in the
3rd Annual Make It Stick Contest

Participated in the
Hurricane Lasers Contest


