

Introduction: Wearable Temperature Sensors for Working in Extreme Cold


When working in extreme temperatures it is important to monitor your body temperature. In freezing weather, your fingers and toes get numb and you can develop frostbite without even noticing it. Likewise, if your core body temperature can drop too low and you can start to start to suffer the effects of hypothermia before you are aware of it.
So I designed an automatic temperature sensor that will monitor the temperature of your fingers, your toes, your torso as well as the outside temperature. This can help you to stay safe when working in extreme cold.
Step 1: Watch the Video
Here is a video walkthrough of the project.
Step 2: Materials


Here are the materials and tools that you will need for this project:
Materials:
Arduino Microcontroller (such as Arduino Uno or Arduino LilyPad)
9V battery
Headphone connector
100 ohm resistor
Earbud Headphones
Thin jumper wires/Connector Cables
Heat shrink tubing
Gloves
Boots
Tools:
Soldering iron and solder
Wire cutters
Wire strippers
Drill and bit set
Knife
Step 3: The Temperature Sensor


There are a lot of different kinds of temperature sensors that you could use for a project like this. There are sensors like thermocouples, and thermistors (temperature dependent resistors) and temperature dependent transistors.
For this project I am using a TMP36 integrated circuit. I chose this sensor because it has a linear output and does not require any calibration. Temperature(in Celsius) = [Vout(in mV) - 500] / 10. It is also has a very wide operating range (−40°C to +125°C"). It works by using several transistors with different sized emitter layers. These transistors will have different outputs at different temperatures. By comparing them, you can determine the temperature. The output given at the center pin starts at 750 mV (at 25°C) and changes by 10mV per degree Celsius as the temperature changes.
If you would like to see a tutorial on how to use this sensor you can check out this Instructable by Adafruit Industries: https://www.instructables.com/id/Temperature-Sensor-Tutorial/
Attachments

Step 4: Add Connector Wires to the Leads of the Temperature Sensor


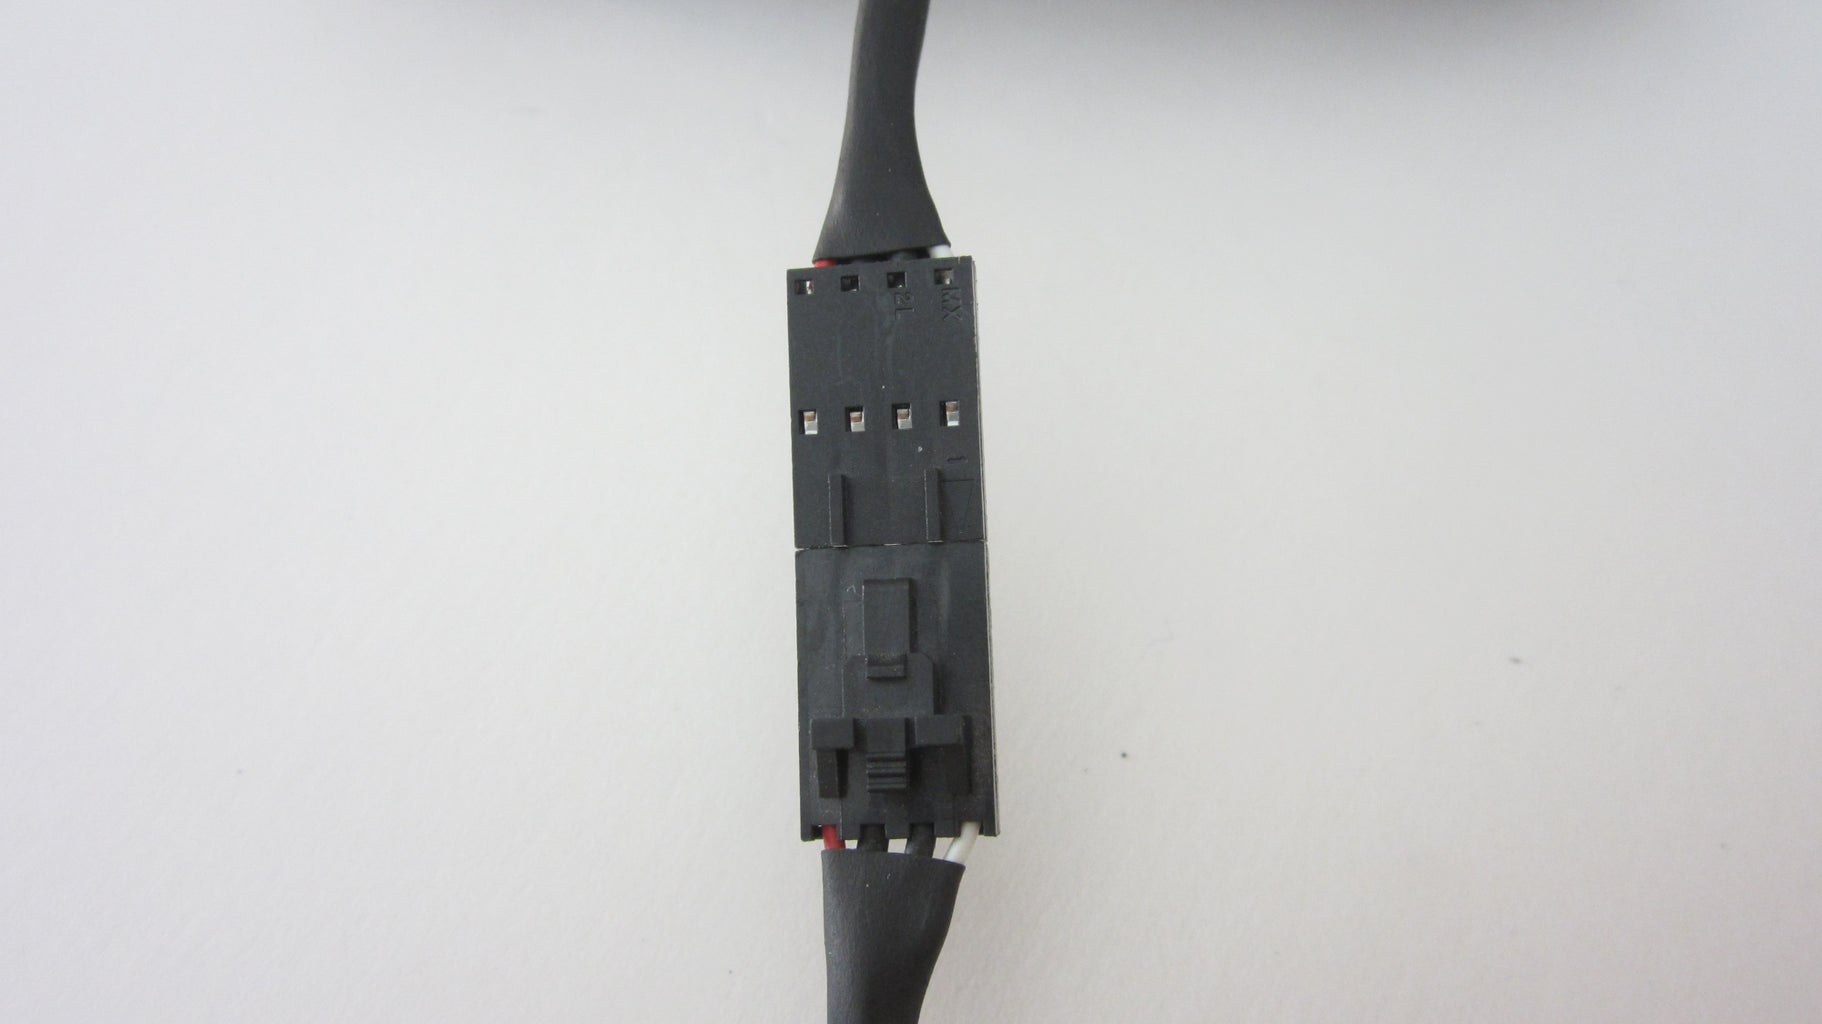
We will be mounting the temperature sensor several feet away from the microcontroller. So we need to connect it to the board with extension wires. I used header pin connector cables from an old computer. This allowed me to easily connect and disconnect the wires so that the gloves will not be permanently attached.
I cut one end of the connector cable and soldered three of the wires to the leads of the temperature sensor. I added heat shrink tubing to help insulate each connection.
Step 5: Mount the Sensor Inside Gloves and Shoes


To allow the temperature sensor to measure the temperature of your fingers and toes, you need to mount the sensors inside a pair of gloves and shoes.
It is easiest to mount the sensor inside gloves that have multiple layers. I was used a pair of gloves that had a leather exterior, cotton insulation and a fabric lining on the inside.
First I cut a small slot in the fabric lining at the inside cuff. Then I carefully slid the sensor and its connector wire into the glove between the fabric liner and the cotton insulation. Slowly move the sensor down to the end of the middle finger. It may snag a few times in the process so be patient. When you are done, the connector should stick out a little past he edge of the glove.
To mount a temperature sensor inside a shoe, you can generally just fit it in place before sliding your foot in. You shouldn't need to modify the shoe at all. If you need some help keeping it in place, you can fit the wires in between the tongue of the shoe and the side.
Step 6: Connect the Sensors to the Arduino
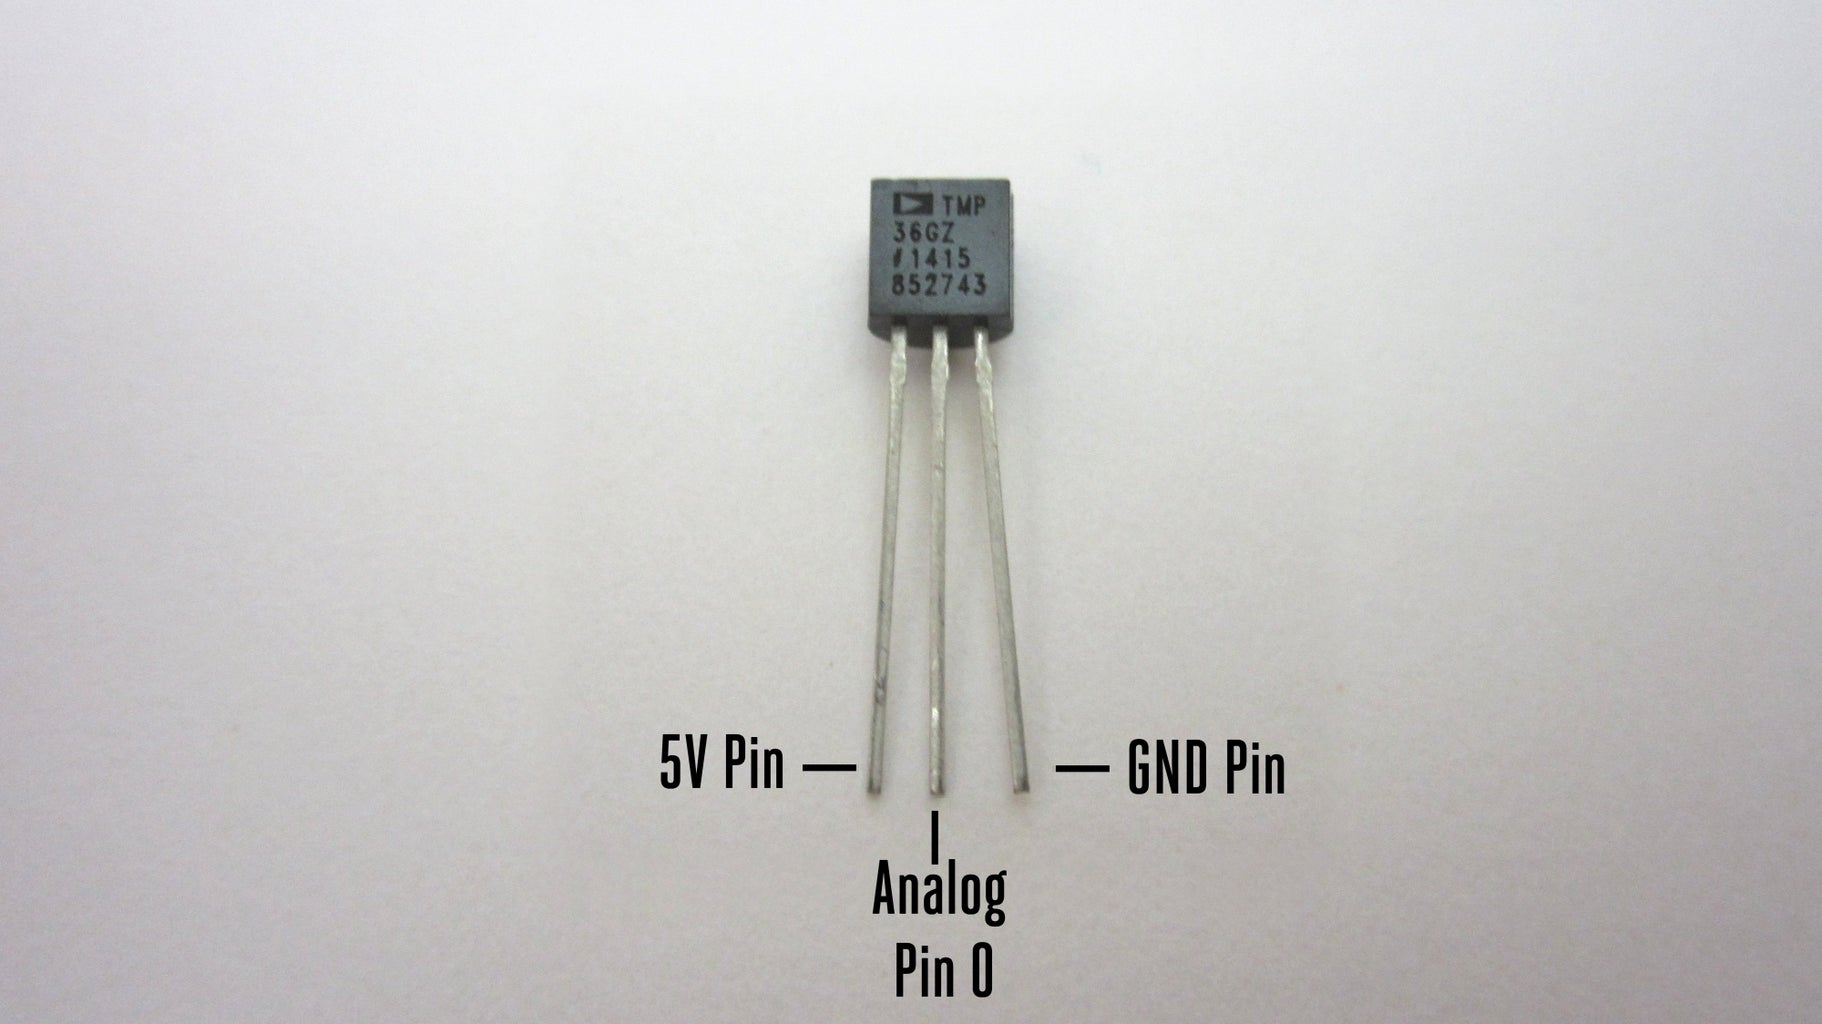

The TMP36 temperature sensor can be connected directly to pins on the Arduino. The left pin on the sensor is connected to the 5V pin (or the 3.3V pin) on the board. The right pin on the sensor is connected to the GND pin on the board. The center pin is connected to one of the analog input pins on the board.
Use a second set of connector wires to go between the board and the connector wires on the gloves and shoes. The wires can easily be fit between layers of clothing without much discomfort. Connect the cables together in whatever way is most convenient. I was using header pin connectors. So I was able to connect them by just inserting a long pin between the two female connectors.
Step 7: Connect a Pair of Earbud Headphones to the Arduino


You need some way for the system to alert you when your fingers and toes are getting too cold. A pair of earbud headphones works well for this because they can easily fit under cold weather head gear. We just need a way to connect it to the Arduino.
The PWM output pins can play a tone on a pair of headphones. You just need to add a 100 kohm resistor to bring the signal down to the appropriate level for the headphones. To connect the headphones to the pins on the board, I added a female headphone connector. Then I soldered on one extension wire and a 100 kohm resistor. To hear the tone in both earbuds, solder the connectors for the end and middle contacts together.
Step 8: The Arduino Code

//Here is the code that I used for this project. You can copy this into a new sketch or download the code file
//This code is written to support six sensors (2 feet, 2 hands, 1 torso and 1 external sensor).
//You can change the variables or comment out sections to modify it for use with fewer sensors.
int sensor[6]; //array for sensor pin variables
int temperatureF[6]; //array for temperature values in Fahrenheit int temperatureC[6]; //array for temperature values in Celsius float voltage; //holds calculated voltage value
void setup() { Serial.begin(9600); pinMode(3, OUTPUT); // sets the pin as output }
void loop() {
int i = 0; Serial.println("Sensor 0 1 2 3 5 6"); //display sensors Serial.print("Temp(F) "); //Fahrenheit //Serial.print("Temp(C) "); //Celsius
for (i=0;i<6;i++) //loop once for each sensor { sensor[i] = analogRead(i); //read the voltage from temperature sensor at analog pins voltage = sensor[i] * 5.0 / 1024; //convert analogRead value into a voltage temperatureF[i] = (((voltage*100 - 50) * 9 / 5) + 32); //converting voltage to temperature in degrees F Serial.print(temperatureF[i]); //display temperature value for each sensor Serial.print(" ");
//temperatureC[i] = (voltage*100 - 50); //converting voltage to temperature in degrees C //Serial.print(temperatureC[i]); //display temperature value for each sensor //Serial.print(" "); } Serial.println(""); Serial.println("");
for (i=0;i<5;i++) //loop once for each internal sensor, ignore outside temperature sensor { //when working with fewer sensors change "i<5" to a smaller number (example: "i<3" for three internal sensors) if(temperatureF[i]<35) { analogWrite(3, 200); // analogWrite values from 0 to 255 delay(1000); //waiting 5 seconds analogWrite(3, 0); // analogWrite values from 0 to 255 delay(1000); //waiting 5 seconds Serial.print("sensor alarm: "); Serial.println(i); } } }
Attachments

Step 9: Mount the Arduino Inside an Insulated Project Enclosure


Find an insulated project enclosure that is just big enough to fit the Arduino and the 9V battery. Drill holes in one side of the housing that are just big enough for the headphone connector and the wires. Then mount everything inside and close up the housing.
Step 10: Use the Temperature Sensor to Prevent Frostbite


Now you can use the system to detect when your fingers or toes are getting too cold (near freezing). You can use up to six sensors at a time. Taking advantage of this, I made two finger sensors, two toe sensors, one sensor for my torso and one sensor that just measured the outside temperature. To do this, the analog input pins are connected to the output lead of the temperature sensors. The 5V pin and the GND pin are connected to all of the sensors in parallel. If connecting the individual wires together is too much trouble you can make a small circuit board to make all the connections on.
If any of the first five sensors (fingers, toes and torso) get below the set alarm value in the code, the Arduino will play a tone in the ear piece to alert you.

Participated in the
Winter Wearables Contest

Participated in the
On a Budget Contest

Participated in the
Homemade Gifts Contest


