

Introduction: Weather Station Based on Raspberry Pi

This is a simple project for a weather station.
Initially it reads temperature, pressure and humidity. Next step is to measure wind direction and after that wind speed.
The base of the project is a Raspberry PI A+ which was chosen by its small consumption, since the idea was that the weather station being powered by solar power.
The OS is raspbian distro, with some off the shelve python libraries.
Main program was written in Python.
Weather station uploads all data to www.wunderground.com every 2 minutes.
Step 1: Hardware Description


For the completion of the project we will need the following :
Raspberry Pi A+ (It is possible to use any model)
Temp/Pressure sensor Bosch BMP180
Temp/Humidity sensor HTU21D
Wireless adapter
SD card
10W Solar panel
7.2 Ah 12V battery
Generic 12V solar controler/charger
5V regulator 7805
Bits and bogs needed
Step 2: Setting Up the Basics
I will not waste time explaining how to install raspbian on a Rpi. I assume that whoever wants to build this project is profficient enough in these matters.
Anyways the link for the distributions is http://www.raspberrypi.org/downloads/
Since i own a few Rpi's , i already have na SD image ready to roll with wireless conectivity, so it was just a question of rewriting it to a new card.
If you do not have such a "backup" it is probably better for you to use a B+ or other model with ethernet, and setup everything using one of many tutorials available.
A good tutorial for setting up Rpi is http://www.raspberrypi.org/help/quick-start-guide/
A good one for wireless is http://www.raspberrypi.org/documentation/configuration/wireless/
If everything went alright you should have now a Rpi with wireless internet access.
You still need to have your Rpi ready to use I2C protocol.
A good one is https://learn.adafruit.com/adafruits-raspberry-pi-lesson-4-gpio-setup/configuring-i2c
Step 3: Setting Up Other Software
After you set up your Rpi, there are a few pieces of software needed for us to be able to read the used sensors.
I did all using Rpi "Headless" and using command line
I used Adafruit library for the BMP180, just follow the link to install it
We also need Pigpio library for Reading the humidity sensor. You can download from
http://abyz.co.uk/rpi/pigpio/download.html and follow installation instructions
After that you have to make sure that whenever you reboot the Rpi, Pigpio is also loaded. I did this by adding the following line to /etc/rc.local
sudo pigpiod
In my case this is enough but this depends on where you have installed pigpio. If you run into problems, just put the whole path for the file and you should be ok.
The presented tutorials are pretty straightforward but if you need any help i'm here :D
Step 4: Setting Up the Sensors


I got both sensors from Ebay, since it's easier (and cheaper) to get ready made small boards with the sensors already soldered that to do them by yourself. If you search Ebay for BMP180 and HTU21D you will find them for sure.
These are I2C sensors which are very easy to communicate with. The I2C protocol allows you to connect several sensors in paralell and communicate with each of them because each has a unique address.
I got both soldered together with some skill , matching all signals as seen on the pictures.
The sensors will need +3.3V, GND, SDA and SCL signals from the Rpi.
You can use any wiring you like, but a 4 wire cable (telephony) is probably a nice idea.
Step 5: Main Program
Main program is temp-monitor.py
You should have python installed , if not, just follow http://raspberry.io/wiki/how-to-get-python-on-your-raspberrypi/
The first part of the program shows the libraries needed.
import Adafruit_BMP.BMP085 as BMP085
import smbus
import os
import sys
import getopt
import sqlite3
import math
import pigpio
import time
Following the program we have 2 functions that will read humidity. Read_temperature is a function that will read the temperature of the HUT21D for compensation when calculating the relative humidity. It is necessary for the following function read_humidity.
There is a few calculations inside these functions, but this is all according to the sensors datasheet. Not importante stuff, but you cam always check them if you like
BMP180 http://www.vssec.vic.edu.au/media/41229/BMP180-datasheet.pdf
HTU21D http://www.meas-spec.com/downloads/HTU21D.pdf
The cmd variable is responsible for sending the data to www.wundergroud.com using curl. This website provides some really nice stats and graphs. You need to register (it's free) an account to upload the data.
After that you will have an ID and a password which you sould change in the cmd variable as shown
cmd = "curl "+"'http://weatherstation.wunderground.com/weatherstation/updateweatherstation.php?ID=&PASSWORD=&dateutc=now&tempf="+str((temp*1.8)+32)+"&humidity="+str(round(humidity,2))+"&baromin="+str((pressure/100)*0.0295299)+"&action=updateraw"+"'"
You then have to change again /etc/rc.local and insert a line for the program to start when the Rpi is rebooted :
sudo python /usr/lib/cgi-bin/temp-monitor.py &
The & symbol is important because it will put your program into memory and releasing the command line to be used.
UPDATE
For the curious minds, temp-monitor-online.py is the current program i'm using, with readings for temperature, pressure, humidity, dew point, wind speed and direction and uv and insolation.

Step 6: Building Up the Solar Panel


So if you have all sorted out and working well it's time to put your weather station outside.
I chose to feed my Rpi using a solar powered system, using 3 3,5W modules bought on Ebay.
The modules output 6V, so 3 modules in series will give us 18V, which is the standard for a 12V solar system.
You can arrange them as i did and you will end up with a pretty nice small panel capable of running the system.
Probably you are thinking that 10W and a 7,2Ah battery is a bit much for the Rpi, but since i am in Ireland, i am expecting to run a few days without sun, so...
Step 7: The Solar Shield


I have made the solar shield from discardable plastic plates and 2 cm pieces of plastic tube. I will not go much into this since there are many ways to do this. The important thing is that the sensors are protected from wind and direct sunlight.
If you would like more details i can update with more information.
Step 8: Everything Connected


With everything in place it's time to connect things.
If you have a solar charger with a load output, it's a good idea to use it, since usually there is a way to turn it on/off. Since we are using a 12V battery, we will need a 7805 regulator to reduce to 5V for the Rpi. If you look to the 7805 with the markings facing to you, the left pin is the input(connect it to 12V) , the middle one is GND, and the right one is the output (5V).
You can connect your 5V to the usual Rpi connector or directly to its header, in this case, pin 2 or 4.
The solar charger has connections for the battery and for the solar panel. Make sure that you connect always the battery in the first place.
It's time to connect the I2C, which are pins 3 and 5 (SDA and SCL) and pins 1 and 9 (+3.3V and GND)
Power up the Rpi, check that everything is running well and close your box :D
Step 9: Final Thoughts
This is my first tutorial so please excuse me for anything that you do not like.
I appreciate comments and improvements.
This is a basic setup and will be improved with a few more sensors
I leave you with the link of my weather station
http://www.wunderground.com/personal-weather-station/dashboard?ID=IWICKLOW13
Enjoy
Step 10: Project Update 1 - Wind Direction


It's been a while since the creation of this instructable and things got some improvement.
The weather station runs and uploads now both wind speed and direction. I will now show you how the wind direction is working. It is also reading and uploading UV índex.
There are a few projects around that use a setup of reed swicthes to get the wind heading. I always thought that it does a pretty simple solution, but nowadays with digital compasses it seems more appropriate to use one of these small devices. Also, since my objective was to run all sensors on I2C bus, i was sure that i could find one that would fit in this type of bus. So i did.
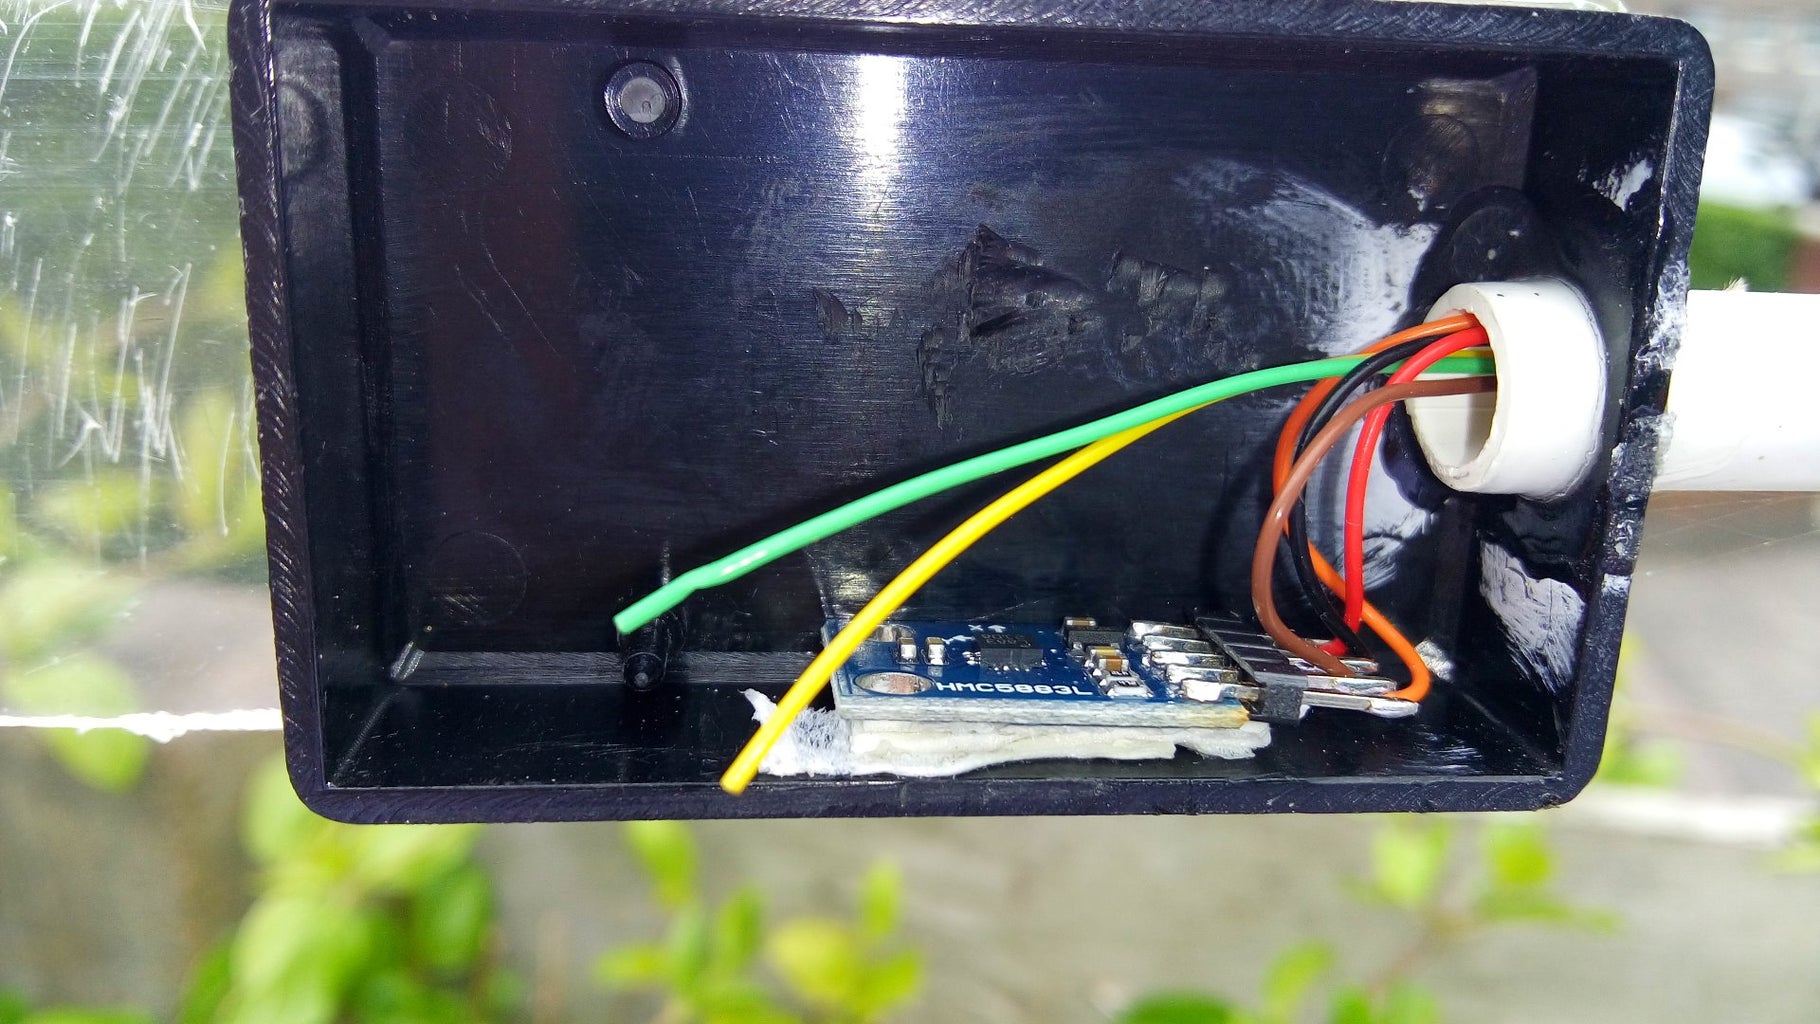
I am using a HMC5883L, which is a 3 axis digital compass, using I2C bus. You can find ready soldered modules on ebay as cheap as 1 euro. Just search and you'll find them for sure.
One piece of advice with this sensor. I believe that this kind of sensors are quite sensitive, since i managed to kill one. After a few days of getting wrong indications from it, i got a new one and all sorted out. Just be careful , don't drop it too many often.
The other importante part that i used is called a slip ring. What is a slip ring? It's a small device that allows you to have a rotating axis and connections at the same time. There are several parameters that define such device. One is the number of ways(or wires) and other is the rated current accepted through the wires. Since we are only Reading sensor, and in this case I2c, we will need 4 wires and the current is as low as you can get.
I got a 6 wire , low current which happened to have the axis diameter the same as the inner measure of some plastic tubing that i used to build the vane.
The various pictures show how i managed to build the thing. It's not pretty but it dows the job.
SOFTWARE
It's a pretty simple thing to read from the HCM. I took a few looks on the datasheet, made some research in the web, and i got to these code lines to put it working :
def write_byte(address,adr, value):
bus.write_byte_data(address, adr, value)
- Procedure to write data in a specific address of the I2C bus.
def median(lst):
lst = sorted(lst)
if len(lst) < 1:
return None
if len(lst) %2 == 1:
return lst[((len(lst)+1)/2)-1]
else:
return float(sum(lst[(len(lst)/2)-1:(len(lst)/2)+1]))/2.0
- This is a procedure for getting the average number of a list of readings. It will be needed
write_byte(0x1E,0, 0b01110000) # Set to 8 samples @ 15Hz
write_byte(0x1E,1, 0b00100000) # 1.3 gain LSb / Gauss 1090 (default)
write_byte(0x1E,2, 0b00000000) # Continuous sampling
scale = 0.92
x_offset = 45
y_offset = -82
- Needed declarations for the sensor. The first 3 lines set up sample readings and gain. The fouth sets the scaling. The 2 last ones are values to tune up the sensor Reading. They may vary from sensor to sensor, but most of the times they do not affect much the Reading.
def get_heading():
x_out = (read_word_2c(0x1E,3) - x_offset) * scale
y_out = (read_word_2c(0x1E,7) - y_offset) * scale
z_out = (read_word_2c(0x1E,5)) * scale
bearing = math.atan2(y_out, x_out)
if (bearing < 0):
bearing += 2 * math.pi
if ((math.degrees(bearing) + 90) < 360 and (math.degrees(bearing)+90) > 90):
heading = math.degrees(bearing)+90
# print round(heading,0)
elif math.degrees(bearing)+90 == 360:
heading = 0
# print round(heading,0)
else:
heading = math.degrees(bearing)-270
# print round(heading,0)
return heading
- This is the main reading procedure. It gives you the heading of the vane in degrees from 0 to 359
So now that we have all declarations and procedures, the only missing past is insert the next code into the main program :
dir = 0
lista = range(500)
print('Reading 500 times wind direction separated by 10mS each for smoothing final reading ...')
for dd in range (0, 500):
lista[dd] = get_heading()
time.sleep(0.01)
direction = median(lista)
print('Done !')
print('Wind dir is ',direction)
I found that doing just one reading would result in huge variations in the direction, so what we are donig here is taking 500 measurements separated by 10mS each, and outputting the average of all values. All print lines can be deleted since they only serve for debugging purposes.
Do not forget to update the upload line to wunderground, now we have more data, so you have to put in windir=direction, in my case.
Cheers, folks!
Step 11: Project Update 2 - New Software
Hi folks
Still waiting for the new slip rings from China, hope i'll get them in a couple of weeks, and then as promissed i will update with the howto of wind direction and wind speed.
I've made some changes on the main program which you can download. The reasons for this are:
- If one of the sensors get disconnected accidentally from the I2C bus, the program will crash. So i've made 4 new test functions which will test if the sensors are really connected, and if not, the program assumes the value 0 for the respective sensor. This can be changed at your will.
- I'm using a cron job to run the program each 5 minutes instead of being running all the time. This actually makes a lot more sense, since you now don't have a program running 24/24 wasting resources and prone to crash. You can also change the 5 minute to whatever you like.
I find easy to setup cronjobs with the aid of a GUI program called gnome-schedule. If you do not have it installed, just do sudo apt-get install gnome.schedule to do it.
After that you just add a new recurrent cron job, give it some sort of name and setup the run command as sudo python temp-monitor.py. After that you just need to setup your time interval , save the task and reboot .
Thanks for the interest


