

Introduction: Weave a Basket From Used Drum Heads


Every drummer is forced to change out their drum heads at some point, even if they don't want to. If you need help with replacing and tuning your new drumheads, check out my instructable HERE. When drumheads are changed out, thousand of them are thrown out across the world every year. Drumheads can have many uses even after they have been beaten to death.
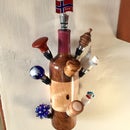
This particular idea is a great way to re-use your old drumheads and make something cool and useful out of them. With a few minutes of cutting and following a simple pattern, you can weave a basket from a couple of old drum heads that can hold your sticks, accessories, serve as a trash can, tip jar or just about anything else you can think of.
I came up with this idea while writing a separate instructable, but felt that this concept could stand on its own as an independent 'ible. For a ton of other useful ideas of what can be done with used heads, check out another of my instructables HERE.
Step 1: Gather the Heads

You will need at least two drumheads to make this - the bigger the better. Kick drum heads work the best here, especially if you want to build a bigger basket. Two-ply heads are preferred, simply because they are heavier, thicker, and will make a sturdier basket. The choice between coated and clear heads is a purely aesthetic one, so think about how it might look and make your decision.
Step 2: Decide on the Size

First of all, grab your biggest head (a kick drum head is ideal, but if you cant get your hands on one of these, you'll just have to make your basket a little smaller). Try to visualize the finished product, and add up the desired height and radius of the theoretical basket. Make sure that this total is equal to or greater than the radius of the biggest head you have. If not, redesign your basket to accommodate for the size of the available heads.
Step 3: Cut the Body


Start by cutting out a big circle, trying to cut away as little of the inside of the head as possible. You will need all the material you can to work with. Once you have separated the metal rim, it is a good idea to use a marker or pen to draw out the shape of the strips. Consider this design tip before continuing:
--> If you look closely at the picture below, you can see several 1" strips separated by triangles. It occurred to me just before I was about to cut that since I am beginning with a large circle, there will be a lot of extra acrylic in between the straight strips that I want to cut. Just cutting straight lines from the circle (like the picture on the page above) would give me a lot of trouble when I wanted to insert the side pieces.
Ok. Begin cutting strips toward the center of your circle. Keep in mind that the height of the basket will end up being approximately the same as the length of these strips. The width of these strips is up to you: a good thickness is between 3/4 and 1.5 inches, depending on how big your circle is. I went with 1". Once you are done, fold the strips at a 90 degree angle to form a sort of cylinder with the round base.
Step 4: Make the Strips


Once again here, it is best to have a big head to cut. There are two ways to do this:
The first is to cut individual strips that will fit around the circumference of the basket. These can then be stapled, taped or glued at the ends to keep them solid. The circumference of my basket was about 22", so I used my second head to cut 1" strips from. Since it was a two-ply head, after cutting a strip the two layers of acrylic separated, giving me twice as many strips as I had expected. It's rare to get a good surprise when trying to design something new (or at least thats my experience).
Now that I have a bunch of approximately foot long strips, it is simply a matter of gluing them together so that they are long enough to reach all the way around the body of the basket. I used a hot glue gun here, but you could use staples or another type of adhesive to attach these.
The second (and riskier) way requires an especially large head that you can cut a spiral out of. Begin by cutting off the metal rim from the head. Start cutting diagonally until you get about an inch inwards from the edge (you can cut a smaller strip depending on how thick the strips in the body are). Level out here and keep cutting at the desired thickness until you get all the way to the middle and can cut no further. This was my initial plan, but I ran into some design problems as I tried to visualize how it would work. I could not figure out if the spiral design would make the strips bend as I wove them around and up the body. I decided to take the safer route and just make separate layers of strips.
Step 5: Assemble the Basket


FYI: this was my first attempt at weaving anything, so if you have had more experience and can offer any further advice to any instructablers who may attempt this, please leave a comment or two.
Grab the body and pick a strip to start with. With your side strips (whether you chose the spiral or individual strip methods), staple or glue the end to the bottom of the body right at the base. Now, begin weaving. Your goal here is to follow the pattern of weaving on the inside and then outside of the body strips. Make sure not to weave too tightly or you may run into problems as you get further up the sides of the basket. Once you have finished the first layer, glue the end down and cut off any excess acrylic from the strip. As you begin the next layer, make sure to start out weaving on the opposite side of each of the strips as you had on the previous layer. (i.e. if you went in/out/in on the first layer, go out/in/out on the next)
It may be necessary to staple or glue periodically on a single layer, otherwise it can be difficult to keep that layer in place. If you end up with any extra on the top of you basket after you install the last layer, you can cut this off, fold and glue it to the top of the last layer, or simply leave it. Now that you're done, find something to put in it. Enjoy.
Participated in the
Craft Skills Contest


